Redis的安装,配置和使用

Redis 是什么?

说到Redis,我们的第一印象肯定是作为缓存中间件使用了,这样想可能太片面,我们按官网的介绍来看吧(http://www.redis.cn/),全面的认识下它的用途和功能:

image-20211204142501295

这里的描述很简练和清晰了,因此,打算梳理的 Redis 相关知识点如下:

  • Redis 支持丰富的数据类型,每种类型的特点及应用场景;
  • Redis 支持持久化机制,有RDB、AOF等持久化方式;
  • Redis 多机数据库的实现,有复制(replication)、哨兵(Sentinel)和集群(cluster)等功能;
  • Redis 支持事务,Redis事务的ACID特性;
  • Redis 支持的其他独立功能,如发布/订阅、慢日志查询、Lua脚本、排序及二进制位数组等;
  • Redis 不仅仅是缓存中间件,也可以当做nosql数据库、消息队列等使用。

当然了,Redis 的优势也有必要说明一下,比如:

  • 读写性能很好,Redis能读的速度是110000次/s,写的速度是81000次/s,原因有多路复用机制、Resp协议、单线程、基于内存持久化操作等;
  • 数据结构丰富,Redis不仅支持strings、lists、hashes、sets、sorted sets等5种基本数据结构,也支持bitmaps、hyperLogLogs、geospatial等复杂数据结构;
  • 所有操作原子性,所有 Redis 的操作都是原子的,能确保当多个客户同时访问 Redis 服务器时,每个用户得到的是更新后的最新值;
  • 拥有多样的特性,比如:支持多种键过期删除策略、支持多机数据库的实现(主从复制、哨兵和集群等)、可当做消息队列使用等。

同时,Redis 作为缓存使用时,缺点也很明显,会出现以下几种问题:

  • 缓存和数据库双写一致性问题;
  • 缓存雪崩问题;
  • 缓存击穿问题;
  • 缓存的并发竞争问题。

而这些问题也都有对应的解决方法

关于Redis的数据持久化

Redis的所有数据都是保存在内存中,然后不定期的通过异步方式保存到磁盘上(这称为“半持久化模式”);也可以把每一次数据变化都写入到一个append only file(aof)里面(这称为“全持久化模式”)。

由于Redis的数据都存放在内存中,如果没有配置持久化,redis重启后数据就全丢失了,于是需要开启redis的持久化功能,将数据保存到磁盘上,当redis重启后,可以从磁盘中恢复数据。redis提供两种方式进行持久化,一种是RDB持久化(原理是将Reids在内存中的数据库记录定时dump到磁盘上的RDB持久化),另外一种是AOF(append only file)持久化(原理是将Reids的操作日志以追加的方式写入文件)。

Redis版本选择及新版本特性

Redis 版本选择和下载(https://redis.io/download)时,一定要了解下官网提及的版本规则及更新信息:

  • Redis 使用标准版本标记进行版本控制:major.minor.patchlevel。偶数的版本号表示稳定的版本, 例如 1.2,2.0,2.2,2.4,2.6,2.8,奇数的版本号用来表示非标准版本,例如2.9.x是非稳定版本,它的稳定版本是3.0。
  • Redis 4.0在2017年7月以GA的形式发布,新用户应该使用Redis 5,但Redis 4是目前最成熟的版本,并将在明年更新,直到Redis 6发布。
  • Redis 5.0是Redis的第一个重大更新版本,引入了新的流数据类型与消费者组,排序集阻塞pop操作,RDB中的LFU/LRU信息,Redis -cli中的集群管理器,活跃的碎片整理V2, HyperLogLogs改进和许多其他改进,2018年10月,Redis 5作为GA发布。
  • Redis 6.0引入了SSL,新的RESP3协议,acl,客户端缓存,无磁盘副本,I/O线程,更快的RDB加载,新的模块api和更多的改进。

经过一番比较后,最终选择使用Redis 5版本!,下载地址:https://download.redis.io/releases/。

Windows 安装和使用 Redis

值得注意的是,从Redis3.x开始一直到目前的Redis6.x,官网一直没有提供Windows系统的 Redis安装包,只提供了Linux或Docker的。因此,没必要折腾去寻找能在Windows安装的zip包了。

另外,关于官网为什么不提供Windows的Redis安装包,原因可能是:

  • redis是基于单线程的高性能操作,而redis需要单线程轮询,Windows和Linux的轮询机制有所不同。
  • Windows使用的是selector,而Linux使用的是epoll,从性能上来说 epoll是高于selector 的,所以redis官方推荐使用linux版本。不过,window版本的redis是民间大神或者微软修改过的,可以在网上搜到相关的安装包使用,不过最新版本是不可能和官方保持一致的。

Linux 安装和使用 Redis

使用环境

  • CentOS 7.6
  • redis-5.0.14 【暂用单机版】

安装步骤

下载安装包

去Redis官网下载Linux安装包:

image-20211205141922934

也可以通过wget直接下载到虚拟机中

$ wget https://download.redis.io/releases/redis-5.0.14.tar.gz

检查gcc环境

redis是c语言编写的, 因此下载之后还需要使用gcc(9.3+)进行编译和安装.

查看gcc版本是否在9.3以上, 如果没有则需要安装

# 查看gcc版本是否在9.3以上,centos7.6默认安装4.8.5
$ gcc -v

如果发现gcc版本低于9.3, 我们需要升级到9.3及以上,如下:

$ sudo yum -y install centos-release-scl
$ sudo yum -y install devtoolset-9-gcc devtoolset-9-gcc-c++ devtoolset-9-binutils

$ scl enable devtoolset-9 bash

需要注意的是scl命令切换gcc版本只是临时的,退出shell或重启就会恢复原系统gcc版本。如果要长期使用gcc 9.3的话:

echo "source /opt/rh/devtoolset-9/enable" >>/etc/profile

编译redis

将下载的压缩包上传到/usr/local目录下,解压编译。

解压同时进入目录进行编译:

# 解压
tar zxf redis-5.0.14.tar.gz -C ~/app
# 编译依赖 - redis 5.x 需要
cd ~/app/redis-5.0.14/deps
make hiredis jemalloc linenoise lua
# 编译
cd ~/app/redis-5.0.14
make MALLOC=libc
# 测试
make test

如果编译测试过程发生错误提示

"You need tcl 8.5 or newer in order to run the Redis test"

则还需要安装tcl依赖

sudo yum install tcl -y

编译后产生一个新的src目录,将里面文件cp到/usr/local/bin/:

cp -rf src/redis-server /usr/local/bin/
cp -rf src/redis-cli /usr/local/bin/

进入src目录并安装Redis服务:

cd src
sudo make install

这样可以将Redis服务器和客户端命令安装到默认位置/usr/local/bin/下面
也可以在make install的时候指定一个前缀PREFIX,指定一个自定义的安装位置

cd src
sudo make install PREFIX=~/app/redis-5.0.14/

至此,Redis安装完毕。

启动Redis

前台启动

$ redis-server

启动效果:

image-20211204143602980

PS:这种启动方式如果关闭终端,redis就直接退出了,所以我们需要下面的后台启动!

后台启动

  1. 修改 redis.conf 文件

    1. 把 daemonize no 改为 daemonize yes

    2. 注释掉 # bind 127.0.0.1

    3. 修改 protected-mode yes 改为 protected-mode no

    4. 如果需要设置密码添加 requirepass niit1234

    5. 修改后的部分示例如下:

      # By default protected mode is enabled. You should disable it only if
      # you are sure you want clients from other hosts to connect to Redis
      # even if no authentication is configured, nor a specific set of interfaces
      # are explicitly listed using the "bind" directive.
      protected-mode no
      
      # Accept connections on the specified port, default is 6379 (IANA #815344).
      # If port 0 is specified Redis will not listen on a TCP socket.
      port 6379
      
      # By default Redis does not run as a daemon. Use 'yes' if you need it.
      daemonize yes
      
      # IMPORTANT NOTE: starting with Redis 6 "requirepass" is just a compatibility
      # layer on top of the new ACL system. The option effect will be just setting
      # the password for the default user. Clients will still authenticate using
      # AUTH <password> as usually, or more explicitly with AUTH default <password>
      # if they follow the new protocol: both will work.
      #
      # requirepass foobared
      requirepass niit1234
  2. 启动和停止后台服务

    ## 启动服务
    [redis-5.0.14]$ redis-server redis.conf
  3. 通过命令查看进程和端口(即启动时显示的PID和PORT)

    ## 查看进程
    [redis-5.0.14]$ ps -ef | grep redis
    ## 查看端口
    [redis-5.0.14]$ netstat -anpt | grep redis
  4. 停止后台服务

    ## 方法1. 如果知道Redis服务的进程ID可以使用Kill命令停止
    kill -9 <进程号>
    
    ## 方法2. 通过Redis Cli命令行客户端停止服务
    ## 如设置密码需要先认证
    [redis-5.0.14]$ bin/redis-cli
    127.0.0.1:6379> auth "niit1234"    # 认证密码
    OK
    127.0.0.1:6379> shutdown

作为系统服务

将配置文件复制到/etc/redis下

$ sudo mkdir /etc/redis
$ sudo cp redis.conf /etc/redis/6379.conf

安装服务

$ cd utils/
Welcome to the redis service installer
This script will help you easily set up a running redis server

Please select the redis port for this instance: [6379]
Selecting default: 6379
Please select the redis config file name [/etc/redis/6379.conf]
Selected default - /etc/redis/6379.conf
Please select the redis log file name [/var/log/redis_6379.log]
Selected default - /var/log/redis_6379.log
Please select the data directory for this instance [/var/lib/redis/6379]
Selected default - /var/lib/redis/6379
Please select the redis executable path [] /usr/local/bin/redis-server
Selected config:
Port           : 6379                           # 默认端口号
Config file    : /etc/redis/6379.conf           # redis服务使用的配置文件
Log file       : /var/log/redis_6379.log        # redis服务器日志
Data dir       : /var/lib/redis/6379            # redis 数据存储目录
Executable     : /usr/local/bin/redis-server    # redis服务命令所在位置
Cli Executable : /usr/local/bin/redis-cli    # redis客户端命令所在位置
Is this ok? Then press ENTER to go on or Ctrl-C to abort.
Copied /tmp/6379.conf => /etc/init.d/redis_6379
Installing service...
Successfully added to chkconfig!
Successfully added to runlevels 345!
Starting Redis server...
Installation successful!

安装完毕后使用chkconfig查看已经安装的服务, 并且此时redis服务已经在运行了.

[hadoop@hadoop000 utils]$ chkconfig

注:该输出结果只显示 SysV 服务,并不包含
原生 systemd 服务。SysV 配置数据
可能被原生 systemd 配置覆盖。

      要列出 systemd 服务,请执行 'systemctl list-unit-files'。
      查看在具体 target 启用的服务请执行
      'systemctl list-dependencies [target]'。

netconsole      0:关    1:关    2:关    3:关    4:关    5:关    6:关
network         0:关    1:关    2:开    3:开    4:开    5:开    6:关
redis_6379      0:关    1:关    2:开    3:开    4:开    5:开    6:关

可以看到, 新安装的服务名称为redis_6379, 并且已经配置了开机自动启动服务

也可以使用命令$ sudo chkconfig redis_6379 off关闭开机自动启动服务.

接下来就可以使用如下命令管理Redis系统服务了.

查看服务状态

$ service redis_6379 status
Redis is running (107335)

关闭服务

$ service redis_6379 stop
Stopping ...
(error) NOAUTH Authentication required.

这里无法关闭服务的原因是我们之前在redis.conf配置文件中设置了requirepasswd
所以解决办法

  1. 取消密码
  2. 修改服务启动文件

    $ sudo vi /etc/init.d/redis_6379
    
    # 修改如下
    36      stop)
    37          if [ ! -f $PIDFILE ]
    38          then
    39              echo "$PIDFILE does not exist, process is not running"
    40          else
    41              PID=$(cat $PIDFILE)
    42              echo "Stopping ..."
    43              # $CLIEXEC -p $REDISPORT shutdown
    44              $CLIEXEC -a "niit1234" -p $REDISPORT shutdown
    45              while [ -x /proc/${PID} ]
    46              do
    47                  echo "Waiting for Redis to shutdown ..."
    48                  sleep 1
    49              done
    50              echo "Redis stopped"
    51          fi
    52          ;;
    

    修改完成后再次关闭服务就可以成功了

    $ service redis_6379 stop
    Stopping ...
    Warning: Using a password with '-a' or '-u' option on the command line interface may not be safe.
    Redis stopped

    启动服务

    $ sudo service redis_6379 start
    Starting Redis server...

使用客户端连接服务

$ redis-cli
127.0.0.1:6379> auth niit1234
OK

卸载Redis

停服务、删文件即可!

#查看进程
ps aux |grep redis
#杀掉进程
kill -9 <进程号>
#查看相关文件
find / -name "redis*"
# rm -rf 删除redis相关文件, 例如:
sudo rm -rf /etc/redis
sudo rm -rf /var/lib/redis
sudo rm -rf /etc/rc.d/init.d/redis_6379
sudo rm -rf /var/log/redis_6379.log
sudo rm -rf /usr/local/bin/redis-*
sudo rm -rf /home/hadoop/app/redis-5.0.14

其他可能出现的问题及解决办法

执行service redis_6379 start命令时,出现提示:

/var/run/redis_6379.pid exists, process is already running or crashed

删除这个pid即可

rm -rf /var/run/redis_6379.pid

Redis性能测试

模拟N个客户端同时发出M个请求:

  • 通过redis-benchmark命令,测试结果如下:(每秒请求数)
$ ./src/redis-benchmark -n 10000 -q
PING_INLINE: 18115.94 requests per second
PING_BULK: 22988.51 requests per second
SET: 36496.35 requests per second
GET: 22883.29 requests per second
INCR: 24570.02 requests per second
LPUSH: 34722.22 requests per second
RPUSH: 20202.02 requests per second
LPOP: 24330.90 requests per second
RPOP: 30120.48 requests per second
SADD: 25252.53 requests per second
HSET: 28571.43 requests per second
SPOP: 35842.29 requests per second
LPUSH (needed to benchmark LRANGE): 15673.98 requests per second
LRANGE_100 (first 100 elements): 10405.83 requests per second
LRANGE_300 (first 300 elements): 9442.87 requests per second
LRANGE_500 (first 450 elements): 7374.63 requests per second
LRANGE_600 (first 600 elements): 5827.51 requests per second
MSET (10 keys): 31055.90 requests per second

使用Redis客户端

使用redi-cli客户端通过命令操作redis,这里先热身一下:

redis-5.0.8]$ ./src/redis-cli
127.0.0.1:6379> set msg helloworld
OK
127.0.0.1:6379> get msg
"helloworld"
127.0.0.1:6379> set cnt 100
OK
127.0.0.1:6379> incr cnt
(integer) 101
127.0.0.1:6379> incrby cnt 10
(integer) 111
127.0.0.1:6379> mset apple 6.82 orange 3.5 banana 9.9
OK
127.0.0.1:6379> mget apple orange banana
1) "6.82"
2) "3.5"
3) "9.9"
127.0.0.1:6379> rpush list0 java
(integer) 1
127.0.0.1:6379> rpush list0 python
(integer) 2
127.0.0.1:6379> rpush list0 go
(integer) 3
127.0.0.1:6379> lrange list0 0 -1
1) "java"
2) "python"
3) "go"
127.0.0.1:6379>

用可视化工具管理 Redis

名称: AnotherRedisDesktopManager

前身是一个工具叫做 RedisDesktopManager, 由于不再更新, 因此有人又制作了另外一款工具起名为AnotherRedisDesktopManager

下载:

GITHUB地址

exe可执行文件下载链接

使用

  1. 创建连接,输入HOST、端口(默认6379)密码(AUTH),连接名称(Name)点击OK,成功!

    image-20201214235231573

连接成功后可以使用AnotherRedisDesktopManager内置的Redis客户端工具与服务器进行交互:

image-20211205185535140

可视化界面可以方便查看和搜索那些已经存储的键值对.

image-20201214235712329

如果要清空所有缓存的数据, 可以点击flush DB选项

image-20211205185659993

当然还有很多其他功能, 这个软件和其他的数据库管理软件类似, 很快就可以上手了.

Views: 294

SpringBoot解决跨域的三种方式

什么是跨域

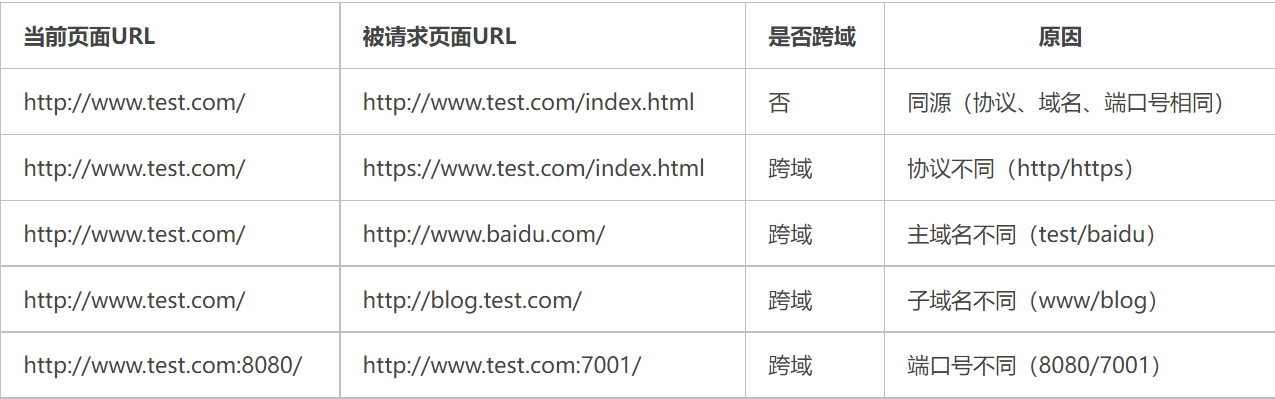
出于浏览器的同源策略限制。同源策略(Same Origin Policy)是一种约定,它是浏览器最核心也最基本的安全功能,如果缺少了同源策略,则浏览器的正常功能可能都会受到影响。可以说Web是构建在同源策略基础之上的,浏览器只是针对同源策略的一种实现。同源策略会阻止一个域的javascript脚本和另外一个域的内容进行交互。所谓同源(即指在同一个域)就是两个页面具有相同的协议(protocol),主机(host)和端口号(port)

简单说A应用只能访问A应用后台传来数据,B应用只能访问B应用后台传来的数据,如果A应用用Ajax获取数据时的URL地址中的协议、端口、域名其中有一个和B应用对应的话,则是A应用跨域了想获取B应用数据,是不允许的

当请求发起方(客户端)的 协议、域名、端口 三者之间任意一个与请求接收方(服务端)不同时即为跨域

file

非同源限制

浏览器为了安全性,限制了一些请求无法访问非同源URL

  1. 无法读取非同源网页的 Cookie、LocalStorage 和 IndexedDB
  2. 无法接触非同源网页的 DOM
  3. 无法向非同源地址发送 AJAX 请求

如何解决跨域问题

服务端使用纯代码的方式逻辑解决跨域问题,如果使用SpringBoot的话请看下章

【腾讯文档】JSONP跨域解决 https://docs.qq.com/doc/DVEVTemdrcVVjSFlE

SpringBoot解决跨域问题

解决方式:

  1. 返回新的CorsFilter
  2. 重写WebMvcConfigurer
  3. 使用注解@CrossOrigin
  4. 手动设置响应头(HttpServletResponse)参考第一章第四节

注意:
CorFilter / WebMvConfigurer / @CrossOrigin 需要 SpringMVC 4.2以上版本才支持,对应springBoot 1.3版本以上

上面前两种方式属于全局 CORS 配置,后两种属于局部 CORS配置。如果使用了局部跨域是会覆盖全局跨域的规则.

所以可以通过 @CrossOrigin 注解来进行细粒度更高的跨域资源控制。
其实无论哪种方案,最终目的都是修改响应头,向响应头中添加浏览器所要求的数据,进而实现跨域

配置CorsFilter(全局跨域)

import org.springframework.boot.SpringBootConfiguration;
import org.springframework.context.annotation.Bean;
import org.springframework.web.cors.CorsConfiguration;
import org.springframework.web.cors.UrlBasedCorsConfigurationSource;
import org.springframework.web.filter.CorsFilter;

@SpringBootConfiguration
public class WebGlobalConfig {

    @Bean
    public CorsFilter corsFilter() {

        //创建CorsConfiguration对象后添加配置
        CorsConfiguration config = new CorsConfiguration();
        //设置放行哪些原始域
        config.addAllowedOrigin("*");
        //放行哪些原始请求头部信息
        config.addAllowedHeader("*");
        //暴露哪些头部信息
        config.addExposedHeader("*");
        //放行哪些请求方式
        config.addAllowedMethod("GET");     //get
        config.addAllowedMethod("PUT");     //put
        config.addAllowedMethod("POST");    //post
        config.addAllowedMethod("DELETE");  //delete
        //corsConfig.addAllowedMethod("*");     //放行全部请求

        //是否发送Cookie
        config.setAllowCredentials(true);

        //2. 添加映射路径
        UrlBasedCorsConfigurationSource corsConfigurationSource =
                new UrlBasedCorsConfigurationSource();
        corsConfigurationSource.registerCorsConfiguration("/**", config);
        //返回CorsFilter
        return new CorsFilter(corsConfigurationSource);
    }
}

如果你使用的是高版本SpringBoot2.4.4则需要改动一下,否则后台报错

java.lang.IllegalArgumentException: When allowCredentials is true, allowedOrigins cannot contain the special value "*" since that cannot be set on the "Access-Control-Allow-Origin" response header. To allow credentials to a set of origins, list them explicitly or consider using "allowedOriginPatterns" instead.
at org.springframework.web.cors.CorsConfiguration.validateAllowCredentials(CorsConfiguration.java:453) ~[spring-web-5.3.6.jar:5.3.6]

当allowCredentials为true时,alloedOrigins不能包含特殊值“*”,因为该值不能在“Access-Control-Allow-Origin”响应头部中设置。要允许凭据访问一组来源,请显式列出它们或考虑改用“AllowedOriginPatterns”。

解决:把 config.addAllowedOrigin("*"); 替换成 config.addAllowedOriginPattern("*");

重写WebMvcConfigurer(全局跨域)

import org.springframework.boot.SpringBootConfiguration;
import org.springframework.web.servlet.config.annotation.CorsRegistry;
import org.springframework.web.servlet.config.annotation.WebMvcConfigurer;

/**
 * @Author AnHui_XiaoYang
 * @Email 939209948@qq.com
 * @Date 2021/5/10 17:49
 * @Description
 */
@SpringBootConfiguration
public class CorsConfig implements WebMvcConfigurer {
    @Override
    public void addCorsMappings(CorsRegistry registry) {
        //添加映射路径
        registry.addMapping("/**")
                //是否发送Cookie
                .allowCredentials(true)
                //设置放行哪些原始域   SpringBoot2.4.4下低版本使用.allowedOrigins("*")    
                .allowedOriginPatterns("*")
                //放行哪些请求方式
                .allowedMethods(new String[]{"GET", "POST", "PUT", "DELETE"})
                //.allowedMethods("*") //或者放行全部
                //放行哪些原始请求头部信息
                .allowedHeaders("*")
                //暴露哪些原始请求头部信息
                .exposedHeaders("*");
    }
}

使用注解@CrossOrigin(局部跨域)

@Target({ElementType.TYPE, ElementType.METHOD})
@Retention(RetentionPolicy.RUNTIME)
@Documented
public @interface CrossOrigin {
    //这origins和value是一样的
    //允许来源域名的列表,例如 'www.jd.com',匹配的域名是跨域预请求 Response 头中的'Access-Control-Aloow_origin' 
    //字段值。不设置确切值时默认支持所有域名跨域访问。
    @AliasFor("origins")
    String[] value() default {};
    @AliasFor("value")
    String[] origins() default {};
    //高版本下Spring2.4.4使用originPatterns 而不是value 和 origins
    String[] originPatterns() default {};

    //跨域请求中允许的请求头中的字段类型, 该值对应跨域预请求 Response 头中的 'Access-Control-Allow-Headers' 字段值。
    //不设置确切值默认支持所有的header字段(Cache-Controller、Content-Language、Content-Type、
    //Expires、Last-Modified、Pragma)跨域访问
    String[] allowedHeaders() default {};

    //跨域请求请求头中允许携带的除Cache-Controller、Content-Language、Content-Type、Expires、Last-Modified、
    //Pragma这六个基本字段之外的其他字段信息,对应的是跨域请求 Response 头中的 'Access-control-Expose-Headers'字段值
    String[] exposedHeaders() default {};

    //跨域HTTP请求中支持的HTTP请求类型(GET、POST...),不指定确切值时默认与 Controller 方法中的 methods 字段保持一致。
    RequestMethod[] methods() default {};

    //该值对应的是是跨域请求 Response 头中的 'Access-Control-Allow-Credentials' 字段值。
    //浏览器是否将本域名下的 cookie 信息携带至跨域服务器中。默认携带至跨域服务器中,但要实现 cookie 
    //共享还需要前端在 AJAX 请求中打开 withCredentials 属性。
    String allowCredentials() default "";

    //该值对应的是是跨域请求 Response 头中的 'Access-Control-Max-Age' 字段值,表示预检请求响应的缓存持续的最大时间,
    //目的是减少浏览器预检请求/响应交互的数量。默认值1800s。设置了该值后,浏览器将在设置值的时间段内对该跨域请求不再发起预请求
    long maxAge() default -1;
}

在控制器(类上)使用@CrossOrigin注解,表示该类的所有方法允许跨域

@Controller
@RequestMapping("/shop")
@CrossOrigin(originPatterns = "*", methods = {RequestMethod.GET, RequestMethod.POST})
public class ShopController {

    @GetMapping("/")
    @ResponseBody
    public Map<String, Object> findAll() {
        //返回数据
        return DataSchool.getStudents();
    }
}

我们也可以设置更小的粒度,在方法上设置跨域

@Controller
@RequestMapping("/shop")
public class ShopController {

    @GetMapping("/")
    @ResponseBody
    //更小的解决跨域 设置只能某些地址访问
    @CrossOrigin(originPatterns = "http://localhost:8080")
    public Map<String, Object> findAll() {
        //返回数据
        return DataSchool.getStudents();
    }
}

.

Views: 234

Kafka Tool 可视化工具

使用Kafka的小伙伴,有没有为无法直观地查看 Kafka 的 Topic 里的内容而发过愁呢?

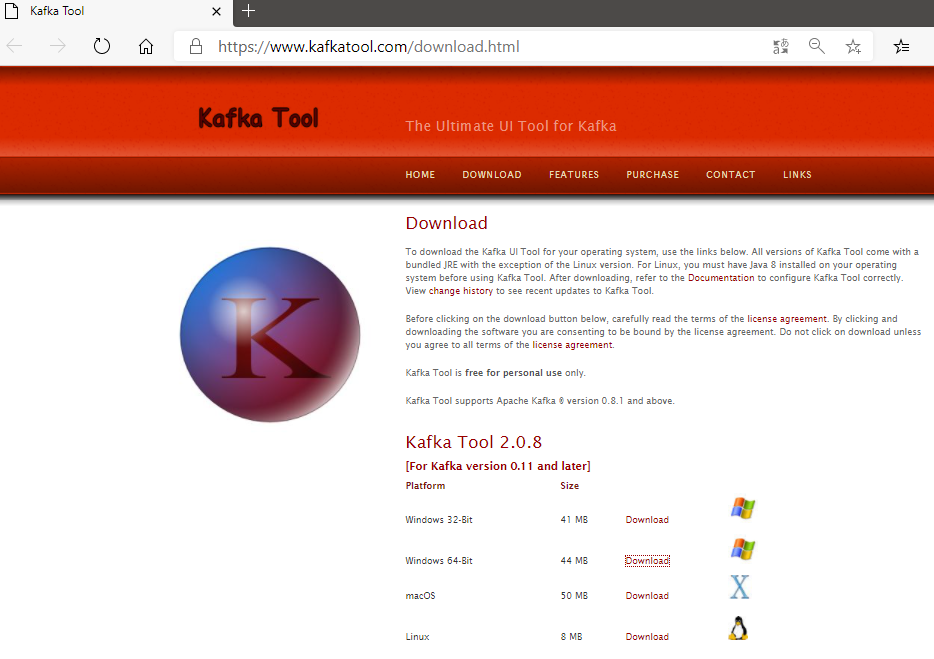
下面推荐给大家一款带有可视化页面的Kafka工具:Kafka Tool (目前已经更名为 offset explorer)

Kafka Tool 工具下载

下载地址

http://www.kafkatool.com/download.html

下载界面

不同版本的Kafka对应不同版本的工具,最新的2.0.8版本适合Kafka 0.11和比这更高的版本。

image-20201220144113429

如果是Windows,下载对应的64或者32位的exe文件,一键安装即可。

Kafka Tool 工具使用

1、Kafka 连接配置

1)启动 Kafka Tool

在安装目录下,双击可执行文件 kafkatool.exe,启动 Kafka Tool

img

2)配置 Kafka 连接信息

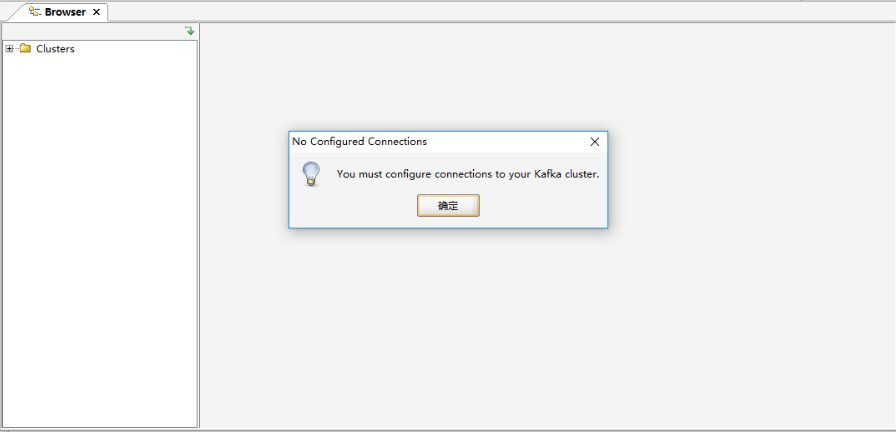
提示配置相应的连接信息

img

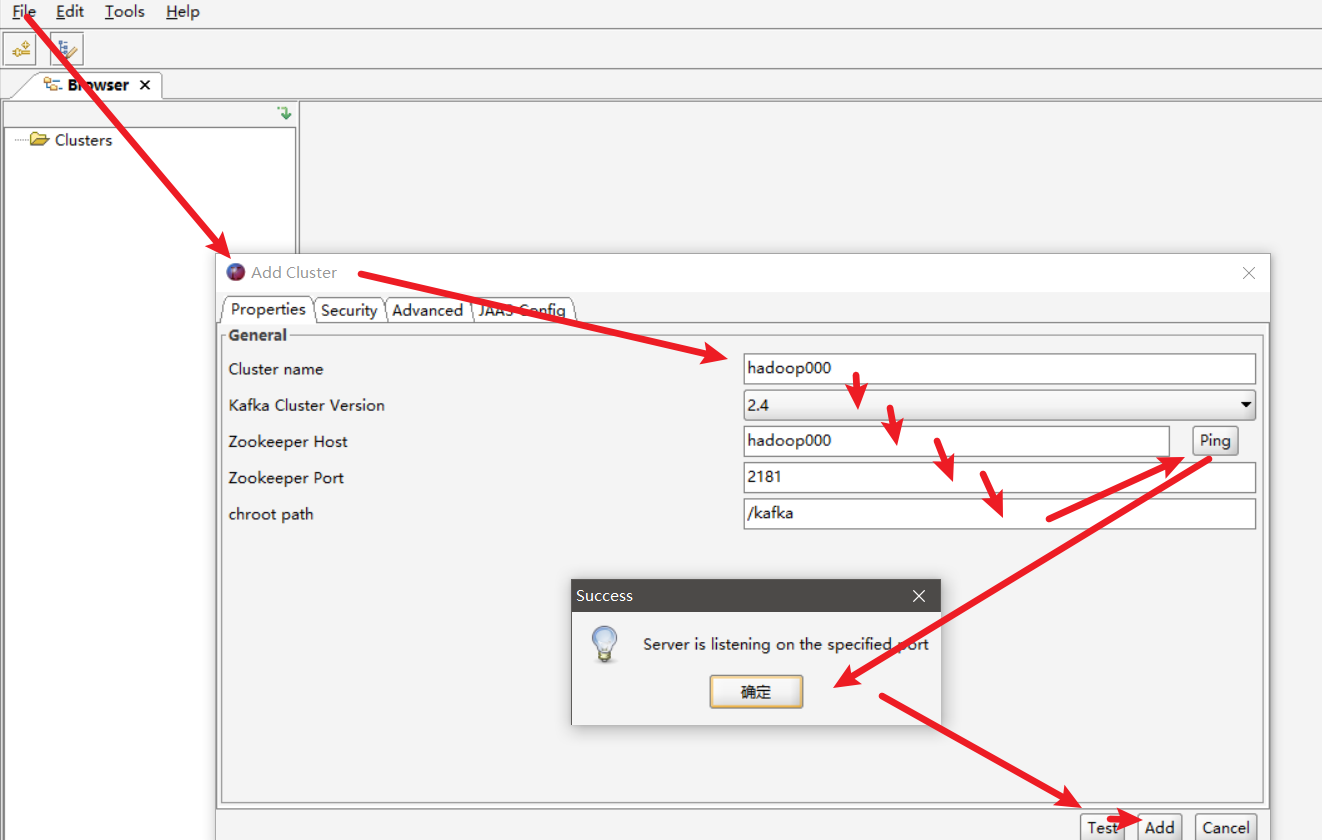
依次填写红框中的信息,点击“Ping” 和 “Test”测试连接情况;测试通过后,点击“Add”进行添加

image-20201220145123007

【注意】这之前需要在 C:\Windows\System32\drivers\etc 下的 hosts 文件中,添加入 kafka 的集群域名

例如,添加如下配置(此处需要根据实际情况配置,配置保存后,需要重启KafkaTools才能读取hosts文件中的内容):

10.10.21.100 hadoop000 
10.10.21.101 hadoop001 
10.10.21.102 hadoop002
10.10.21.103 hadoop003

2、查看 Kafka 数据

1)查看 Kafka 数据

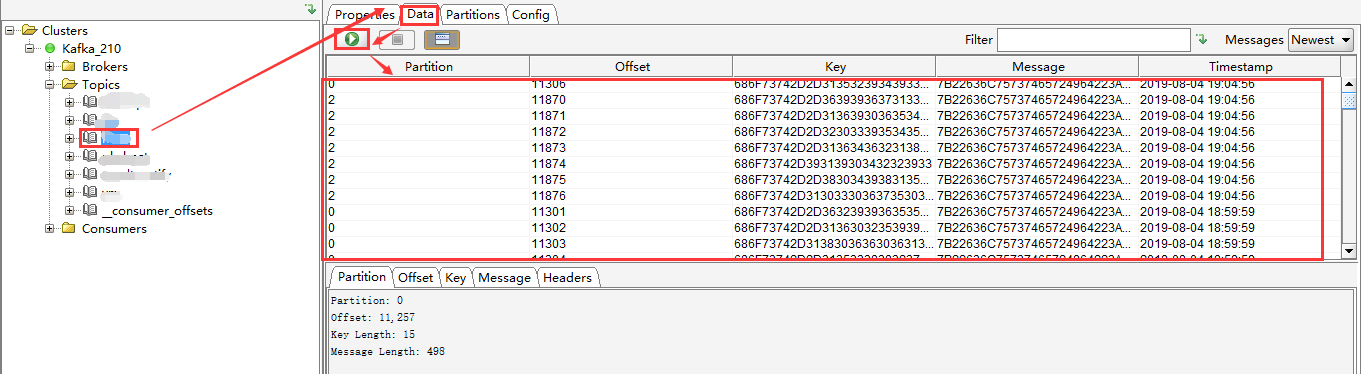
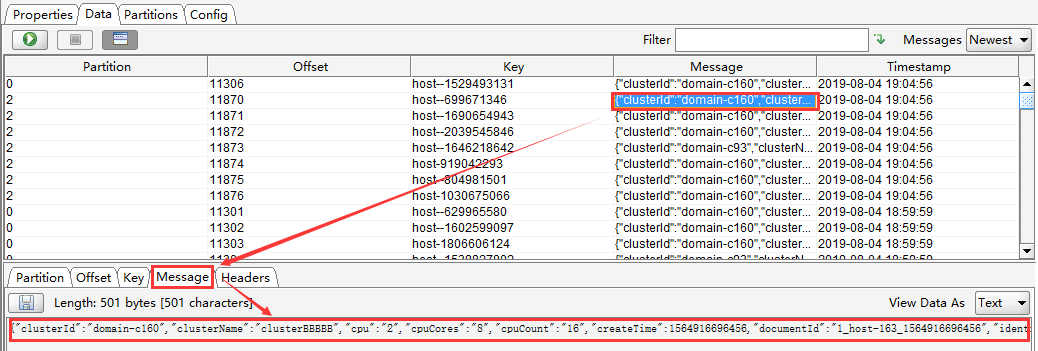
选择一个Topic --> Data,点击查询即可看到数据(但是Key和Message是二进制的,不能直观的看到具体的消息信息,需要设置展示格式)

Messages选择Newest,表示当有新信息来的时候,查看最新的Kafka数据;

结果列表中的每列,通过点击表头,可以按照升序或者降序排序(一般用在时间字段排序,方便查看最新数据)。

img

2)设置 Kafka 数据展示格式

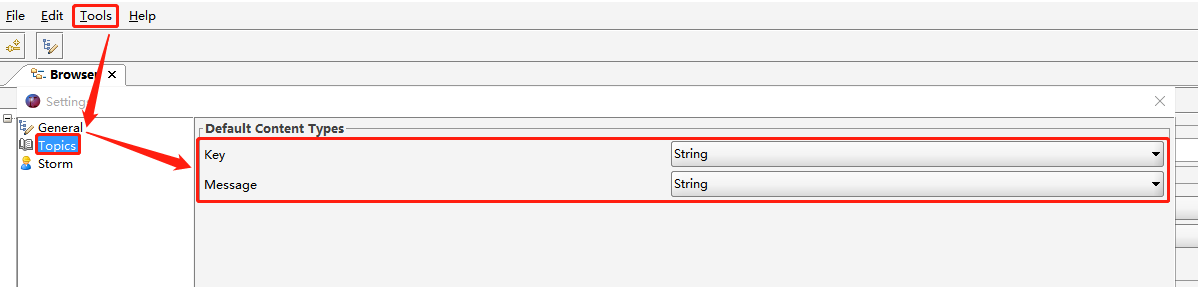
在Tools -->Settings --> Topics,将 Key 和 Message 均设置为String 保存。这样是全局设置,对所有 Topic 均生效。

img

img

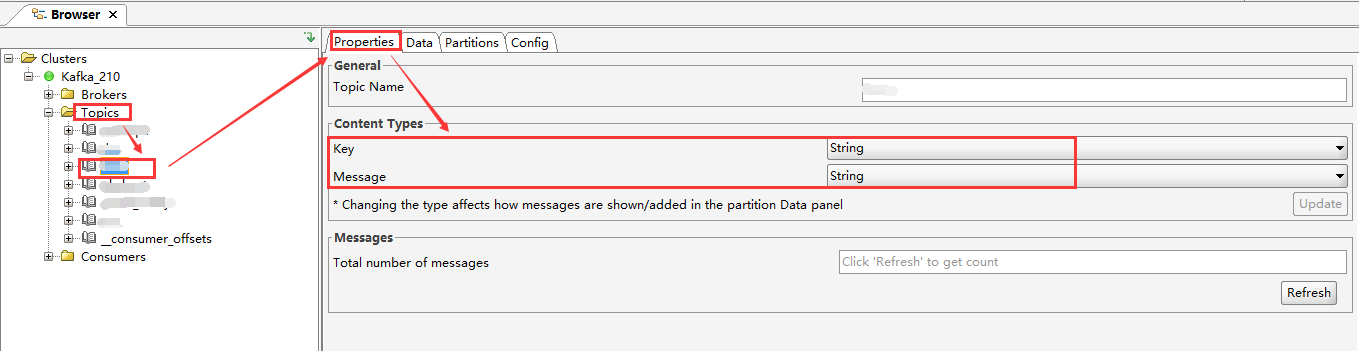
如果只是想单独设置某个 Topic,可以选中某个 Topic,在 Properties --> Content Type 中,将显示格式设置为String,点击 Update --> Refresh 即可生效

img

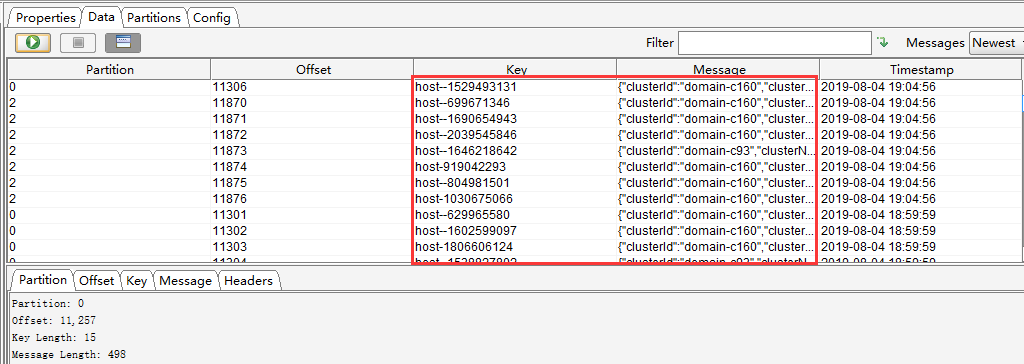
设置后的数据列表如下

img

3)查看具体某一条消息

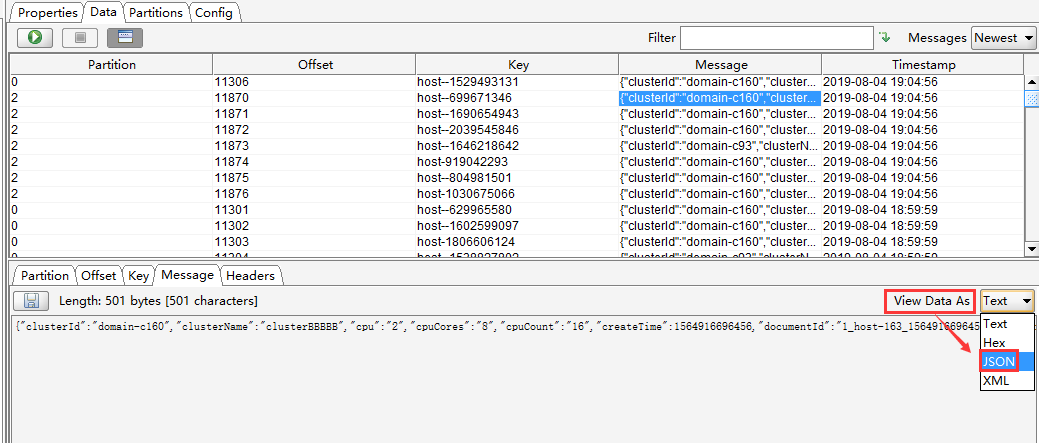
选中某一个message,点击“Message”查看详情,默认是“Text”格式(如果想看到JSON格式,只需要设置下“View Data As”即可)

img

img

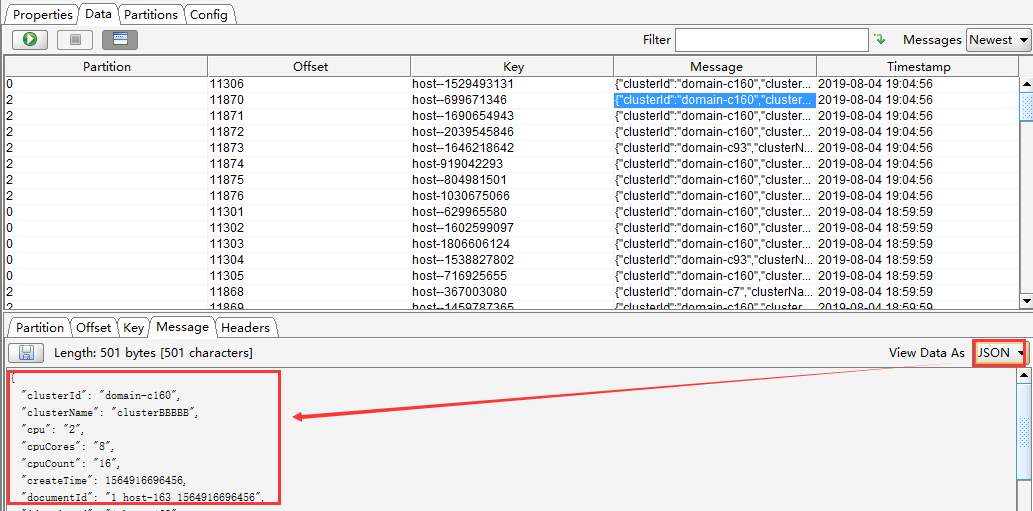
“View Data As”设置为 JSON 后,消息信息格式如下

img

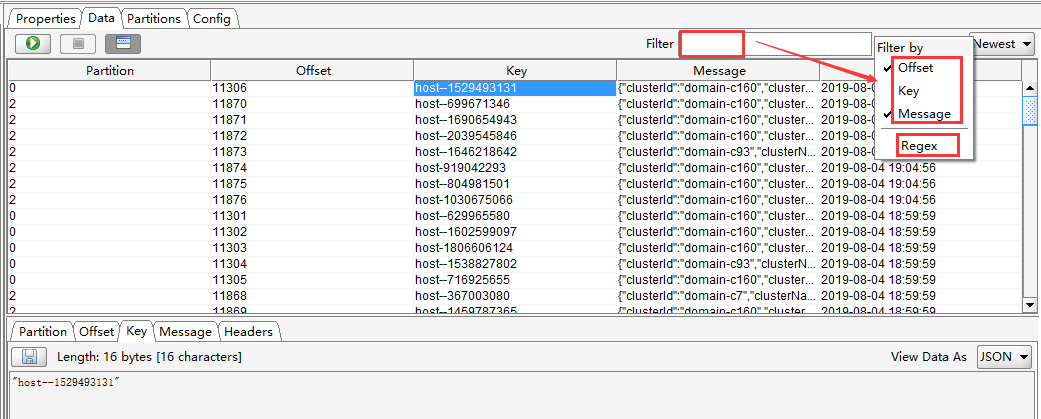
4)过滤查询 Kafka 消息

可以按照Offset(偏移量),Key(消息key),Message(消息主体),Regex(正则表达式)进行单个或者组合查询

img

Views: 288

Spring Boot 简介和使用

https://spring.io/projects/spring-framework

Spring Framework 为基于 Java 的现代企业应用程序 (在任何类型的部署平台上)提供了全面的编程和配置模型。

Spring 的一个关键要素是应用程序级别的基础设施支持:Spring 侧重于企业应用程序的"管道",以便团队可以专注于应用程序级的业务逻辑,而无需与特定的部署环境进行不必要的联系。

特性

  • 核心技术: 依赖项注入、事件、资源、i18n、验证、数据绑定、类型转换、SpEL、AOP。
  • 测试:模拟对象,测试上下文框架,Spring MVC 测试。WebTestClient
  • 数据访问: 事务, Dao 支持, Jdbc, ORM(Hibernate,Mybatis(Sql映射))。
  • Spring MVC和Spring WebFlux Web 框架。
  • 集成: 远程处理, JMS, JCA, JMX, 电子邮件, 任务, 计划, 缓存。
  • 语言: Java, Kotlin, Groovy, 等动态语言。

Spring Core Technologies

https://docs.spring.io/spring-framework/docs/current/reference/html/core.html

Spring框架核心技术中最重要的是 Spring 框架的控制反转 (IoC) 容器以及面向切面编程 (AOP) 技术。

SpringBoot

https://spring.io/projects/spring-boot

Spring Boot 可轻松创建独立的、生产级 Spring 应用程序,您可以"直接运行(java jar)",而无需提前准备例如Tomcat应用容器服务器。

Spring Boot 启动应用程序只需要最少的Spring相关配置,贯彻“约定大于配置”的理念。

如果您要查找有关特定版本的信息,或有关如何从早期版本升级的说明,请查看项目发行说明部分在我们的维基上。

特性

  • 创建独立的Spring应用
  • 直接嵌入 Tomcat、Jetty 或底图(Undertow,无需部署 WAR 文件)
  • 提供有意见的"启动器"依赖关系,以简化生成配置
  • 尽可能自动配置Spring和第三方库
  • 提供支持生产所需功能,如指标、健康检查和外部配置
  • 绝对没有生成代码,极大减少 XML 配置要求

快速开始

RESTful Web Service

https://spring.io/guides/gs/rest-service/

This guide walks you through the process of creating a “Hello, World” RESTful web service with Spring.

What You Will Build

You will build a service that will accept HTTP GET requests at http://localhost:8080/greeting.

It will respond with a JSON representation of a greeting, as the following listing shows:

{"id":1,"content":"Hello, World!"}

You can customize the greeting with an optional name parameter in the query string, as the following listing shows:

http://localhost:8080/greeting?name=User

The name parameter value overrides the default value of World and is reflected in the response, as the following listing shows:

{"id":1,"content":"Hello, User!"}

What You Need

How to complete this guide

Like most Spring Getting Started guides, you can start from scratch and complete each step or you can bypass basic setup steps that are already familiar to you. Either way, you end up with working code.

To start from scratch, move on to Starting with Spring Initializr.

To skip the basics, do the following:

When you finish, you can check your results against the code in gs-rest-service/complete.

Starting with Spring Initializr

For all Spring applications, you should start with the Spring Initializr. The Initializr offers a fast way to pull in all the dependencies you need for an application and does a lot of the setup for you. This example needs only the Spring Web dependency.

The following listing shows the pom.xml file that is created when you choose Maven:

<?xml version="1.0" encoding="UTF-8"?>
<project xmlns="http://maven.apache.org/POM/4.0.0" xmlns:xsi="http://www.w3.org/2001/XMLSchema-instance"
    xsi:schemaLocation="http://maven.apache.org/POM/4.0.0 https://maven.apache.org/xsd/maven-4.0.0.xsd">
    <modelVersion>4.0.0</modelVersion>
    <parent>
        <groupId>org.springframework.boot</groupId>
        <artifactId>spring-boot-starter-parent</artifactId>
        <version>2.3.0.RELEASE</version>
        <relativePath/> <!-- lookup parent from repository -->
    </parent>
    <groupId>com.example</groupId>
    <artifactId>rest-service</artifactId>
    <version>0.0.1-SNAPSHOT</version>
    <name>rest-service</name>
    <description>Demo project for Spring Boot</description>

    <properties>
        <java.version>1.8</java.version>
    </properties>

    <dependencies>
        <dependency>
            <groupId>org.springframework.boot</groupId>
            <artifactId>spring-boot-starter-web</artifactId>
        </dependency>

        <dependency>
            <groupId>org.springframework.boot</groupId>
            <artifactId>spring-boot-starter-actuator</artifactId>
        </dependency>

        <dependency>
            <groupId>org.springframework.boot</groupId>
            <artifactId>spring-boot-starter-test</artifactId>
            <scope>test</scope>
            <exclusions>
                <exclusion>
                    <groupId>org.junit.vintage</groupId>
                    <artifactId>junit-vintage-engine</artifactId>
                </exclusion>
            </exclusions>
        </dependency>
    </dependencies>

    <build>
        <plugins>
            <plugin>
                <groupId>org.springframework.boot</groupId>
                <artifactId>spring-boot-maven-plugin</artifactId>
            </plugin>
        </plugins>
    </build>

</project>

The following listing shows the build.gradle file that is created when you choose Gradle:

plugins {
    id 'org.springframework.boot' version '2.3.2.RELEASE'
    id 'io.spring.dependency-management' version '1.0.8.RELEASE'
    id 'java'
}

group = 'com.example'
version = '0.0.1-SNAPSHOT'
sourceCompatibility = '1.8'

repositories {
    mavenCentral()
}

dependencies {
    implementation 'org.springframework.boot:spring-boot-starter-web'
    testImplementation('org.springframework.boot:spring-boot-starter-test') {
        exclude group: 'org.junit.vintage', module: 'junit-vintage-engine'
    }
}

test {
    useJUnitPlatform()
}

Create a Resource Representation Class

Now that you have set up the project and build system, you can create your web service.

Begin the process by thinking about service interactions.

The service will handle GET requests for /greeting, optionally with a name parameter in the query string. The GET request should return a 200 OK response with JSON in the body that represents a greeting. It should resemble the following output:

{
    "id": 1,
    "content": "Hello, World!"
}

The id field is a unique identifier for the greeting, and content is the textual representation of the greeting.

To model the greeting representation, create a resource representation class. To do so, provide a plain old Java object with fields, constructors, and accessors for the id and content data, as the following listing (from src/main/java/com/example/restservice/Greeting.java) shows:

package com.example.restservice;

public class Greeting {

    private final long id;
    private final String content;

    public Greeting(long id, String content) {
        this.id = id;
        this.content = content;
    }

    public long getId() {
        return id;
    }

    public String getContent() {
        return content;
    }
}
This application uses the Jackson JSON library to automatically marshal instances of type Greeting into JSON. Jackson is included by default by the web starter.

Create a Resource Controller

In Spring’s approach to building RESTful web services, HTTP requests are handled by a controller. These components are identified by the @RestController annotation, and the GreetingController shown in the following listing (from src/main/java/com/example/restservice/GreetingController.java) handles GET requests for /greeting by returning a new instance of the Greeting class:

package com.example.restservice;

import java.util.concurrent.atomic.AtomicLong;

import org.springframework.web.bind.annotation.GetMapping;
import org.springframework.web.bind.annotation.RequestParam;
import org.springframework.web.bind.annotation.RestController;

@RestController
public class GreetingController {

    private static final String template = "Hello, %s!";
    private final AtomicLong counter = new AtomicLong();

    @GetMapping("/greeting")
    public Greeting greeting(@RequestParam(value = "name", defaultValue = "World") String name) {
        return new Greeting(counter.incrementAndGet(), String.format(template, name));
    }
}

This controller is concise and simple, but there is plenty going on under the hood. We break it down step by step.

The @GetMapping annotation ensures that HTTP GET requests to /greeting are mapped to the greeting() method.

There are companion annotations for other HTTP verbs (e.g. @PostMapping for POST). There is also a @RequestMapping annotation that they all derive from, and can serve as a synonym (e.g. @RequestMapping(method=GET)).

@RequestParam binds the value of the query string parameter name into the name parameter of the greeting() method. If the name parameter is absent in the request, the defaultValue of World is used.

The implementation of the method body creates and returns a new Greeting object with id and content attributes based on the next value from the counter and formats the given name by using the greeting template.

A key difference between a traditional MVC controller and the RESTful web service controller shown earlier is the way that the HTTP response body is created. Rather than relying on a view technology to perform server-side rendering of the greeting data to HTML, this RESTful web service controller populates and returns a Greeting object. The object data will be written directly to the HTTP response as JSON.

This code uses Spring @RestController annotation, which marks the class as a controller where every method returns a domain object instead of a view. It is shorthand for including both @Controller and @ResponseBody.

The Greeting object must be converted to JSON. Thanks to Spring’s HTTP message converter support, you need not do this conversion manually. Because Jackson 2 is on the classpath, Spring’s MappingJackson2HttpMessageConverter is automatically chosen to convert the Greeting instance to JSON.

@SpringBootApplication is a convenience annotation that adds all of the following:

  • @Configuration: Tags the class as a source of bean definitions for the application context.
  • @EnableAutoConfiguration: Tells Spring Boot to start adding beans based on classpath settings, other beans, and various property settings. For example, if spring-webmvc is on the classpath, this annotation flags the application as a web application and activates key behaviors, such as setting up a DispatcherServlet.
  • @ComponentScan: Tells Spring to look for other components, configurations, and services in the com/example package, letting it find the controllers.

The main() method uses Spring Boot’s SpringApplication.run() method to launch an application. Did you notice that there was not a single line of XML? There is no web.xml file, either. This web application is 100% pure Java and you did not have to deal with configuring any plumbing or infrastructure.

Build an executable JAR

You can run the application from the command line with Gradle or Maven. You can also build a single executable JAR file that contains all the necessary dependencies, classes, and resources and run that. Building an executable jar makes it easy to ship, version, and deploy the service as an application throughout the development lifecycle, across different environments, and so forth.

If you use Gradle, you can run the application by using ./gradlew bootRun. Alternatively, you can build the JAR file by using ./gradlew build and then run the JAR file, as follows:

java -jar build/libs/gs-rest-service-0.1.0.jar

If you use Maven, you can run the application by using ./mvnw spring-boot:run. Alternatively, you can build the JAR file with ./mvnw clean package and then run the JAR file, as follows:

java -jar target/gs-rest-service-0.1.0.jar
The steps described here create a runnable JAR. You can also build a classic WAR file.

Logging output is displayed. The service should be up and running within a few seconds.

Test the Service

Now that the service is up, visit http://localhost:8080/greeting, where you should see:

{"id":1,"content":"Hello, World!"}

Provide a name query string parameter by visiting http://localhost:8080/greeting?name=User. Notice how the value of the content attribute changes from Hello, World! to Hello, User!, as the following listing shows:

{"id":2,"content":"Hello, User!"}

This change demonstrates that the @RequestParam arrangement in GreetingController is working as expected. The name parameter has been given a default value of World but can be explicitly overridden through the query string.

Notice also how the id attribute has changed from 1 to 2. This proves that you are working against the same GreetingController instance across multiple requests and that its counter field is being incremented on each call as expected.

Summary

Congratulations! You have just developed a RESTful web service with Spring.

See Also

The following guides may also be helpful:

Views: 605

Apache ECharts 介绍和使用

Apache ECharts
一个基于 JavaScript 的开源可视化图表库

5 分钟上手 ECharts

获取 ECharts

你可以通过以下几种方式获取 Apache EChartsTM。

引入 ECharts

通过标签方式直接引入构建好的 echarts 文件

<!DOCTYPE html>
<html>
<head>
    <meta charset="utf-8">
    <!-- 引入 ECharts 文件 -->
    <script type="text/javascript" src="https://cdn.jsdelivr.net/npm/echarts/dist/echarts.min.js"></script>
</head>
</html>

绘制一个简单的图表

在绘图前我们需要为 ECharts 准备一个具备高宽的 DOM 容器。

<body>
    <!-- 为 ECharts 准备一个具备大小(宽高)的 DOM -->
    <div id="main" style="width: 600px;height:400px;"></div>
</body>

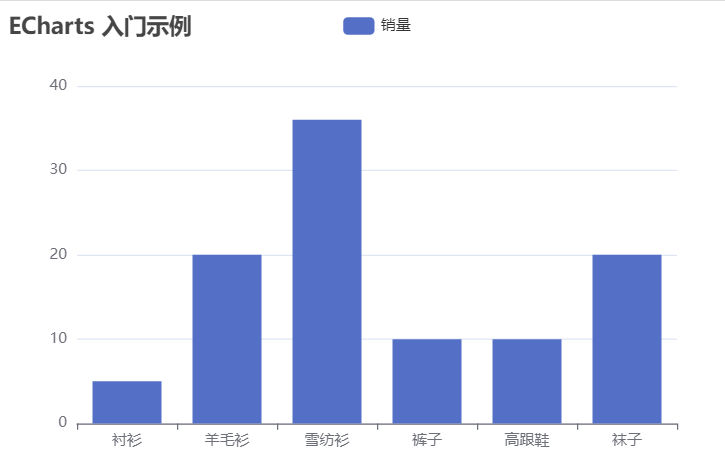
然后就可以通过 echarts.init 方法初始化一个 echarts 实例并通过 setOption 方法生成一个简单的柱状图,下面是完整代码。

<!DOCTYPE html>
<html>
<head>
    <meta charset="utf-8">
    <title>ECharts</title>
    <!-- 引入 echarts.js -->
    <script src="echarts.min.js"></script>
</head>
<body>
    <!-- 为ECharts准备一个具备大小(宽高)的Dom -->
    <div id="main" style="width: 600px;height:400px;"></div>
    <script type="text/javascript">
        // 基于准备好的dom,初始化echarts实例
        var myChart = echarts.init(document.getElementById('main'));

        // 指定图表的配置项和数据
        var option = {
            title: {
                text: 'ECharts 入门示例'
            },
            tooltip: {},
            legend: {
                data:['销量']
            },
            xAxis: {
                data: ["衬衫","羊毛衫","雪纺衫","裤子","高跟鞋","袜子"]
            },
            yAxis: {},
            series: [{
                name: '销量',
                type: 'bar',
                data: [5, 20, 36, 10, 10, 20]
            }]
        };

        // 使用刚指定的配置项和数据显示图表。
        myChart.setOption(option);
    </script>
</body>
</html>

这样你的第一个图表就诞生了!

file

ECharts 基础概念概览

本文介绍 Apache EChartsTM 最基本的名词和概念。

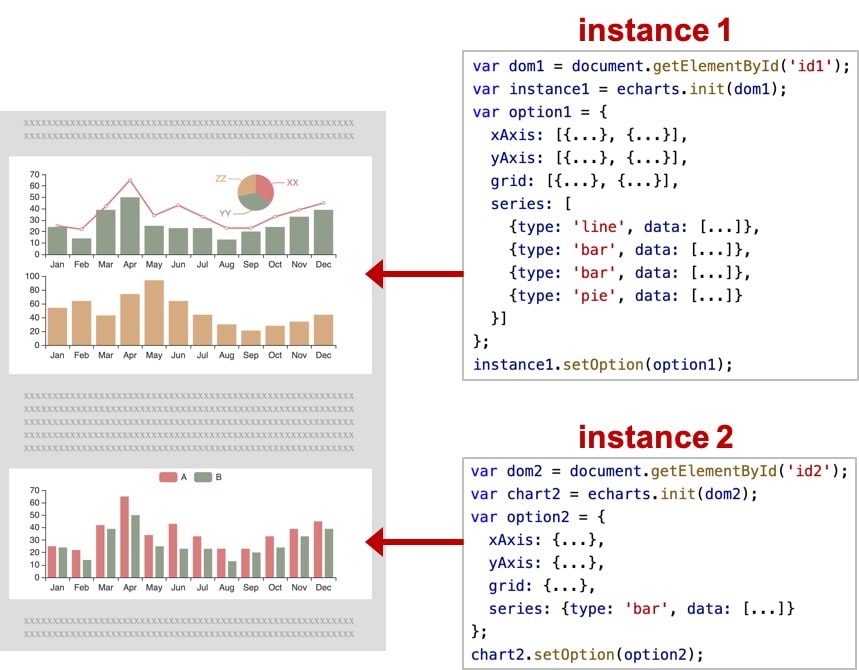
echarts 实例

一个网页中可以创建多个 echarts 实例。每个 echarts 实例 中可以创建多个图表和坐标系等等(用 option 来描述)。准备一个 DOM 节点(作为 echarts 的渲染容器),就可以在上面创建一个 echarts 实例。每个 echarts 实例独占一个 DOM 节点。

img

系列(series)

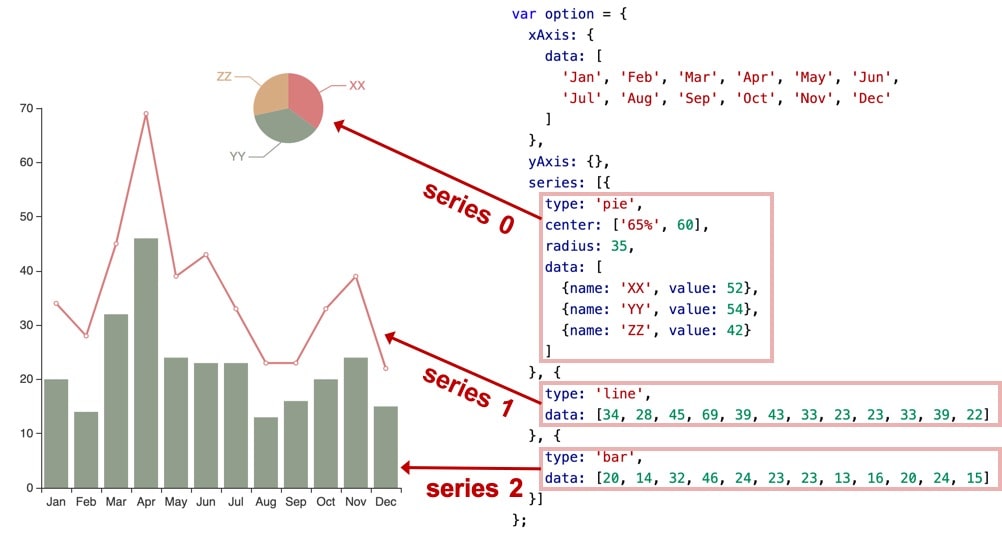
系列(series)是很常见的名词。在 echarts 里,系列(series)是指:一组数值以及他们映射成的图。“系列”这个词原本可能来源于“一系列的数据”,而在 echarts 中取其扩展的概念,不仅表示数据,也表示数据映射成为的图。所以,一个 系列 包含的要素至少有:一组数值、图表类型(series.type)、以及其他的关于这些数据如何映射成图的参数。

echarts 里系列类型(series.type)就是图表类型。系列类型(series.type)至少有:line(折线图)、bar(柱状图)、pie(饼图)、scatter(散点图)、graph(关系图)、tree(树图)、...

如下图,右侧的 option 中声明了三个 系列(series):pie(饼图系列)、line(折线图系列)、bar(柱状图系列),每个系列中有他所需要的数据(series.data)。

img

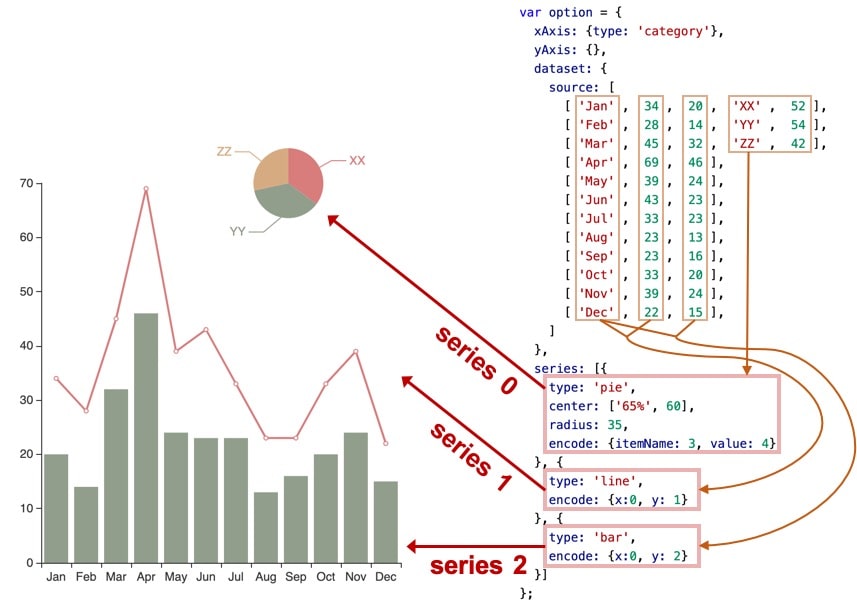
类同地,下图中是另一种配置方式,系列的数据从 dataset 中取:

img

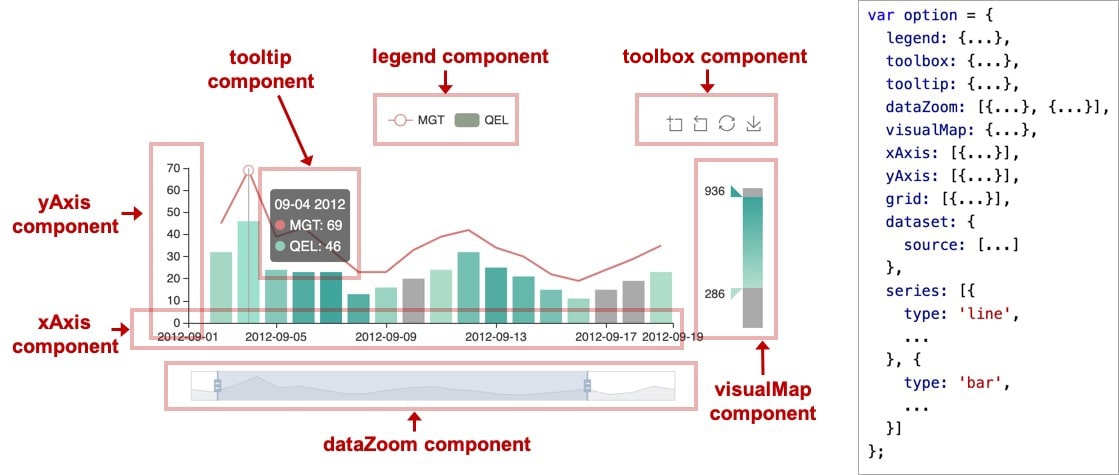
组件(component)

在系列之上,echarts 中各种内容,被抽象为“组件”。例如,echarts 中至少有这些组件:xAxis(直角坐标系 X 轴)、yAxis(直角坐标系 Y 轴)、grid(直角坐标系底板)、angleAxis(极坐标系角度轴)、radiusAxis(极坐标系半径轴)、polar(极坐标系底板)、geo(地理坐标系)、dataZoom(数据区缩放组件)、visualMap(视觉映射组件)、tooltip(提示框组件)、toolbox(工具栏组件)、series(系列)、...

我们注意到,其实系列(series)也是一种组件,可以理解为:系列是专门绘制“图”的组件。

如下图,右侧的 option 中声明了各个组件(包括系列),各个组件就出现在图中。

img

注:因为系列是一种特殊的组件,所以有时候也会出现 “组件和系列” 这样的描述,这种语境下的 “组件” 是指:除了 “系列” 以外的其他组件。

用 option 描述图表

上面已经出现了 option 这个概念。echarts 的使用者,使用 option 来描述其对图表的各种需求,包括:有什么数据、要画什么图表、图表长什么样子、含有什么组件、组件能操作什么事情等等。简而言之,option 表述了:数据、数据如何映射成图形、交互行为。

// 创建 echarts 实例。
var dom = document.getElementById('dom-id');
var chart = echarts.init(dom);

// 用 option 描述 <code>数据、数据如何映射成图形、交互行为 等。
// option 是个大的 JavaScript 对象。
var option = {
    // option 每个属性是一类组件。
    legend: {...},
    grid: {...},
    tooltip: {...},
    toolbox: {...},
    dataZoom: {...},
    visualMap: {...},
    // 如果有多个同类组件,那么就是个数组。例如这里有三个 X 轴。
    xAxis: [
        // 数组每项表示一个组件实例,用 type 描述“子类型”。
        {type: 'category', ...},
        {type: 'category', ...},
        {type: 'value', ...}
    ],
    yAxis: [{...}, {...}],
    // 这里有多个系列,也是构成一个数组。
    series: [
        // 每个系列,也有 type 描述“子类型”,即“图表类型”。
        {type: 'line', data: [['AA', 332], ['CC', 124], ['FF', 412], ... ]},
        {type: 'line', data: [2231, 1234, 552, ... ]},
        {type: 'line', data: [[4, 51], [8, 12], ... ]}
    }]
};

// 调用 setOption 将 option 输入 echarts,然后 echarts 渲染图表。
chart.setOption(option);

系列里的 series.data 是本系列的数据。而另一种描述方式,系列数据从 dataset 中取:

var option = {
    dataset: {
        source: [
            [121, 'XX', 442, 43.11],
            [663, 'ZZ', 311, 91.14],
            [913, 'ZZ', 312, 92.12],
            ...
        ]
    },
    xAxis: {},
    yAxis: {},
    series: [
        // 数据从 dataset 中取,encode 中的数值是 dataset.source 的维度 index (即第几列)
        {type: 'bar', encode: {x: 1, y: 0}},
        {type: 'bar', encode: {x: 1, y: 2}},
        {type: 'scatter', encode: {x: 1, y: 3}},
        ...
    ]
};

组件的定位

不同的组件、系列,常有不同的定位方式。

[类 CSS 的绝对定位]

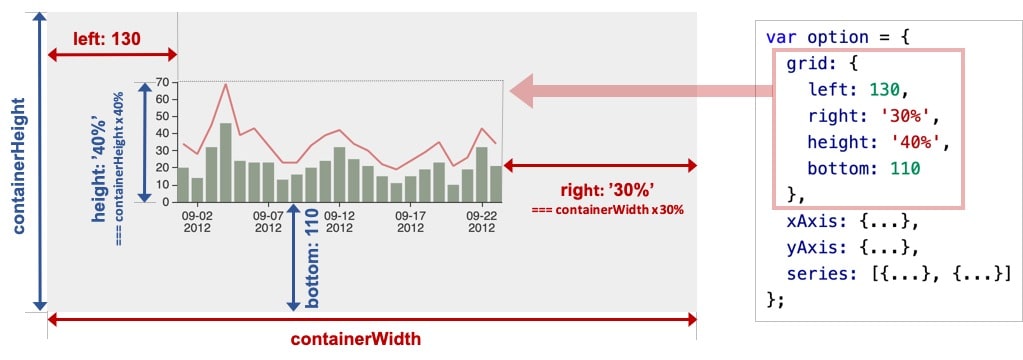
多数组件和系列,都能够基于 top / right / down / left / width / height 绝对定位。 这种绝对定位的方式,类似于 CSS 的绝对定位(position: absolute)。绝对定位基于的是 echarts 容器 DOM 节点。

其中,他们每个值都可以是:

  • 绝对数值(例如 bottom: 54 表示:距离 echarts 容器底边界 54 像素)。
  • 或者基于 echarts 容器高宽的百分比(例如 right: '20%' 表示:距离 echarts 容器右边界的距离是 echarts 容器宽度的 20%)。

如下图的例子,对 grid 组件(也就是直角坐标系的底板)设置 left、right、height、bottom 达到的效果。

img

我们可以注意到,left right width 是一组(横向)、top bottom height 是另一组(纵向)。这两组没有什么关联。每组中,至多设置两项就可以了,第三项会被自动算出。例如,设置了 left 和 right 就可以了,width 会被自动算出。

[中心半径定位]

少数圆形的组件或系列,可以使用“中心半径定位”,例如,pie(饼图)、sunburst(旭日图)、polar(极坐标系)。

中心半径定位,往往依据 center(中心)、radius(半径)来决定位置。

[其他定位]

少数组件和系列可能有自己的特殊的定位方式。在他们的文档中会有说明。

坐标系

很多系列,例如 line(折线图)、bar(柱状图)、scatter(散点图)、heatmap(热力图)等等,需要运行在 “坐标系” 上。坐标系用于布局这些图,以及显示数据的刻度等等。例如 echarts 中至少支持这些坐标系:直角坐标系、极坐标系、地理坐标系(GEO)、单轴坐标系、日历坐标系 等。其他一些系列,例如 pie(饼图)、tree(树图)等等,并不依赖坐标系,能独立存在。还有一些图,例如 graph(关系图)等,既能独立存在,也能布局在坐标系中,依据用户的设定而来。

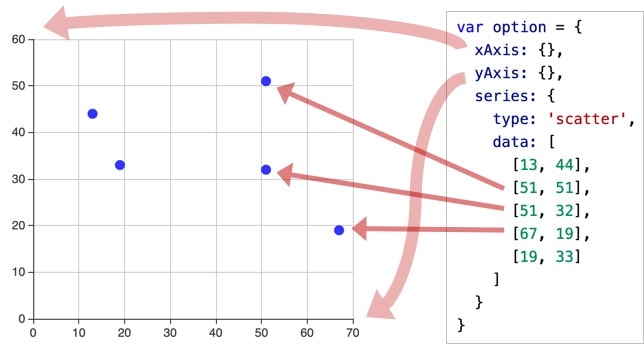
一个坐标系,可能由多个组件协作而成。我们以最常见的直角坐标系来举例。直角坐标系中,包括有 xAxis(直角坐标系 X 轴)、yAxis(直角坐标系 Y 轴)、grid(直角坐标系底板)三种组件。xAxis、yAxis 被 grid 自动引用并组织起来,共同工作。

我们来看下图,这是最简单的使用直角坐标系的方式:只声明了 xAxis、yAxis 和一个 scatter(散点图系列),echarts 暗自为他们创建了 grid 并关联起他们:

img

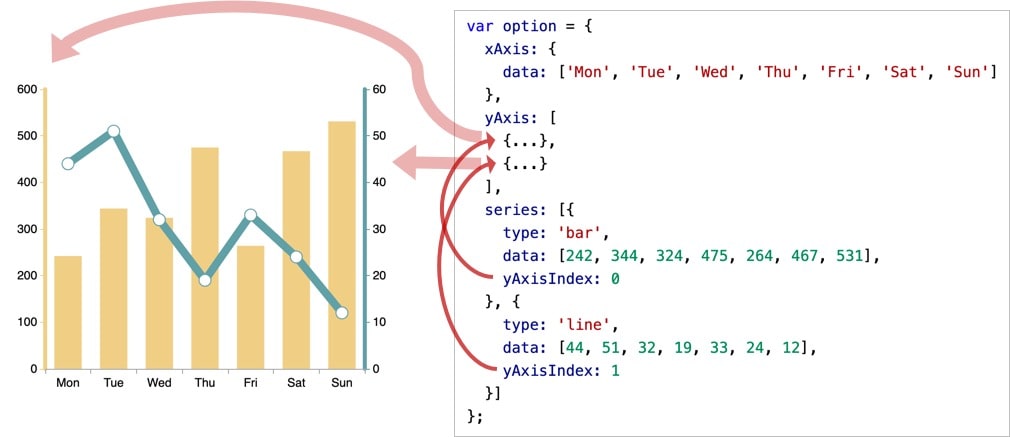
再来看下图,两个 yAxis,共享了一个 xAxis。两个 series,也共享了这个 xAxis,但是分别使用不同的 yAxis,使用 yAxisIndex 来指定它自己使用的是哪个 yAxis:

img

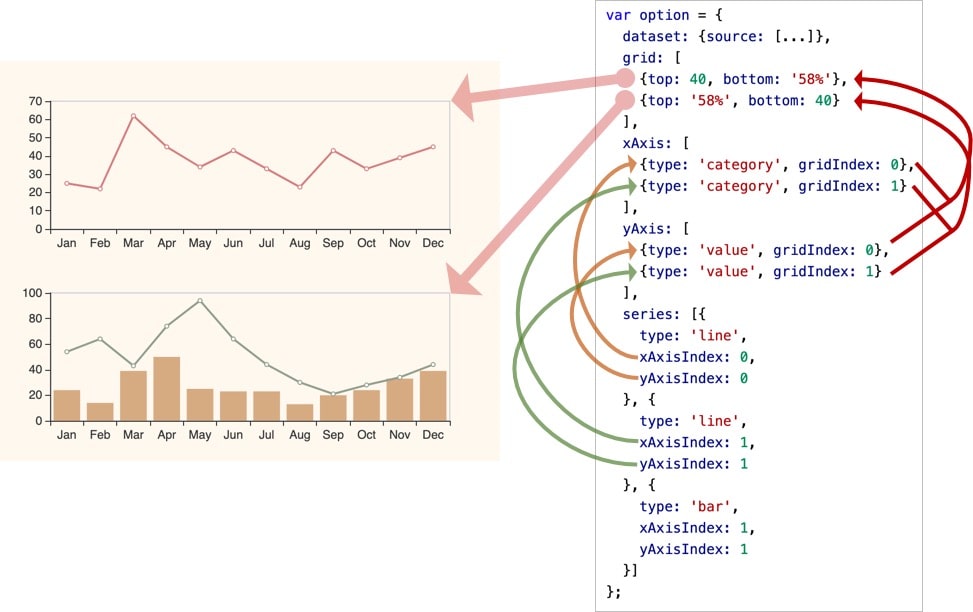
再来看下图,一个 echarts 实例中,有多个 grid,每个 grid 分别有 xAxis、yAxis,他们使用 xAxisIndex、yAxisIndex、gridIndex 来指定引用关系:

img

另外,一个系列,往往能运行在不同的坐标系中。例如,一个 scatter(散点图)能运行在 直角坐标系、极坐标系 、地理坐标系(GEO) 等各种坐标系中。同样,一个坐标系,也能承载不同的系列,如上面出现的各种例子,直角坐标系 里承载了 line(折线图)、bar(柱状图)等等。

ECharts 高级

ECharts API文档

ECharts Option说明

ECharts 官方示例

Views: 530