01 机器学习概述

课程定位
  • 课程以算法、案例为驱动的学习,伴随浅显易懂的数学知识
  • 作为人工智能领域(数据挖掘/机器学习方向)的提升课程,掌握更深更有效的解决问题技能
课程 目标
  • 应用Scikit-learn实现数据集的特征工程
  • 掌握机器学习常见算法原理
  • 应用Scikit-learn实现机器学习算法的应用,结合场景解决实际问题

1. 机器学习概述

了解机器学习定义以及应用场景
说明机器学习算法监督学习与无监督学习的区别
说明监督学习中的分类、回归特点
说明机器学习算法目标值的两种数据类型
说明机器学习(数据挖掘)的开发流程

1.1 人工智能概述

1.1.1 机器学习与人工智能、深度学习

  • 机器学习和人工智能,深度学习的关系
    • 机器学习是人工智能的一个实现途径
    • 深度学习是机器学习的一个方法发展而来
  • 达特茅斯会议-人工智能的起点1956年8月,在美国汉诺斯小镇宁静的达特茅斯学院中,约翰·麦卡锡(John McCarthy)马文·闵斯基(Marvin Minsky,人工智能与认知学专家)克劳德·香农(Claude Shannon,信息论的创始人)艾伦·纽厄尔(Allen Newell,计算机科学家)赫伯特·西蒙(Herbert Simon,诺贝尔经济学奖得主)等科学家正聚在一起,讨论着一个完全不食人间烟火的主题:用机器来模仿人类学习以及其他方面的智能。会议足足开了两个月的时间,虽然大家没有达成普遍的共识,但是却为会议讨论的内容起了一个名字:人工智能因此,1956年也就成为了人工智能元年。

1.1.2 机器学习、深度学习能做些什么

机器学习的应用场景非常多,可以说渗透到了各个行业领域当中。医疗、航空、教育、物流、电商等等领域的各种场景。

  • 用在挖掘、预测领域:
    • 应用场景:店铺销量预测、量化投资、广告推荐、企业客户分类、SQL语句安全检测分类…
  • 用在图像领域:
    • 应用场景:街道交通标志检测、人脸识别等等
  • 用在自然语言处理领域:
    • 应用场景:文本分类、情感分析、自动聊天、文本检测等等

当前重要的是掌握一些机器学习算法等技巧,从某个业务领域切入解决问题。

1.1.3 人工智能阶段课程安排

1.2 什么是机器学习

1.2.1 定义

机器学习是从数据自动分析获得模型,并利用模型对未知数据进行预测。

1.2.2 解释

  • 我们人从大量的日常经验中归纳规律,当面临新的问题的时候,就可以利用以往总结的规律去分析现实状况,采取最佳策略。
  • 从数据(大量的猫和狗的图片)中自动分析获得模型(辨别猫和狗的规律),从而使机器拥有识别猫和狗的能力。
  • 从数据(房屋的各种信息)中自动分析获得模型(判断房屋价格的规律),从而使机器拥有预测房屋价格的能力。

从历史数据当中获得规律?这些历史数据是怎么的格式?

1.2.3 数据集构成

  • 结构:特征值+目标值

注:

  • 对于每一行数据我们可以称之为样本
  • 有些数据集可以没有目标值:

1.3 机器学习算法分类

学习目标

  • 目标
    • 说明机器学习算法监督学习与无监督学习的区别
    • 说明监督学习中的分类、回归特点

分析1.2中的例子:

  • 特征值:猫/狗的图片;目标值:猫/狗-类别
    • 分类问题
  • 特征值:房屋的各个属性信息;目标值:房屋价格-连续型数据
    • 回归问题
  • 特征值:人物的各个属性信息;目标值:无
    • 无监督学习

1.3.1 总结

1.3.2 练习

说一下它们具体问题类别:

1、预测明天的气温是多少度?

2、预测明天是阴、晴还是雨?

3、人脸年龄预测?

4、人脸识别?

1.3.3 机器学习算法分类

  • 监督学习(supervised learning)(预测)
  • 定义:输入数据是由输入特征值和目标值所组成。函数的输出可以是一个连续的值(称为回归),或是输出是有限个离散值(称作分类)。
    • 分类 k-近邻算法、贝叶斯分类、决策树与随机森林、逻辑回归、神经网络
    • 回归 线性回归、岭回归
  • 无监督学习(unsupervised learning)
  • 定义:输入数据是由输入特征值所组成。
    • 聚类 k-means

1.4 机器学习开发流程

  • 流程图:

1.5 学习框架和资料介绍

需明确几点问题:

(1)算法是核心,数据计算是基础

(2)找准定位

大部分复杂模型的算法设计都是算法工程师在做,而我们

  • 分析很多的数据
  • 分析具体的业务
  • 应用常见的算法
  • 特征工程、调参数、优化
注意: 参考书比较晦涩难懂, 不建议直接从头到尾阅读
  • 我们应该怎么做?
  • 学会分析问题,使用机器学习算法的目的,想要算法完成何种任务
  • 掌握算法基本思想,学会对问题用相应的算法解决
  • 学会利用库或者框架解决问题

当前重要的是掌握一些机器学习算法等技巧,从某个业务领域切入解决问题。

1.5.1 机器学习库与框架

1.5.2 书籍资料

1.5.3 提深内功(但不是必须)

1.5 开发环境和介绍

  • python
  • scikit-learn
  • jupyter notebook

1.6 机器学习开发环境部署

python 安装

Anaconda安装

安装后打开Anacoinda navigator

打开终端

创建sklearn环境

>conda create -n sklearn

cmd控制台切换环境

在cmd中可以使用conda --info --envs列出可用环境, 使用conda activate激活环境

C:\Users\Lenovo>conda info --envs
# conda environments:  
# 这里配置了python2(base)和python3(py3)共存
base                  *  D:\dev\Anaconda2    
py3                      D:\dev\Anaconda2\envs\py3
                         D:\dev\Anaconda2\envs\py3\envs\sklearn                                                                                                                                                                                                                                                                                                                                                                                                                                                                                                                                                                                                                 
C:\Users\Lenovo>conda activate py3                                                                                                           
(py3) C:\Users\Lenovo>conda activate sklearn                                                                                                                                                          
(sklearn) C:\Users\Lenovo>                                                               

Anaconda Navigator 切换环境

安装jupyter notebook

安装完毕之后点击lauch即进入jupyter notebook的WEB UI界面(使用默认浏览器)

创建测试文件(Python3)体验 jupyter notebook 的使用

快捷键: ctrl+enter执行当前代码块, alt+enter执行当前代码块并向下插入新的代码块

修改conda镜像源为清华源, 并取消SSL验证

找到C:\Users\你的用户名\.condarc,修改如下:

ssl_verify: false
channels:
  - https://mirrors.tuna.tsinghua.edu.cn/anaconda/pkgs/main/
  - https://mirrors.tuna.tsinghua.edu.cn/anaconda/pkgs/free/
  - https://mirrors.tuna.tsinghua.edu.cn/anaconda/cloud/pytorch/
  - https://mirrors.tuna.tsinghua.edu.cn/anaconda/cloud/menpo/
  - https://mirrors.tuna.tsinghua.edu.cn/anaconda/cloud/bioconda/
  - https://mirrors.tuna.tsinghua.edu.cn/anaconda/cloud/msys2/
  - https://mirrors.tuna.tsinghua.edu.cn/anaconda/cloud/conda-forge/
show_channel_urls: true

接下来保存并进入sklearn环境终端,安装依赖库numpy和sklearny以及pandas

(sklearn)>conda install numpy        #矩阵运算库
(sklearn)>conda install scikit-learn #机器学习库
(sklearn)>conda install pandas       #数据分析库

进入jupyter notebook 输入以下代码并运行, 没报错即为成功

import numpy as np
import sklearn
import pandas

d = np.eye(3)

print(d)

输出

[[1. 0. 0.]
 [0. 1. 0.]
 [0. 0. 1.]]

最后可以为jupyter notebook添加你喜欢的主题, 设置成你喜欢的风格

GitHub - dunovank/jupyter-themes: Custom Jupyter Notebook Themes

使用pip安装jupyter themes

>pip install jupyterthemes

进行主题风格配置

jt -t oceans16 -f fira -fs 17 -cellw 90% -ofs 14 -dfs 14 -T

进入jupyter notebook查看主题变化

至此, 开发环境准备就完成了!

Views: 181

Kafka-Storm 实时计算项目开发实战

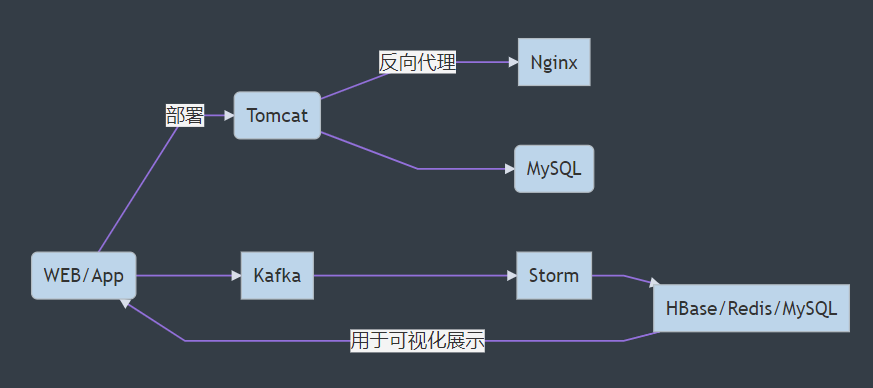
项目架构

image-20211209020000874

基本要求

  1. 主题相关的WebAPP
    1. 1个首页和若干功能页面
    2. 有生成数据的能力(实际展示的时候,为了有更多丰富的数据, 允许使用脚本生成假数据)
      1. KafkaProducer 直接将需要采集的信息发送到Storm
    3. 分析结果的图表展示
      1. echarts, 或者其他图表库
        1. Jquery的ajax库
        2. json
    4. 其他要求:
      1. 参照Alibaba的Java开发手册的规约
      2. 代码中适当添加注释
  2. 部署到服务器(虚拟机或者购买的服务器)
    1. JavaWeb程序需要部署到 Tomcat
    2. Nginx 实现反向代理
  3. 实时数据分析
    1. kafka -> storm
    2. 持久化到数据库(HBase,MySQL,Redis)
    3. 最好每个团队成员都有一个完整的实时分析流程
    4. 每个团队最少有两种实时分析, 不同类型(不要过于简单,分析的内容要能体现实时性)

开发流程建议

  1. 确定需求和分工

  2. 学习使用版本控制工具(Gitee 码云 / Github)

  3. 统一消息格式,建议使用JSON

  4. 开发时先采用本地的Tomcat和Storm环境测试

  5. 本地环境测试时可以远程连接服务器上的的Kafka和Hbase

    没问题再使用Tomcat和Nginx部署到服务器

  6. 将拓扑上传到Storm集群中运行

  7. 联调所有模块

  8. 完善SRS报告

    记录整个项目的需求, 架构, 开发、部署、测试的详细过程

  9. 每个人准备PPT, 视频等交付资料

  10. 每周使用在线表格记录项目进度情况

WebApp开发

采用前后端分离的模式开发和部署

后端可以采用基于tomcat的普通JavaWeb应用或者SpringBoot项目

消息传递

一般项目可以使用kafka-clients依赖里的KafkaProducer API来发送消息到Kafka, 这样便于快速调试.

对于SpringBoot项目,可以使用spring-kafka依赖.

kafka相关配置

spring:
  kafka:
    bootstrap-servers: hadoop000:9092,hadoop000:9093,hadoop000:9094
    producer:
      key-serializer: org.apache.kafka.common.serialization.StringSerializer
      value-serializer: org.apache.kafka.common.serialization.StringSerializer
      client-id: app-pro-cli
      acks: 1
      retries: 3
    consumer:
      key-deserializer: org.apache.kafka.common.serialization.StringDeserializer
      value-deserializer: org.apache.kafka.common.serialization.StringDeserializer
      client-id: app-pro-cli
      group-id: g1

Kafka的初始化配置

package cn.delucia.project.conf;

import org.apache.kafka.clients.admin.NewTopic;
import org.springframework.beans.factory.annotation.Value;
import org.springframework.context.annotation.Bean;
import org.springframework.context.annotation.Configuration;

@Configuration
public class KafkaInitConf {
    @Value("${app.kafka-topic}")
    private String kafkaTopic;
    @Value("${app.topic-partitions}")
    private Integer topicPartitions;
    // 创建一个Topic并设置分区数和副本数
    @Bean
    public NewTopic initialTopic() {
        return new NewTopic(kafkaTopic, 1, (short) 1);
    }
    // 如果要修改分区数,只需修改配置值重启项目即可
    // 修改分区数并不会导致数据的丢失,但是分区数只能增大不能减小
    @Bean
    public NewTopic updateTopic() {
        return new NewTopic(kafkaTopic, topicPartitions, (short) 1);
    }
}

在控制器类中注入kafkaTemplate并调用send方法发送消息, 例如:

@Slf4j
@RestController
public class GreetingController {

    @Autowired
    private KafkaTemplate<Object, String> kafkaTemplate;

    public Greeting greeting(@RequestParam(value = "name", defaultValue = "农场主") String name) {

        Greeting greeting = new Greeting(counter.incrementAndGet(), name);

        try {
            String s = new ObjectMapper().writeValueAsString(greeting);
            // 带回调的生产者
            kafkaTemplate.send(kafkaTopic, "Greeting:" + s).addCallback(success -> {
                // 消息发送到的topic
                String topic = Objects.requireNonNull(success).getRecordMetadata().topic();
                // 消息发送到的分区
                int partition = success.getRecordMetadata().partition();
                // 消息在分区内的offset
                long offset = success.getRecordMetadata().offset();
                log.info("发送消息成功: {}-{}-{}, Greeting:{}", topic, partition, offset, s);
            }, failure -> {
                log.info("发送消息失败: {}", failure.getMessage());
            });
        } catch (JsonProcessingException e) {
            log.info("解析Json格式失败: {}", e.getMessage());
        }
        ...
    }
}

安装Tomcat

准备:安装Java JDK1.8

这里安装openjdk是因为比较简单, 工作场合一定要使用oracle提供的jdk1.8

sudo yum -y install java-1.8.0-openjdk*

这样安装的好处就是环境变量都配好了

可以直接查看版本 java -version

Tomcat安装

下载页面: https://tomcat.apache.org/download-90.cgi

文档:https://tomcat.apache.org/tomcat-9.0-doc/index.html

下载链接

wget https://mirrors.tuna.tsinghua.edu.cn/apache/tomcat/tomcat-9/v9.0.41/bin/apache-tomcat-9.0.41.tar.gz

解压到后改名tomcat9

tar -zxvf apache-tomcat-9.0.41.tar.gz -C ~/app
cd ~/app
mv apache-tomcat-9.0.41/ tomcat9

默认tomcat端口是8080, 为了避免冲突, 这里修改为18080

 $ vi ~/app/tomcat9/conf/server.xml

 69     <Connector port="18080" protocol="HTTP/1.1"
 70                connectionTimeout="20000"
 71                redirectPort="8443" />

启动: 进入 /bin目录下 运行startup.sh脚本文件

$ ./startup.sh 
Using CATALINA_BASE:   /home/hadoop/app/tomcat9
Using CATALINA_HOME:   /home/hadoop/app/tomcat9
Using CATALINA_TMPDIR: /home/hadoop/app/tomcat9/temp
Using JRE_HOME:        /home/hadoop/app/jdk1.8.0_211
Using CLASSPATH:       /home/hadoop/app/tomcat9/bin/bootstrap.jar:/home/hadoop/app/tomcat9/bin/tomcat-juli.jar
Tomcat started.

检查tomcat进程信息

$ bin]$ ps -ef | grep tomcat
hadoop    15142      1  1 14:41 pts/0    00:00:05 /home/hadoop/app/jdk1.8.0_211/bin/java -Djava.util.logging.config.file=/home/hadoop/app/tomcat9/conf/logging.properties -Djava.util.logging.manager=org.apache.juli.ClassLoaderLogManager -Djdk.tls.ephemeralDHKeySize=2048 -Djava.protocol.handler.pkgs=org.apache.catalina.webresources -Dorg.apache.catalina.security.SecurityListener.UMASK=0027 -Dignore.endorsed.dirs= -classpath /home/hadoop/app/tomcat9/bin/bootstrap.jar:/home/hadoop/app/tomcat9/bin/tomcat-juli.jar -Dcatalina.base=/home/hadoop/app/tomcat9 -Dcatalina.home=/home/hadoop/app/tomcat9 -Djava.io.tmpdir=/home/hadoop/app/tomcat9/temp org.apache.catalina.startup.Bootstrap start
hadoop    15296  15064  0 14:47 pts/0    00:00:00 grep --color=auto tomcat

检查对应的监听端口信息

netstat -anpt | grep 15142

网页访问虚拟机主机名或IP地址:18080

为了方便可以为tomcat的安装目录配置环境变量CATALINA_HOME,添加到PATH中

为tomcat添加用户和角色

修改conf/tomcat-users.xml, 添加如下内容

<!--  
  <role rolename="tomcat"/>
  <role rolename="role1"/>
  <user username="tomcat" password="tomcat" roles="tomcat"/>
  <user username="both" password="tomcat" roles="tomcat,role1"/>
  <user username="role1" password="tomcat" roles="role1"/>
-->
  <role rolename="manager-gui"/>
  <role rolename="manager-script" />
  <user username="admin" password="123123" roles="manager-gui,manager-script" />
</tomcat-users>

修改webapps/manager/META-INF目录下的context.xml,在allow行的末尾加上|\d+.\d+.\d+.\d+表示允许所有主机访问。

<Context antiResourceLocking="false" privileged="true" >
  <Valve className="org.apache.catalina.valves.RemoteAddrValve"
         allow="127\.\d+\.\d+\.\d+|::1|0:0:0:0:0:0:0:1|\d+\.\d+\.\d+\.\d+" />
  <Manager sessionAttributeValueClassNameFilter="java\.lang\.(?:Boolean|Integer|Long|Number|String)|org\.apache\.catalina\.filters\.CsrfPreventionFilter\$LruCache(?:\$1)?|java\.util\.(?:Linked)?HashMap"/>
</Context>

重启tomcat生效

部署项目

一般的javaee项目可以直接build出一个war包进行上传服务器。

SpringBoot默认是打成jar包,如果需要打成war包, 需要修改pom.xml文件:

    <groupId>com.niit</groupId>
    <artifactId>demo</artifactId>
    <version>0.0.1-SNAPSHOT</version>

    <!-- 这里打成war包 若打jar,需将war改为jar -->
    <packaging>war</packaging>

    <name>demo</name>
    <description>Demo project for Spring Boot</description>

然后使用mvn:package构建war包即可,然后上传到服务器的tomcat目录下的webapp文件夹之内。

tomcat 容器的运行机制👇

tomcat默认会加载tomcat目录下的webapp文件夹之内的文件,如

其中ROOT目录下为Tomcat的欢迎页

http://hadoop000/index.jsp

http://hadoop000/tomcat.gif

examples目录是一些官方示例

http://hadoop000/examples/

tomcat也会默认会加载tomcat目录下的webapp文件夹中下面的war包,并自动解压在webapp下面。

默认的访问方式就是 http://域名:端口号/war包名, 端口号默认是8080

启动tomcat, 浏览器访问 http://hadoop000:18080/demo/

部署SpringBoot项目

项目的服务器设置:

server:
  port: 18080
  servlet:
    context-path: "/project"
#debug: on

使用maven的springboot打包插件按照jar包的方式打包

   <groupId>com.niit</groupId>
    <artifactId>demo</artifactId>
    <version>0.0.1-SNAPSHOT</version>

    <!-- 这里打成war包 若打jar,需将war改为jar -->
    <packaging>jar</packaging>

    <name>demo</name>
    <description>Demo project for Spring Boot</description>

然后使用mvn:package打包即可,将打包出来的jar文件重命名然后上传到服务器

在服务器启动项目(需要Java8以上环境)

[hadoop@hadoop000 webapps]$ java -jar demo-jar.jar 

  .   ____          _            __ _ _
 /\\ / ___'_ __ _ _(_)_ __  __ _ \ \ \ \
( ( )\___ | '_ | '_| | '_ \/ _` | \ \ \ \
 \\/  ___)| |_)| | | | | || (_| |  ) ) ) )
  '  |____| .__|_| |_|_| |_\__, | / / / /
 =========|_|==============|___/=/_/_/_/
 :: Spring Boot ::        (v2.3.0.RELEASE)

如果后台运行可以(推荐)

$ nohup java -jar demo-jar.jar 1> demo.log 2>&1 &

浏览器访问 http://hadoop000:18080/project/greeting

配置Nginx反向代理

但是这样带8080端口的访问并不是很好,因此一般都使用nginx反向代理.

通过反向代理将对nginx的80端口的访问请求转发到tomcat的8080端口

首先在物理机hosts文件创建虚拟机主机名和ip的映射

192.168.186.100 hadoop000

Nginx安装

安装前确认是否已经安装过

sudo yum search nginx

Nginx文档http://nginx.org/en/docs/

Installation on Linux, nginx packages from nginx.org can be used.

Installation instructions
RHEL/CentOS
Debian
Ubuntu
SLES
Alpine

以 CentOS为例进行安装

Install the prerequisites:

sudo yum install yum-utils

To set up the yum repository, create the file named /etc/yum.repos.d/nginx.repo with the following contents:

sudo vi /etc/yum.repos.d/nginx.repo

内容如下:

[nginx-stable]
name=nginx stable repo
baseurl=http://nginx.org/packages/centos/$releasever/$basearch/
gpgcheck=1
enabled=1
gpgkey=https://nginx.org/keys/nginx_signing.key
module_hotfixes=true

[nginx-mainline]
name=nginx mainline repo
baseurl=http://nginx.org/packages/mainline/centos/$releasever/$basearch/
gpgcheck=1
enabled=0
gpgkey=https://nginx.org/keys/nginx_signing.key
module_hotfixes=true

By default, the repository for stable nginx packages is used. If you would like to use mainline nginx packages, run the following command:

sudo yum-config-manager --enable nginx-mainline

To install nginx, run the following command:

sudo yum install -y nginx

When prompted to accept the GPG key, verify that the fingerprint matches 573B FD6B 3D8F BC64 1079 A6AB ABF5 BD82 7BD9 BF62, and if so, accept it.

Nginx配置

创建java.conf ,进行最简配置

$ cd /etc/nginx/conf.d/
$ sudo cp default.conf java.conf
$ vi java.conf

URL记住不要忘了加http://前缀

server {
    listen  80;
    server_name hadoop000;
    location / {
        proxy_pass http://127.0.0.1:18080;
    }
}

常用命令

解释 命令
安装服务 yum install nginx
启动服务 service nginx start
停止服务 service nginx stop
重载服务 service nginx reload

配置完成后启动服务

sudo service nginx start

如果服务器已经启动,当配置发生变化可以直接使用重载服务来更新配置,运维常用,因为不需要停止服务就可以重载新的配置。

如果启动失败可以查看错误日志

sudo vi /var/log/nginx/error.log 

经过反向代理配置之后,使用浏览器访问 http://hadoop000就相当于访问虚拟机hadoop000的本地服务http://127.0.0.1:18080的效果

如果发现502错误:

2020/11/18 16:12:39 [crit] 16376#16376: *1 connect() to 127.0.0.1:8080 failed (13: Permission denied) while connecting to upstream, client: 192.168.186.1, server: hadoop000, request: "GET /favicon.ico HTTP/1.1", upstream: "http://127.0.0.1:8080/favicon.ico", host: "hadoop000", referrer: "http://hadoop000/"

此时需要考虑把linux操作系统默认的强制访问安全限制设置为禁用。

关闭SElinux即可

  1. 临时关闭 SElinux

    sudo setenforce 0
  2. 永久关闭 SElinux

    sudo vim /etc/selinux/config
    SELINUX=disabled

修改之后就可以正常访问了

配置开机启动

[hadoop@hadoop000 download]$ chkconfig nginx
注意:正在将请求转发到“systemctl is-enabled nginx.service”。
disabled

[hadoop@hadoop000 download]$ chkconfig nginx on
注意:正在将请求转发到“systemctl enable nginx.service”。
==== AUTHENTICATING FOR org.freedesktop.systemd1.manage-unit-files ===
Authentication is required to manage system service or unit files.
Authenticating as: root
Password: 
==== AUTHENTICATION COMPLETE ===
Created symlink from /etc/systemd/system/multi-user.target.wants/nginx.service to /usr/lib/systemd/system/nginx.service.
==== AUTHENTICATING FOR org.freedesktop.systemd1.reload-daemon ===
Authentication is required to reload the systemd state.
Authenticating as: root
Password: 
==== AUTHENTICATION COMPLETE ===

[hadoop@hadoop000 download]$ chkconfig nginx
注意:正在将请求转发到“systemctl is-enabled nginx.service”。
enabled

前后端分离

nginx是一个高性能服务器,除了配置反向代理之外,也非常适合部署静态资源并支持高并发请求, 并且也提供负载均衡的功能。

首先删除默认的配置

# sudo vim /etc/nginx/conf.d/default.conf

为了将反向代理请求和静态资源的请求分开,修改我们之前的配置如下:

upstream webapp.server {
    server hadoop000:18080;
}

server {
        listen  80;
        server_name localhost hadoop000;
        root /data/www/;

        # 静态资源
        location / {
            index index.html;
            access_log /var/log/nginx/java-hadoop.log main;
        }

        # 反向代理到本地JavaWeb的后台服务
        location ^~ /project/ {
            proxy_pass http://webapp.server/project/;
        }
}

一些说明如下:

  1. listen 80 是http协议的默认端口,:80 可以省略
  2. server_name 表示请求路径中的服务器主机名,可配置多个
  3. /data/www 为站点根目录,需手动创建,权限一般为755
  4. access_log 对应的路径是应用的服务器日志,文件夹不存在则需手动创建
  5. location 的匹配规则,优先匹配 /demo/,其次 /

一般来说前后端分离部署应该是部署在不同的服务器上的,这里放在一台服务器上只是为了演示方便。

前端部署

然后将项目的静态页面放到/data/www下即可

后端部署

SpringBoot项目移除静态资源,单独部署在tomcat上,并使用ngixn实现反向代理

实时数据采集

主要技术:Kafka

image-20211209020033601

实时数据流计算

主要技术:Kafka-clients,storm-hbase|storm-redis|storm-mysql

以热力图项目为例, 拓扑代码如下

package com.niit.project;

import org.apache.kafka.clients.consumer.ConsumerConfig;
import org.apache.storm.Config;
import org.apache.storm.LocalCluster;
import org.apache.storm.StormSubmitter;
import org.apache.storm.hbase.bolt.HBaseBolt;
import org.apache.storm.hbase.bolt.mapper.SimpleHBaseMapper;
import org.apache.storm.kafka.spout.ByTopicRecordTranslator;
import org.apache.storm.kafka.spout.KafkaSpout;
import org.apache.storm.kafka.spout.KafkaSpoutConfig;
import org.apache.storm.task.OutputCollector;
import org.apache.storm.task.TopologyContext;
import org.apache.storm.topology.OutputFieldsDeclarer;
import org.apache.storm.topology.TopologyBuilder;
import org.apache.storm.topology.base.BaseRichBolt;
import org.apache.storm.tuple.Fields;
import org.apache.storm.tuple.Tuple;
import org.apache.storm.tuple.Values;

import java.util.HashMap;
import java.util.Map;

public class KafkaStormProjectApp {

    public static String topologyName = "project-topo";
    public static final String KAFKA_BROKER = "hadoop000:9092";
    public static final String INPUT_TOPIC = "storm-project";

    private static class SplitBolt extends BaseRichBolt {
        private OutputCollector outputCollector;

        @Override
        public void prepare(Map<String, Object> topoConf, TopologyContext context, OutputCollector collector) {
            this.outputCollector = collector;
        }

        @Override
        public void execute(Tuple input) {
            String id = input.getStringByField("line");
            String[] split = id.split(",");

            try {
                double lng = Double.parseDouble(split[0]);
                double lat = Double.parseDouble(split[1]);
                this.outputCollector.emit(new Values(id, lng, lat));
            } catch (NumberFormatException e) {
                System.err.println(e.getMessage());
            }
        }

        @Override
        public void declareOutputFields(OutputFieldsDeclarer declarer) {
            declarer.declare(new Fields("id", "lng", "lat"));
        }
    }

    /**
     * 计数利用HBase的CountColumn特性
     */
    private static class CountBolt extends BaseRichBolt {

        private OutputCollector collector;
        private final HashMap<String, Long> counts = null;

        @Override
        public void prepare(Map<String, Object> topoConf, TopologyContext context, OutputCollector collector) {
            this.collector = collector;
        }

        @Override
        public void execute(Tuple input) {
            String id = input.getString(0);
            double lng = input.getDouble(1);
            double lat = input.getDouble(2);

            this.collector.emit(new Values(id, lng, lat, 1L));
        }

        @Override
        public void declareOutputFields(OutputFieldsDeclarer declarer) {
            declarer.declare(new Fields("id", "lng", "lat", "count"));
        }
    }

    public static void main(String[] args) throws Exception {

        final TopologyBuilder builder = new TopologyBuilder();

        // storm conf
        Config conf = new Config();
        conf.setNumAckers(0);
        conf.setDebug(true);

        // kafka bolt
        ByTopicRecordTranslator<String, String> translator =
                new ByTopicRecordTranslator<>((r) -> new Values(r.value()), new Fields("line"));
        translator.forTopic(INPUT_TOPIC, (r) -> new Values(r.value()), new Fields("line"));

        KafkaSpoutConfig<String, String> kafkaSpoutConfig = KafkaSpoutConfig
                // bootstrapServers 以及topic
                .builder(KAFKA_BROKER, INPUT_TOPIC)
                // 设置group.id
                .setProp(ConsumerConfig.GROUP_ID_CONFIG, "location")
                // ensure at-least-once processing
                .setProp(ConsumerConfig.AUTO_OFFSET_RESET_CONFIG, "earliest")
                // 设置开始消费的起始位置
                // 设置提交消费边界的时长间隔
                .setOffsetCommitPeriodMs(10_000)
                //Translator
                .setRecordTranslator(translator)
                .build();

        KafkaSpout<String, String> kafkaSpout = new KafkaSpout<>(kafkaSpoutConfig);

        // hbase bolt
        Map<String, Object> hbConf = new HashMap<>();
        hbConf.put("hbase.rootdir", "hdfs://hadoop000:9000/hbase");
        hbConf.put("hbase.zookeeper.quorum", "hadoop000:2181");
        conf.put("hbase.conf", hbConf);
        conf.setNumWorkers(2);  // 设置为1个topology创建2个worker进程

        SimpleHBaseMapper mapper = new SimpleHBaseMapper()
                .withRowKeyField("id")
                .withColumnFields(new Fields("lng","lat"))
                .withCounterFields(new Fields("count"))
                .withColumnFamily("cf");

        HBaseBolt hbaseBolt = new HBaseBolt("project", mapper).withConfigKey("hbase.conf");

        // build topology
        builder.setSpout("kafka_spout", kafkaSpout);
        builder.setBolt("split-bolt", new SplitBolt(), 2)
                .setNumTasks(4)
                .shuffleGrouping("kafka_spout");
        builder.setBolt("count-bolt", new CountBolt())
                .fieldsGrouping("split-bolt", new Fields("id"));
        builder.setBolt("hbase-bolt", hbaseBolt).globalGrouping("count-bolt");

        if (args != null && args.length > 0) {
            topologyName = args[0];
            StormSubmitter.submitTopology(topologyName, conf, builder.createTopology());
        } else {
            LocalCluster localCluster = new LocalCluster();
            localCluster.submitTopology(topologyName, conf, builder.createTopology());
        }
    }

}

其中聚合操作是利用了HBase的CounterColumn特性

这里没有使用时间窗口Bolt来体现实时,而是利用了HBase表的TTL属性,TTL可以在创建表的时候指定,TTL设置为60即表示表中记录的存活时间为1分钟:

create "project",{NAME => 'cf', MIN_VERSIONS => '0',TTL => '60'}

也可以disable表之后使用alter语句对已有表进行修改。

由于插入数据的时候经纬度是采用了Double类型,而计数列采用了Long类型,但是HBase只有使用字节数组这样一种方式进行存储,所以需要程序员自己控制数据类型的转换。在查看表中记录的使用需要这样进行数据类型的转换:

scan 'project', {COLUMNS => ['cf:lng:toDouble','cf:lat:toDouble','cf:count:toLong']}

将上传到Storm集群

[kafka-storm-project]$ storm jar project-topology.jar com.niit.demo.KafkaStormProjectTopology project-topo

数据可视化

主要技术:百度echarts图表,异步请求图表渲染(Ajax & JSON)

这个热力图项目的前端比较简单,只有一个index.html文件

<!DOCTYPE html>
<html lang="en">
<head>
    <meta charset="UTF-8">
    <title>百度地图</title>
    <style>
        #main {
            position: absolute;
            top: 0;
            left: 0;
            right: 0;
            bottom: 0;
            width: 100%;
            height: 100%;
        }
    </style>
</head>
<body>

<!-- 为ECharts准备一个具备大小(宽高)的Dom -->
<div id="main"></div>

<!-- jquery 1.11.3 -->
<script type="text/javascript" src="https://cdn.jsdelivr.net/npm/jquery@1.11.3/dist/jquery.min.js"></script>
<!-- bootstrap 3.3.7-->
<script type="text/javascript" src="https://cdn.jsdelivr.net/npm/bootstrap@3.3.7/dist/js/bootstrap.min.js"></script>
<!-- echarts 插件  -->
<script type="text/javascript" src="https://cdn.jsdelivr.net/npm/echarts/dist/echarts.min.js"></script>
<!-- echarts 百度地图插件 -->
<script type="text/javascript" src="https://cdn.jsdelivr.net/npm/echarts/dist/extension/bmap.js"></script>
<script type="text/javascript"
        src="https://api.map.baidu.com/api?v=2.0&ak=KOmVjPVUAey1G2E8zNhPiuQ6QiEmAwZu&__ec_v__=20190126"></script>
<script>

    var points = [];
    var myChart = echarts.init(document.getElementById('main'));

    myChart.setOption(option = {
        animation: false,
        bmap: {
            center: [110.337731, 20.064295],  // 海南大学
            zoom: 18, // 地图缩放等级
            roam: true
        },
        visualMap: {
            show: false,
            top: 'top',
            min: 0,
            max: 5,
            seriesIndex: 0,
            calculable: true,
            inRange: {
                color: ['blue', 'blue', 'green', 'yellow', 'red']
            }
        },
        series: [{
            type: 'heatmap',
            coordinateSystem: 'bmap',
            data: points,
            pointSize: 5,
            blurSize: 6
        }]
    });
    // 添加百度地图插件
    var bmap = myChart.getModel().getComponent('bmap').getBMap();
    bmap.addControl(new BMap.MapTypeControl());
    // 禁止拖拽和缩放
    bmap.disableDragging();
    bmap.disableScrollWheelZoom();

    bmap.addEventListener("click", function (e) {
        $.post('log', {
            lng: e.point.lng,
            lat: e.point.lat
        });
    });

    // 10秒更新一次地图
    window.setInterval(function () {
        $.get(
            "points",
            function (data) {
                for (var i = 0; i < data.length; i++) {
                        point = [];
                    for (var j = 0; j < data[i].count; j++) {
                        points.push([data[i].lng, data[i].lat, 1]);
                    }
                }
                option.series.data = points;
                myChart.setOption(option);
            }
        )
    }, 10000);

</script>
</body>
</html>

其中请求demo/points可以到达后端的SpringBoot项目,并且返回HBase的最新数据,对应的接口如下:

src\main\java\com\niit\demo\service\LocationService.java

package com.niit.demo.service;

import com.niit.demo.entity.Point;
import com.niit.demo.utils.HBaseHelper;
import org.apache.hadoop.hbase.Cell;
import org.apache.hadoop.hbase.CellUtil;
import org.apache.hadoop.hbase.client.ResultScanner;
import org.apache.hadoop.hbase.util.Bytes;
import org.springframework.stereotype.Component;

import java.util.ArrayList;
import java.util.List;

@Component
public class LocationService {

    public List<Point> getLocationList() {

        List<Point> list = new ArrayList<>();
        ResultScanner scanner = HBaseHelper.getScanner("project");

        if (scanner != null) {
            scanner.forEach(rowResult -> {

                Point point = new Point();
                for (Cell cell : rowResult.listCells()) {

                    String qualifier = Bytes.toString(CellUtil.cloneQualifier(cell));
                    switch (qualifier) {
                        case "lng":
                            point.setLongitude(Bytes.toDouble(CellUtil.cloneValue(cell)));
                            break;
                        case "lat":
                            point.setLatitude(Bytes.toDouble(CellUtil.cloneValue(cell)));
                            break;
                        case "count":
                            point.setCount(Bytes.toLong(CellUtil.cloneValue(cell)));
                            break;
                        default:
                            break;
                    }
                }
                list.add(point);
            });
        }
        return list;
    }

}

src\main\java\com\niit\demo\IndexController.java

package com.niit.demo;

import com.niit.demo.entity.Point;
import com.niit.demo.service.LocationService;
import org.slf4j.Logger;
import org.slf4j.LoggerFactory;
import org.springframework.beans.factory.annotation.Autowired;
import org.springframework.web.bind.annotation.GetMapping;
import org.springframework.web.bind.annotation.PostMapping;
import org.springframework.web.bind.annotation.RequestMapping;
import org.springframework.web.bind.annotation.RestController;

import java.util.List;

@RestController
@RequestMapping("/")
public class IndexController {
    @Autowired
    public LocationService service;
    Logger logger = LoggerFactory.getLogger(IndexController.class);

    @GetMapping("/points")
    public List<Point> getPoints() {
        return service.getLocationList();
    }

    @PostMapping("/log")
    public void log(double lng, double lat) {
        logger.info("{},{}", lng, lat);
    }
}

常见问题:

Tomcat项目乱码

Tomcat中部署的JSP页面出现中文乱码问题:

  1. 修改tomcat/conf目录下的主配置文件server.xml,添加URIEncoding=“UTF-8”配置项,配置位置如下:

    <Connector port="8080" protocol="HTTP/1.1"
           connectionTimeout="20000"
           redirectPort="8443" URIEncoding="UTF-8" />
    
    <Connector protocol="AJP/1.3"
           address="::1"
           port="8009"
           redirectPort="8443" URIEncoding="UTF-8" />
  2. 修改tomcat/conf/web.xml,在 <servlet>节点中添加如下内容:

    <init-param>
           <param-name>fileEncoding</param-name>
           <param-value>UTF-8</param-value>
    </init-param>

3.重启服务

Tomcat设为开机自启

  1. 进入init.d目录

进入到/etc/init.d目录下,命令是:

cd /etc/init.d
  1. 新建一个名为tomcat的文件
vim tomcat
  1. 为/etc/init.d/tomcat文件添加可执行权限
chmod 755 tomcat
  1. 编辑tomcat文件,添加以下内容
vi tomcat

添加内容为: 注意CATALINA_HOME需要修改正确

#!/bin/bash
# processname: tomcat9
# chkconfig: 2345 86 16
# description: Tomcat9 start|restart|stop.

if [ -f /etc/init.d/functions ]; then
. /etc/init.d/functions
elif [ -f /etc/rc.d/init.d/functions ]; then
. /etc/rc.d/init.d/functions
else
echo -e "/atomcat: unable to locate functions lib. Cannot continue."
exit -1
fi

RETVAL=$?
CATALINA_HOME=/opt/pkg/tomcat9

case "$1" in
start)
if [ -f $CATALINA_HOME/bin/startup.sh ];
then
echo $"Starting Tomcat"
$CATALINA_HOME/bin/startup.sh
fi
;;
stop)
if [ -f $CATALINA_HOME/bin/shutdown.sh ];
then
echo $"Stopping Tomcat"
$CATALINA_HOME/bin/shutdown.sh
fi
;;
*)
echo $"Usage: $0 {start|stop}"
exit 1
;;
esac

exit $RETVAL
  1. 把tomcat这个脚本添加到开机启动项里面
chkconfig --add tomcat
chkconfig tomcat on
  1. 如果想看看是否添加成功
chkconfig --list

netconsole      0:关 1:关 2:关 3:关 4:关 5:关 6:关
network         0:关 1:关 2:开 3:开 4:开 5:开 6:关
tomcat          0:关 1:关 2:开 3:开 4:开 5:开 6:关
  1. 在tomcat/bin下创建一个setenv.sh文件,加入以下环境变量, 并赋予执行权限
[root@hadoop000 tomcat9]# vi bin/setenv.sh

export JAVA_HOME=/opt/pkg/jdk1.8.0_261
export JRE_HOME=/opt/pkg/jdk1.8.0_261/jre
export CATALINA_HOME=/opt/pkg/tomcat9
export CATALINA_BASE=/opt/pkg/tomcat9

[root@hadoop000 tomcat9]# chmod a+x bin/setenv.sh
  1. 查看看是否开机启动

使用命令重启机器,命令是:

reboot
  1. 查看网络状态,执行命令,查看8080端口是否启动
netstat   -lntup
  1. 查看tomcat进程
 ps -ef |grep tomcat
  1. 如果不需要开机启动,从启动脚本删除即可
chkconfig --del tomcat

Views: 419

图解 Redis 数据结构

Redis 为什么那么快?

除了它是内存数据库,使得所有的操作都在内存上进行之外,还有一个重要因素,它实现的数据结构,使得我们对数据进行增删查改操作时,Redis 能高效的处理。

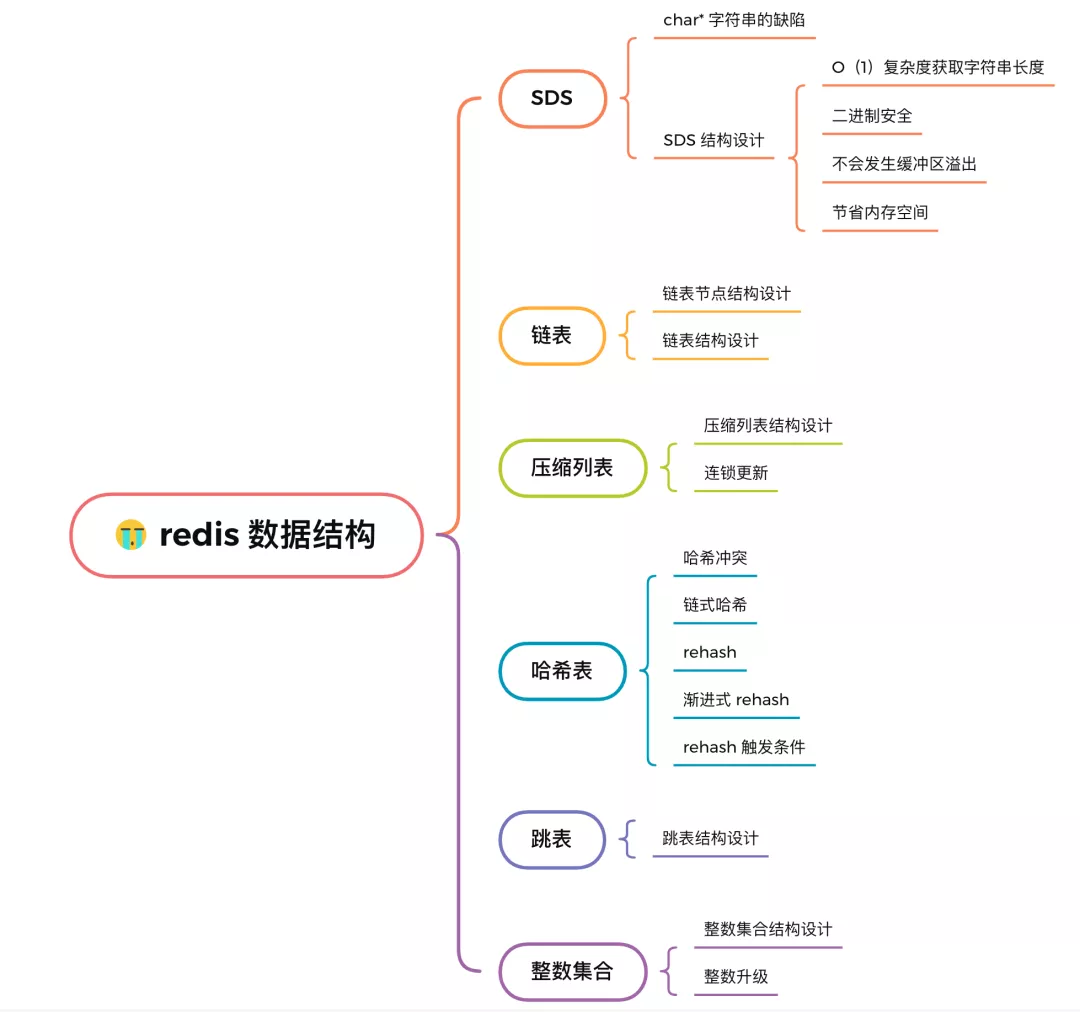
因此,这次我们就来好好聊一下 Redis 数据结构,这个在面试中太常问了。

注意,Redis 数据结构并不是指 string(字符串)、List(列表)、Hash(哈希)、Set(集合)和 Zset(有序集合),因为这些是 Redis 键值对存储中值的数据类型,下面要将的是这些数据类型对应的底层实现的方式。

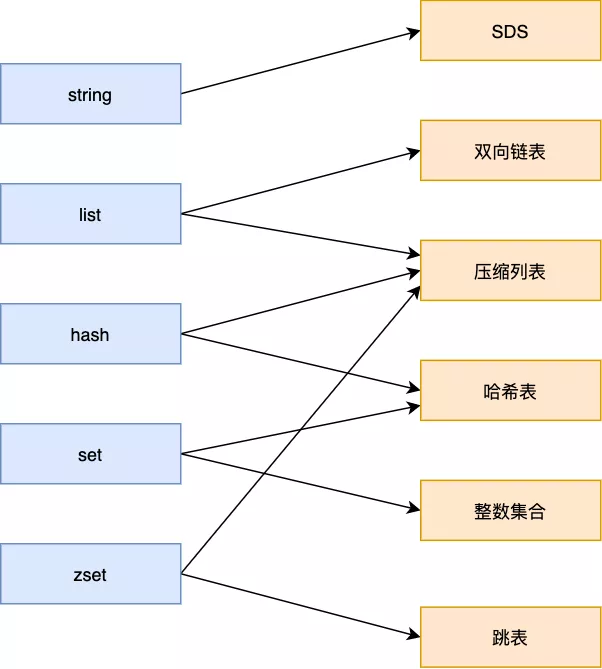
Redis 底层的数据结构一共有 6 种,如下图右边部分,它和数据类型对应关系也如下图:

图片

可以看到,有些数据类型可以由两种 数据结构实现,比如:

  • List 数据类型底层数据结构由「双向链表」或「压缩表列表」实现;
  • Hash 数据类型底层数据结构由「压缩列表」或「哈希表」实现;
  • Set 数据类型底层数据结构由「哈希表」或「整数集合」实现;
  • Zset 数据类型底层数据结构由「压缩列表」或「跳表」实现;

好了,不多 BB 了,直接发车!

图片

1. SDS

字符串在 Redis 中是很常用的,键值对中的键是字符串,值有时也是字符串。

Redis 是用 C 语言实现的,但是它没有直接使用 C 语言的 char* 字符数组来实现字符串,而是自己封装了一个名为简单动态字符串(simple dynamic string,SDS) 的数据结构来表示字符串,也就是 Redis 的 String 数据类型的底层数据结构是 SDS。

既然 Redis 设计了 SDS 结构来表示字符串,肯定是 C 语言的 char* 字符数组存在一些缺陷。

要了解这一点,得先来看看 char* 字符数组的结构。

C 语言字符串的缺陷

C 语言的字符串其实就是一个字符数组,即数组中每个元素是字符串中的一个字符。

比如,下图就是字符串“xiaolin”的 char* 字符数组的结构:

图片

没学过 C 语言的同学,可能会好奇为什么最后一个字符是“\0”?

在 C 语言里,对字符串操作时,char * 指针只是指向字符数组的起始位置,而字符数组的结尾位置就用“\0”表示,意思是指字符串的结束

因此,C 语言标准库中字符串的操作函数,就通过判断字符是不是“\0”,如果不是说明字符串还没结束,可以继续操作,如果是则说明字符串结束了,停止操作。

举个例子,C 语言获取字符串长度的函数 strlen,就是通过字符数组中的每一个字符,并进行计数,等遇到字符为“\0”后,就会停止遍历,然后返回已经统计到的字符个数,即为字符串长度。下图显示了 strlen 函数的执行流程:

图片

很明显,C 语言获取字符串长度操作的时间复杂度是 O(N)(*这是一个可以改进的地方*

C 语言的字符串用 “\0” 字符作为结尾标记有个缺陷。假设有个字符串中有个 “\0” 字符,这时在操作这个字符串时就会提早结束,比如 “xiao\0lin” 字符串,计算字符串长度的时候则会是 4,如下图:

图片

还有,除了字符串中不能 “\0” 字符外,用 char* 字符串中的字符必须符合某种编码(比如ASCII)。

这些限制使得 C 语言的字符串只能保存文本数据,不能保存像图片、音频、视频文化这样的二进制数据(这也是一个可以改进的地方)

C 语言标准库中字符串的操作函数是很不安全的,对程序员很不友好,稍微一不注意,就会导致缓冲区溢出。

举个例子,strcat 函数是可以将两个字符串拼接在一起。

c //将 src 字符串拼接到 dest 字符串后面 char *strcat(char *dest, const char* src);

C 语言的字符串是不会记录自身的缓冲区大小的,所以 strcat 函数假定程序员在执行这个函数时,已经为 dest 分配了足够多的内存,可以容纳 src 字符串中的所有内容,而一旦这个假定不成立,就会发生缓冲区溢出将可能会造成程序运行终止,(这是一个可以改进的地方)

而且,strcat 函数和 strlen 函数类似,时间复杂度也很高,也都需要先通过遍历字符串才能得到目标字符串的末尾。然后对于 strcat 函数来说,还要再遍历源字符串才能完成追加,对字符串的操作效率不高。

好了, 通过以上的分析,我们可以得知 C 语言的字符串 不足之处以及可以改进的地方:

  • 获取字符串长度的时间复杂度为 O(N);
  • 字符串的结尾是以 “\0” 字符标识,而且字符必须符合某种编码(比如ASCII),只能保存文本数据,不能保存二进制数据;
  • 字符串操作函数不高效且不安全,比如可能会发生缓冲区溢出,从而造成程序运行终止;

Redis 实现的 SDS 的结构就把上面这些问题解决了,接下来我们一起看看 Redis 是如何解决的。

SDS 结构设计

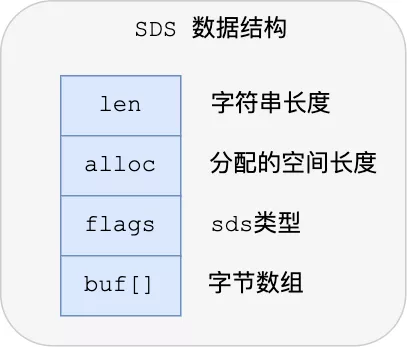
下图就是 Redis 5.0 的 SDS 的数据结构:

图片

结构中的每个成员变量分别介绍下:

  • len,SDS 所保存的字符串长度。这样获取字符串长度的时候,只需要返回这个变量值就行,时间复杂度只需要 O(1)。
  • alloc,分配给字符数组的空间长度。这样在修改字符串的时候,可以通过 alloc - len 计算 出剩余的空间大小,然后用来判断空间是否满足修改需求,如果不满足的话,就会自动将 SDS 的空间扩展至执行修改所需的大小,然后才执行实际的修改操作,所以使用 SDS 既不需要手动修改 SDS 的空间大小,也不会出现前面所说的缓冲区益处的问题。
  • flags,SDS 类型,用来表示不同类型的 SDS。一共设计了 5 种类型,分别是 sdshdr5、sdshdr8、sdshdr16、sdshdr32 和 sdshdr64,后面再说明区别之处。
  • buf[],字节数组,用来保存实际数据。不需要用 “\0” 字符来标识字符串结尾了,而是直接将其作为二进制数据处理,可以用来保存图片等二进制数据。它即可以保存文本数据,也可以保存二进制数据,所以叫字节数组会更好点。

总的来说,Redis 的 SDS 结构在原本字符数组之上,增加了三个元数据:len、alloc、flags,用来解决 C 语言字符串的缺陷。

支持O(1)复杂度获取字符串长度

C 语言的字符串长度获取 strlen 函数,需要通过遍历的方式来统计字符串长度,时间复杂度是 O(N)。

而 Redis 的 SDS 结构因为加入了 len 成员变量,那么获取字符串长度的时候,直接返回这个变量的值就行,所以复杂度只有 O(1)。

支持二进制安全读写

因为 SDS 不需要用 “\0” 字符来标识字符串结尾了,而且 SDS 的 API 都是以处理二进制的方式来处理 SDS 存放在 buf[] 里的数据,程序不会对其中的数据做任何限制,数据写入的时候时什么样的,它被读取时就是什么样的。

通过使用二进制安全的 SDS,而不是 C 字符串,使得 Redis 不仅 可以保存文本数据,也可以保存任意格式的二进制数据。

不会发生缓冲区溢出

C 语言的字符串标准库提供的字符串操作函数,大多数(比如 strcat 追加字符串函数)都是不安全的,因为这些函数把缓冲区大小是否满足操作的工作交由开发者来保证,程序内部并不会判断缓冲区大小是否足够用,当发生了缓冲区溢出就有可能造成程序异常结束。

所以,Redis 的 SDS 结构里引入了 alloc 和 leb 成员变量,这样 SDS API 通过 alloc - len 计算,可以算出剩余可用的空间大小,这样在对字符串做修改操作的时候,就可以由程序内部判断缓冲区大小是否足够用。

而且,当判断出缓冲区大小不够用时,Redis 会自动将扩大 SDS 的空间大小,以满足修改所需的大小。

在扩展 SDS 空间之前,SDS API 会优先检查未使用空间是否足够,如果不够的话,API 不仅会为 SDS 分配修改所必须要的空间,还会给 SDS 分配额外的「未使用空间」。

这样的好处是,下次在操作 SDS 时,如果 SDS 空间够的话,API 就会直接使用「未使用空间」,而无须执行内存分配,有效的减少内存分配次数。

所以,使用 SDS 即不需要手动修改 SDS 的空间大小,也不会出现缓冲区溢出的问题。

节省内存空间

SDS 结构中有个 flags 成员变量,表示的是 SDS 类型。

Redos 一共设计了 5 种类型,分别是 sdshdr5、sdshdr8、sdshdr16、sdshdr32 和 sdshdr64。

这 5 种类型的主要区别就在于,它们数据结构中的 len 和 alloc 成员变量的数据类型不同

比如 sdshdr16 和 sdshdr32 这两个类型,它们的定义分别如下:

struct __attribute__ ((__packed__)) sdshdr16 {
    uint16_t len;
    uint16_t alloc; 
    unsigned char flags; 
    char buf[];
};

struct __attribute__ ((__packed__)) sdshdr32 {
    uint32_t len;
    uint32_t alloc; 
    unsigned char flags;
    char buf[];
};

可以看到:

  • sdshdr16 类型的 len 和 alloc 的数据类型都是 uint16_t,表示字符数组长度和分配空间大小不能超过 2 的 16 次方。
  • sdshdr32 则都是 uint32_t,表示表示字符数组长度和分配空间大小不能超过 2 的 32 次方。

之所以 SDS 设计不同类型的结构体,是为了能灵活保存不同大小的字符串,从而有效节省内存空间。比如,在保存小字符串时,结构头占用空间也比较少。

除了设计不同类型的结构体,Redis 在编程上还使用了专门的编译优化来节省内存空间,即在 struct 声明了 __attribute__ ((packed)) ,它的作用是:告诉编译器取消结构在编译过程中的优化对齐,按照实际占用字节数进行对齐

比如,sdshdr16 类型的 SDS,默认情况下,编译器会按照 16 字节对其的方式给变量分配内存,这意味着,即使一个变量的大小不到 16 个字节,编译器也会给它分配 16 个字节。

举个例子,假设下面这个结构体,它有两个成员变量,类型分别是 char 和 int,如下所示:

#include <stdio.h>

 struct test1 {
    char a;
    int b;
 } test1;

int main() {
     printf("%lu\n", sizeof(test1));
     return 0;
}

大家猜猜这个结构体大小是多少?我先直接说答案,这个结构体大小计算出来是 8。

图片

这是因为默认情况下,编译器是使用字节对其的方式分配内存,虽然 char 类型只占一个字节,但是由于成员变量里有 int 类型,它占用了 4 个字节,所以在成员变量为 char 类型分配内存时,会分配 4 个字节,其中这多余的 3 个字节是为了字节对其而分配的,相当于有 3 个字节被浪费掉了。

如果不想编译器使用字节对其的方式进行分配内存,可以采用了 __attribute__ ((packed)) 属性定义结构体,这样一来,结构体实际占用多少内存空间,编译器就分配多少空间。

比如,我用 __attribute__ ((packed)) 属性定义下面的结构体 ,同样包含 char 和 int 两个类型的成员变量,代码如下所示:

#include <stdio.h>

struct __attribute__((packed)) test2  {
    char a;
    int b;
 } test2;

int main() {
     printf("%lu\n", sizeof(test2));
     return 0;
}

这时打印的结果是 5(1 个字节 char + 4 字节 int)。

图片

可以看得出,这是按照实际占用字节数进行分配内存的,这样可以节省内存空间。


2. 链表

除了数组之外,相信大家最熟悉的数据结构就是链表了。

Redis 的 list 数据类型的底层实现之一就是链表。C 语言本身也是没有链表这个数据结构的,所以 Redis 自己设计了一个链表数据结构。

链表节点结构设计

先来看看链表节点结构的样子:

typedef struct listNode {
    //前置节点
    struct listNode *prev;
    //后置节点
    struct listNode *next;
    //节点的值
    void *value;
} listNode;

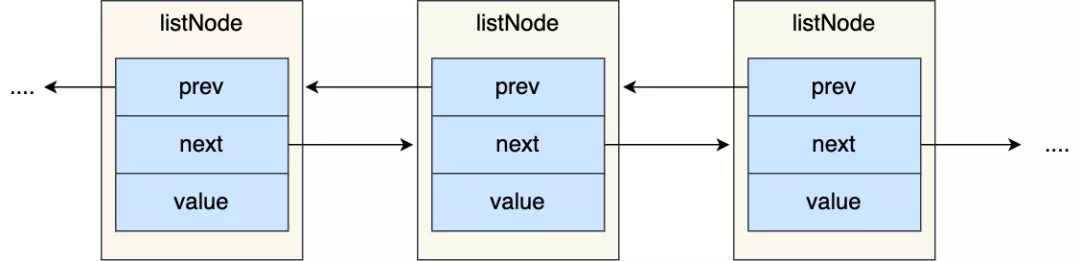
有前置节点和后置节点,可以看的出,这个是一个双向链表。

图片

链表结构设计

不过,Redis 在 listNode 结构体基础上又封装了 list 这个数据结构,这样操作起来会更方便,链表结构如下:

typedef struct list {
    //链表头节点
    listNode *head;
    //链表尾节点
    listNode *tail;
    //节点值复制函数
    void *(*dup)(void *ptr);
    //节点值释放函数
    void (*free)(void *ptr);
    //节点值比较函数
    int (*match)(void *ptr, void *key);
    //链表节点数量
    unsigned long len;
} list;

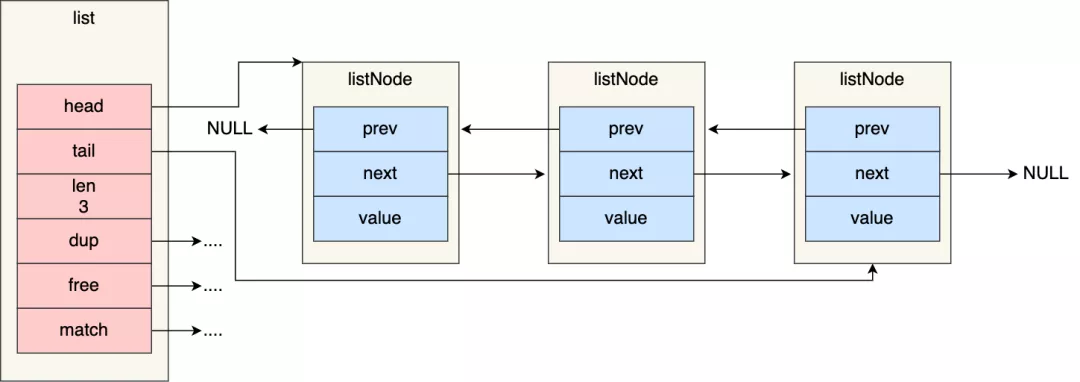
list 结构为链表提供了链表头指针 head、链表尾节点 tail、链表节点数量 len、以及可以自定义实现的 dup、free、match 函数。

举个例子,下面是由 list 结构和 3 个 listNode 结构组成的链表。

图片

Redis 的链表实现优点如下:

  • listNode 链表节点带有 prev 和 next 指针,获取某个节点的前置节点或后置节点的时间复杂度只需O(1),而且这两个指针都可以指向 NULL,所以链表是无环链表
  • list 结构因为提供了表头指针 head 和表尾节点 tail,所以获取链表的表头节点和表尾节点的时间复杂度只需O(1)
  • list 结构因为提供了链表节点数量 len,所以获取链表中的节点数量的时间复杂度只需O(1)
  • listNode 链表节使用 void* 指针保存节点值,并且可以通过 list 结构的 dup、free、match 函数指针为节点设置该节点类型特定的函数,因此链表节点可以保存各种不同类型的值;

链表的缺陷也是有的,链表每个节点之间的内存都是不连续的,意味着无法很好利用 CPU 缓存。

能很好利用 CPU 缓存的数据结构就是数组,因为数组的内存是连续的,这样就可以充分利用 CPU 缓存来加速访问。

因此,Redis 的 list 数据类型在数据量比较少的情况下,会采用「压缩列表」作为底层数据结构的实现,压缩列表就是由数组实现的,下面我们会细说压缩列表。


3. 压缩列表

压缩列表是 Redis 数据类型为 list 和 hash 的底层实现之一。

  • 当一个列表键(list)只包含少量的列表项,并且每个列表项都是小整数值,或者长度比较短的字符串,那么 Redis 就会使用压缩列表作为列表键(list)的底层实现。
  • 当一个哈希键(hash)只包含少量键值对,并且每个键值对的键和值都是小整数值,或者长度比较短的字符串,那么 Redis 就会使用压缩列表作为哈希键(hash)的底层实现。

压缩列表结构设计

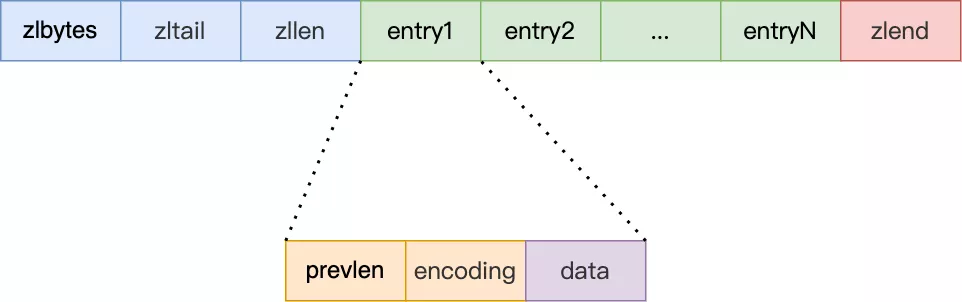
压缩列表是 Redis 为了节约内存而开发的,它是由连续内存块组成的顺序型数据结构,有点类似于数组。

图片

压缩列表在表头有三个字段:

  • zlbytes,记录整个压缩列表占用对内存字节数;
  • zltail,记录压缩列表「尾部」节点距离起始地址由多少字节,也就是列表尾的偏移量;
  • zllen,记录压缩列表包含的节点数量;
  • zlend,标记压缩列表的结束点,特殊值 OxFF(十进制255)。

在压缩列表中,如果我们要查找定位第一个元素和最后一个元素,可以通过表头三个字段的长度直接定位,复杂度是 O(1)。而查找其他元素时,就没有这么高效了,只能逐个查找,此时的复杂度就是 O(N) 了。

另外,压缩列表节点(entry)的构成如下:

图片

压缩列表节点包含三部分内容:

  • prevlen,记录了前一个节点的长度;
  • encoding,记录了当前节点实际数据的类型以及长度;
  • data,记录了当前节点的实际数据;

当我们往压缩列表中插入数据时,压缩列表 就会根据数据是字符串还是整数,以及它们的大小会在 prevlen 和 encoding 这两个元素里保存不同的信息,这种根据数据大小进行对应信息保存的设计思想,正是 Redis 为了节省内存而采用的。

连锁更新

压缩列表除了查找复杂度高的问题,压缩列表在插入元素时,如果内存空间不够了,压缩列表还需要重新分配一块连续的内存空间,而这可能会引发连锁更新的问题。

压缩列表里的每个节点中的 prevlen 属性都记录了「前一个节点的长度」,而且 prevlen 属性的空间大小跟前一个节点长度值有关,比如:

  • 如果前一个节点的长度小于 254 字节,那么 prevlen 属性需要用 1 字节的空间来保存这个长度值;
  • 如果前一个节点的长度大于等于 254 字节,那么 prevlen 属性需要用 5 字节的空间来保存这个长度值;

现在假设一个压缩列表中有多个连续的、长度在 250~253 之间的节点,如下图:

图片

因为这些节点长度值小于 254 字节,所以 prevlen 属性需要用 1 字节的空间来保存这个长度值。

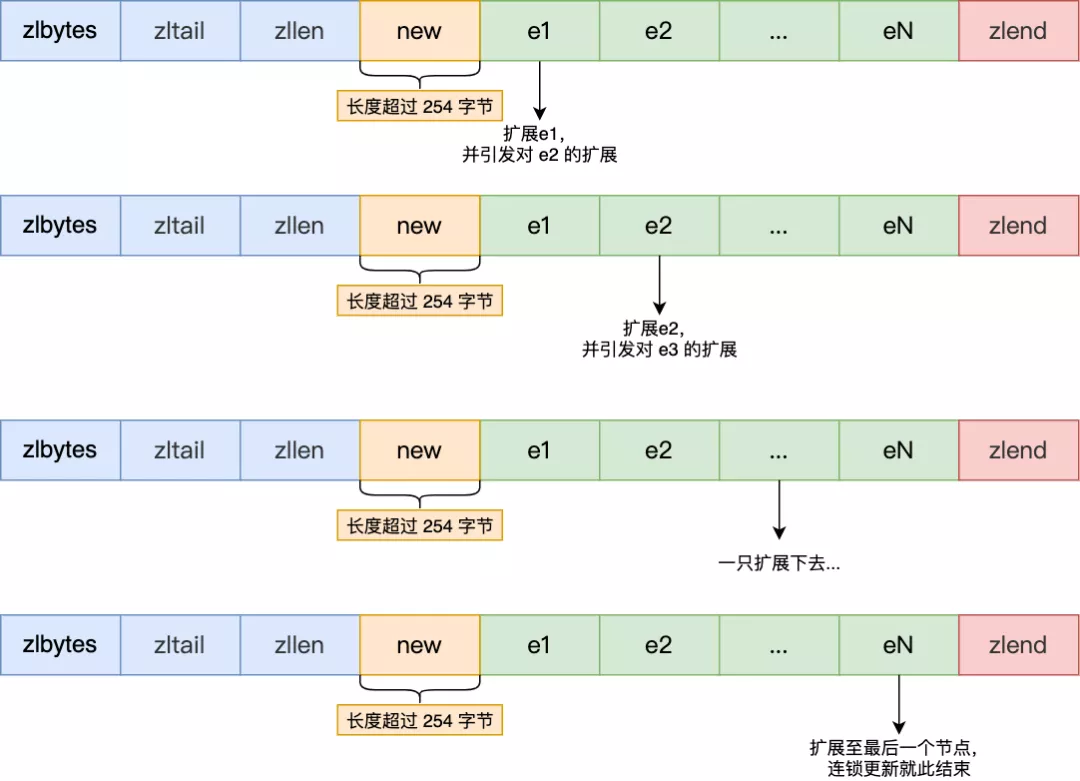
这时,如果将一个长度大于等于 254 字节的新节点加入到压缩列表的表头节点,即新节点将成为 e1 的前置节点,如下图:

图片

因为 e1 节点的 prevlen 属性只有 1 个字节大小,无法保存新节点的长度,此时就需要对压缩列表的空间重分配操作,并将 e1 节点的 prevlen 属性从原来的 1 字节大小扩展为 5 字节大小。

多米诺牌的效应就此开始。

图片

e1 原本的长度在 250~253 之间,因为刚才的扩展空间,此时 e1 的长度就大于等于 254 了,因此原本 e2 保存 e1 的 prevlen 属性也必须从 1 字节扩展至 5 字节大小。

正如扩展 e1 引发了对 e2 扩展一样,扩展 e2 也会引发对 e3 的扩展,而扩展 e3 又会引发对 e4 的扩展…. 一直持续到结尾。

这种在特殊情况下产生的连续多次空间扩展操作就叫做「连锁更新」,就像多米诺牌的效应一样,第一张牌倒下了,推动了第二张牌倒下;第二张牌倒下,又推动了第三张牌倒下….

连锁更新一旦发生,就会导致压缩列表 占用的内存空间要多次重新分配,这就会直接影响到压缩列表的访问性能。

所以说,虽然压缩列表紧凑型的内存布局能节省内存开销,但是如果保存的元素数量增加了,或是元素变大了,压缩列表就会面临「连锁更新」的风险。

因此,压缩列表只会用于保存的节点数量不多的场景,只要节点数量足够小,即使发生连锁更新,也是能接受的。

4. 哈希表

哈希表是一种保存键值对(key-value)的数据结构。

哈希表中的每一个 key 都是独一无二的,程序可以根据 key 查找到与之关联的 value,或者通过 key 来更新 value,又或者根据 key 来删除整个 key-value等等。

在讲压缩列表的时候,提到过 Redis 的 hash 数据类型的底层实现之一是压缩列表。hash 数据类型的另外一个底层实现就是哈希表。

那 hash 数据类型什么时候会选用哈希表作为底层实现呢?

当一个哈希键包含的 key-value 比较多,或者 key-value 中元素都是比较长多字符串时,Redis 就会使用哈希表作为哈希键的底层实现。

Hash 表优点在于,它能以 O(1) 的复杂度快速查询数据。主要是通过 Hash 函数的计算,就能定位数据在表中的位置,紧接着可以对数据进行操作,这就使得数据操作非常快。

但是存在的风险也是有,在哈希表大小固定的情况下,随着数据不断增多,那么哈希冲突的可能性也会越高。

解决哈希冲突的方式,有很多种。Redis 采用了链式哈希,在不扩容哈希表的前提下,将具有相同哈希值的数据链接起来,以便这些数据在表中仍然可以被查询到。

接下来,详细说说哈希冲突以及链式哈希。

哈希冲突

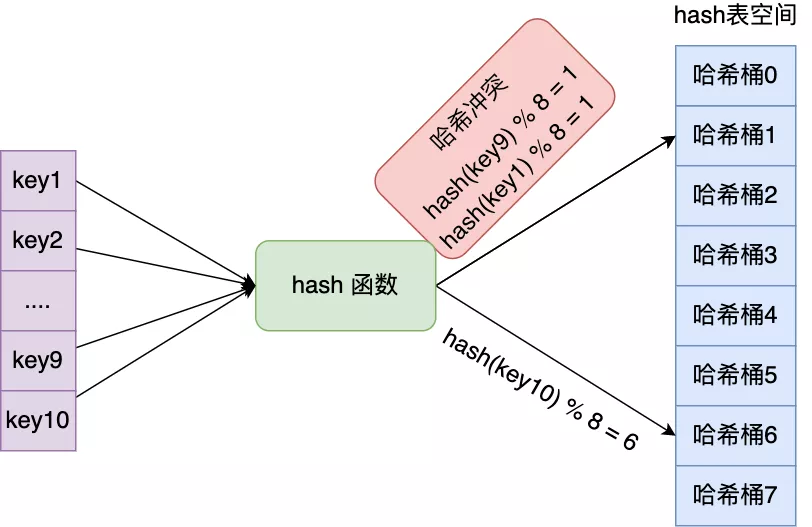
哈希表实际上是一个数组,数组里多每一个元素就是一个哈希桶。

当一个键值对的键经过 Hash 函数计算后得到哈希值,再将(哈希值 % 哈希表大小)取模计算,得到的结果值就是该 key-value 对应的数组元素位置,也就是第几个哈希桶。

举个例子,有一个可以存放 8 个哈希桶的哈希表。key1 经过哈希函数计算后,再将「哈希值 % 8 」进行取模计算,结果值为 1,那么就对应哈希桶 1,类似的,key9 和 key10 分别对应哈希桶 1 和桶 6。

图片

此时,key1 和 key9 对应到了相同的哈希桶中,这就发生了哈希冲突。

因此,当有两个以上数量的 kay 被分配到了哈希表数组的同一个哈希桶上时,此时称这些 key 发生了冲突。

链式哈希

Redis 采用了「链式哈希」的方法来解决哈希冲突。

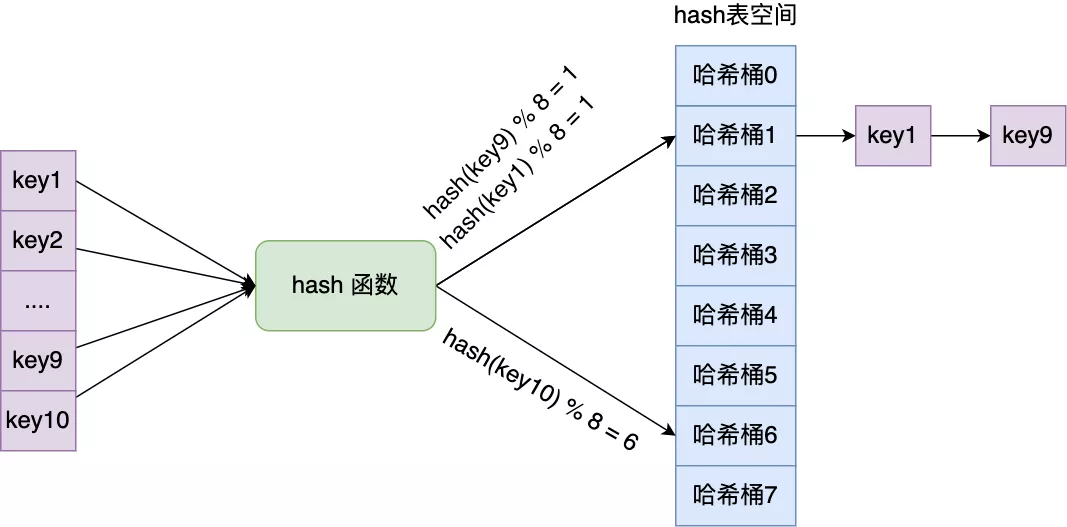
实现的方式就是每个哈希表节点都有一个 next 指针,多个哈希表节点可以用 next 指针构成一个单项链表,被分配到同一个哈希桶上的多个节点可以用这个单项链表连接起来,这样就解决了哈希冲突。

还是用前面的哈希冲突例子,key1 和 key9 经过哈希计算后,都落在同一个哈希桶,链式哈希的话,key1 就会通过 next 指针指向 key9,形成一个单向链表。

图片

不过,链式哈希局限性也很明显,随着链表长度的增加,在查询这一位置上的数据的耗时就会增加,毕竟链表的查询的时间复杂度是 O(n)。

要想解决这一问题,就需要进行 rehash,就是对哈希表的大小进行扩展。

接下来,看看 Redis 是如何实现的 rehash 的。

rehash

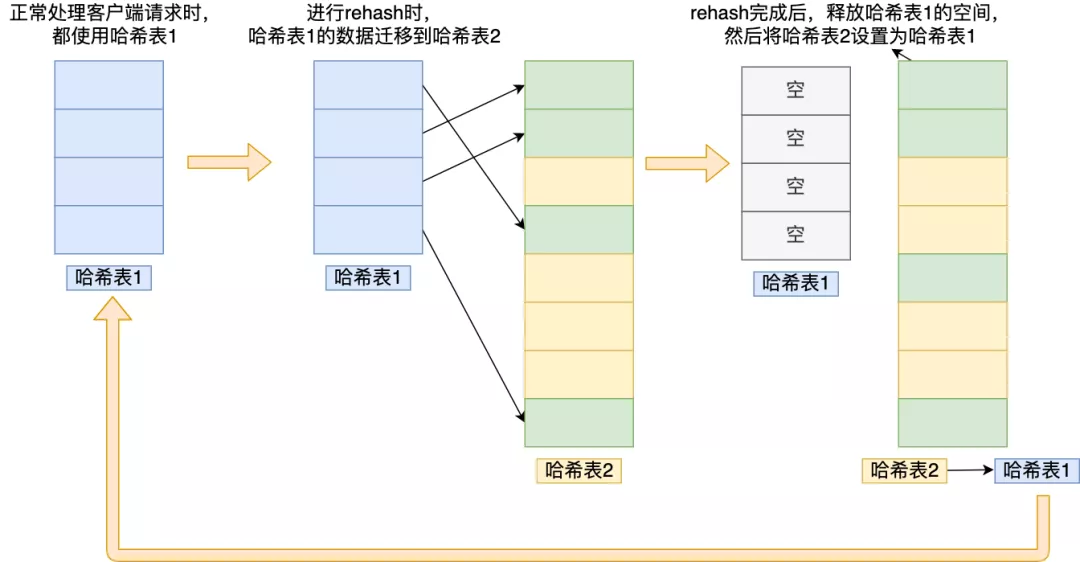
Redis 会使用了两个全局哈希表进行 rehash。

在正常服务请求阶段,插入的数据,都会写入到「哈希表 1」,此时的「哈希表 2 」 并没有被分配空间。

随着数据逐步增多,触发了 rehash 操作,这个过程分为三步:

  • 给「哈希表 2」 分配空间,一般会比「哈希表 1」 大 2 倍;
  • 将「哈希表 1 」的数据迁移到「哈希表 2」 中;
  • 迁移完成后,「哈希表 1 」的空间会被释放,并把「哈希表 2」 设置为「哈希表 1」,然后在「哈希表 2」 新创建一个空白的哈希表,为下次 rehash 做准备。

为了方便你理解,我把 rehash 这三个过程画在了下面这张图:

图片

这个过程看起来简单,但是其实第二步很有问题,如果「哈希表 1 」的数据量非常大,那么在迁移至「哈希表 2 」的时候,因为会涉及大量的数据拷贝,此时可能会对 Redis 造成阻塞,无法服务其他请求。

渐进式 rehash

为了避免 rehash 在数据迁移过程中,因拷贝数据的耗时,影响 Redis 性能的情况,所以 Redis 采用了渐进式 rehash,也就是将数据的迁移的工作不再是一次性迁移完成,而是分多次迁移。

渐进式 rehash 步骤如下:

  • 给「哈希表 2」 分配空间;
  • 在 rehash 进行期间,每次哈希表元素进行新增、删除、查找或者更新操作时,Redis 除了会执行对应的操作之外,还会顺序将「哈希表 1 」中索引位置上的所有 key-value 迁移到「哈希表 2」 上
  • 随着处理客户端发起的哈希表操作请求数量越多,最终会把「哈希表 1 」的所有 key-value 迁移到「哈希表 2」,从而完成 rehash 操作。

这样就巧妙地把一次性大量数据迁移工作的开销,分摊到了多次处理请求的过程中,避免了一次性 rehash 的耗时操作。

在进行渐进式 rehash 的过程中,会有两个哈希表,所以在渐进式 rehash 进行期间,哈希表元素的删除、查找、更新等操作都会在这两个哈希表进行。

比如,查找一个 key 的值的话,先会在哈希表 1 里面进行查找,如果没找到,就会继续到哈希表 2 里面进行找到。

另外,在渐进式 rehash 进行期间,新增一个 key-value 时,会被保存到「哈希表 2 」里面,而「哈希表 1」 则不再进行任何添加操作,这样保证了「哈希表 1 」的 key-value 数量只会减少,随着 rehash 操作的完成,最终「哈希表 1 」就会变成空表。

rehash 触发条件

介绍了 rehash 那么多,还没说什么时情况下会触发 rehash 操作呢?

rehash 的触发条件跟负载因子(load factor)有关系。

负载因子可以通过下面这个公式计算:

图片

触发 rehash 操作的条件,主要有两个:

  • 当负载因子大于等于 1 ,并且 Redis 没有在执行 bgsave 命令或者 bgrewiteaof 命令,也就是没有执行 RDB 快照或没有进行 AOF 重写的时候,就会进行 rehash 操作。
  • 当负载因子大于等于 5 时,此时说明哈希冲突非常严重了,不管有没有有在执行 RDB 快照或 AOF 重写,都会强制进行 rehash 操作。

参考资料:《redis设计与实现》、《Redis 源码剖析与实战》。

以上文章来源于作者小林coding
小林coding.图解得了技术,谈吐得了烟火。

Views: 186

KAFKA STREAMS ARCHITECTURE

Kafka Streams simplifies application development by building on the Kafka producer and consumer libraries and leveraging the native capabilities of Kafka to offer data parallelism, distributed coordination, fault tolerance, and operational simplicity. In this section, we describe how Kafka Streams works underneath the covers.

The picture below shows the anatomy of an application that uses the Kafka Streams library. Let's walk through some details.

img

Stream Partitions and Tasks

The messaging layer of Kafka partitions data for storing and transporting it. Kafka Streams partitions data for processing it. In both cases, this partitioning is what enables data locality, elasticity, scalability, high performance, and fault tolerance. Kafka Streams uses the concepts of partitions and tasks as logical units of its parallelism model based on Kafka topic partitions. There are close links between Kafka Streams and Kafka in the context of parallelism:

  • Each stream partition is a totally ordered sequence of data records and maps to a Kafka topic partition.
  • A data record in the stream maps to a Kafka message from that topic.
  • The keys of data records determine the partitioning of data in both Kafka and Kafka Streams, i.e., how data is routed to specific partitions within topics.

An application's processor topology is scaled by breaking it into multiple tasks. More specifically, Kafka Streams creates a fixed number of tasks based on the input stream partitions for the application, with each task assigned a list of partitions from the input streams (i.e., Kafka topics). The assignment of partitions to tasks never changes so that each task is a fixed unit of parallelism of the application. Tasks can then instantiate their own processor topology based on the assigned partitions; they also maintain a buffer for each of its assigned partitions and process messages one-at-a-time from these record buffers. As a result stream tasks can be processed independently and in parallel without manual intervention.

Slightly simplified, the maximum parallelism at which your application may run is bounded by the maximum number of stream tasks, which itself is determined by maximum number of partitions of the input topic(s) the application is reading from. For example, if your input topic has 5 partitions, then you can run up to 5 applications instances. These instances will collaboratively process the topic’s data. If you run a larger number of app instances than partitions of the input topic, the “excess” app instances will launch but remain idle; however, if one of the busy instances goes down, one of the idle instances will resume the former’s work.

It is important to understand that Kafka Streams is not a resource manager, but a library that "runs" anywhere its stream processing application runs. Multiple instances of the application are executed either on the same machine, or spread across multiple machines and tasks can be distributed automatically by the library to those running application instances. The assignment of partitions to tasks never changes; if an application instance fails, all its assigned tasks will be automatically restarted on other instances and continue to consume from the same stream partitions.

NOTE: Topic partitions are assigned to tasks, and tasks are assigned to all threads over all instances, in a best-effort attempt to trade off load-balancing and stickiness of stateful tasks. For this assignment, Kafka Streams uses the StreamsPartitionAssignor class and doesn't let you change to a different assignor. If you try to use a different assignor, Kafka Streams ignores it.

The following diagram shows two tasks each assigned with one partition of the input streams.

img

Threading Model

Kafka Streams allows the user to configure the number of threads that the library can use to parallelize processing within an application instance. Each thread can execute one or more tasks with their processor topologies independently. For example, the following diagram shows one stream thread running two stream tasks.

img

Starting more stream threads or more instances of the application merely amounts to replicating the topology and having it process a different subset of Kafka partitions, effectively parallelizing processing. It is worth noting that there is no shared state amongst the threads, so no inter-thread coordination is necessary. This makes it very simple to run topologies in parallel across the application instances and threads. The assignment of Kafka topic partitions amongst the various stream threads is transparently handled by Kafka Streams leveraging Kafka's coordination functionality.

As we described above, scaling your stream processing application with Kafka Streams is easy: you merely need to start additional instances of your application, and Kafka Streams takes care of distributing partitions amongst tasks that run in the application instances. You can start as many threads of the application as there are input Kafka topic partitions so that, across all running instances of an application, every thread (or rather, the tasks it runs) has at least one input partition to process.

As of Kafka 2.8 you can scale stream threads much in the same way you can scale your Kafka Stream clients. Simply add or remove stream threads and Kafka Streams will take care of redistributing the partitions. You may also add threads to replace stream threads that have died removing the need to restart clients to recover the number of thread running.

Local State Stores

Kafka Streams provides so-called state stores, which can be used by stream processing applications to store and query data, which is an important capability when implementing stateful operations. The Kafka Streams DSL, for example, automatically creates and manages such state stores when you are calling stateful operators such as join() or aggregate(), or when you are windowing a stream.

Every stream task in a Kafka Streams application may embed one or more local state stores that can be accessed via APIs to store and query data required for processing. Kafka Streams offers fault-tolerance and automatic recovery for such local state stores.

The following diagram shows two stream tasks with their dedicated local state stores.

img

Fault Tolerance

Kafka Streams builds on fault-tolerance capabilities integrated natively within Kafka. Kafka partitions are highly available and replicated; so when stream data is persisted to Kafka it is available even if the application fails and needs to re-process it. Tasks in Kafka Streams leverage the fault-tolerance capability offered by the Kafka consumer client to handle failures. If a task runs on a machine that fails, Kafka Streams automatically restarts the task in one of the remaining running instances of the application.

In addition, Kafka Streams makes sure that the local state stores are robust to failures, too. For each state store, it maintains a replicated changelog Kafka topic in which it tracks any state updates. These changelog topics are partitioned as well so that each local state store instance, and hence the task accessing the store, has its own dedicated changelog topic partition. Log compaction is enabled on the changelog topics so that old data can be purged safely to prevent the topics from growing indefinitely. If tasks run on a machine that fails and are restarted on another machine, Kafka Streams guarantees to restore their associated state stores to the content before the failure by replaying the corresponding changelog topics prior to resuming the processing on the newly started tasks. As a result, failure handling is completely transparent to the end user.

Note that the cost of task (re)initialization typically depends primarily on the time for restoring the state by replaying the state stores' associated changelog topics. To minimize this restoration time, users can configure their applications to have standby replicas of local states (i.e. fully replicated copies of the state). When a task migration happens, Kafka Streams will assign a task to an application instance where such a standby replica already exists in order to minimize the task (re)initialization cost. See num.standby.replicas in the Kafka Streams Configs section. Starting in 2.6, Kafka Streams will guarantee that a task is only ever assigned to an instance with a fully caught-up local copy of the state, if such an instance exists. Standby tasks will increase the likelihood that a caught-up instance exists in the case of a failure.

Views: 201

KAFKA STREAMS CONCEPTS

INTRODUCTION RUN DEMO APP TUTORIAL: WRITE APP CONCEPTS ARCHITECTURE DEVELOPER GUIDE UPGRADE

Kafka Streams is a client library for processing and analyzing data stored in Kafka. It builds upon important stream processing concepts such as properly distinguishing between event time and processing time, windowing support, and simple yet efficient management and real-time querying of application state.

Kafka Streams has a low barrier to entry: You can quickly write and run a small-scale proof-of-concept on a single machine; and you only need to run additional instances of your application on multiple machines to scale up to high-volume production workloads. Kafka Streams transparently handles the load balancing of multiple instances of the same application by leveraging Kafka's parallelism model.

Some highlights of Kafka Streams:

  • Designed as a simple and lightweight client library, which can be easily embedded in any Java application and integrated with any existing packaging, deployment and operational tools that users have for their streaming applications.
  • Has no external dependencies on systems other than Apache Kafka itself as the internal messaging layer; notably, it uses Kafka's partitioning model to horizontally scale processing while maintaining strong ordering guarantees.
  • Supports fault-tolerant local state, which enables very fast and efficient stateful operations like windowed joins and aggregations.
  • Supports exactly-once processing semantics to guarantee that each record will be processed once and only once even when there is a failure on either Streams clients or Kafka brokers in the middle of processing.
  • Employs one-record-at-a-time processing to achieve millisecond processing latency, and supports event-time based windowing operations with out-of-order arrival of records.
  • Offers necessary stream processing primitives, along with a high-level Streams DSL and a low-level Processor API.

We first summarize the key concepts of Kafka Streams.

Stream Processing Topology

  • A stream is the most important abstraction provided by Kafka Streams: it represents an unbounded, continuously updating data set. A stream is an ordered, replayable, and fault-tolerant sequence of immutable data records, where a data record is defined as a key-value pair.
  • A stream processing application is any program that makes use of the Kafka Streams library. It defines its computational logic through one or more processor topologies, where a processor topology is a graph of stream processors (nodes) that are connected by streams (edges).
  • A stream processor is a node in the processor topology; it represents a processing step to transform data in streams by receiving one input record at a time from its upstream processors in the topology, applying its operation to it, and may subsequently produce one or more output records to its downstream processors.

There are two special processors in the topology:

  • Source Processor: A source processor is a special type of stream processor that does not have any upstream processors. It produces an input stream to its topology from one or multiple Kafka topics by consuming records from these topics and forwarding them to its down-stream processors.
  • Sink Processor: A sink processor is a special type of stream processor that does not have down-stream processors. It sends any received records from its up-stream processors to a specified Kafka topic.

Note that in normal processor nodes other remote systems can also be accessed while processing the current record. Therefore the processed results can either be streamed back into Kafka or written to an external system.

img

Kafka Streams offers two ways to define the stream processing topology: the Kafka Streams DSL provides the most common data transformation operations such as map, filter, join and aggregations out of the box; the lower-level Processor API allows developers define and connect custom processors as well as to interact with state stores.

A processor topology is merely a logical abstraction for your stream processing code. At runtime, the logical topology is instantiated and replicated inside the application for parallel processing (see Stream Partitions and Tasks for details).

Time

A critical aspect in stream processing is the notion of time, and how it is modeled and integrated. For example, some operations such as windowing are defined based on time boundaries.

Common notions of time in streams are:

  • Event time - The point in time when an event or data record occurred, i.e. was originally created "at the source". Example: If the event is a geo-location change reported by a GPS sensor in a car, then the associated event-time would be the time when the GPS sensor captured the location change.
  • Processing time - The point in time when the event or data record happens to be processed by the stream processing application, i.e. when the record is being consumed. The processing time may be milliseconds, hours, or days etc. later than the original event time. Example: Imagine an analytics application that reads and processes the geo-location data reported from car sensors to present it to a fleet management dashboard. Here, processing-time in the analytics application might be milliseconds or seconds (e.g. for real-time pipelines based on Apache Kafka and Kafka Streams) or hours (e.g. for batch pipelines based on Apache Hadoop or Apache Spark) after event-time.
  • Ingestion time - The point in time when an event or data record is stored in a topic partition by a Kafka broker. The difference to event time is that this ingestion timestamp is generated when the record is appended to the target topic by the Kafka broker, not when the record is created "at the source". The difference to processing time is that processing time is when the stream processing application processes the record. For example, if a record is never processed, there is no notion of processing time for it, but it still has an ingestion time.

The choice between event-time and ingestion-time is actually done through the configuration of Kafka (not Kafka Streams): From Kafka 0.10.x onwards, timestamps are automatically embedded into Kafka messages. Depending on Kafka's configuration these timestamps represent event-time or ingestion-time. The respective Kafka configuration setting can be specified on the broker level or per topic. The default timestamp extractor in Kafka Streams will retrieve these embedded timestamps as-is. Hence, the effective time semantics of your application depend on the effective Kafka configuration for these embedded timestamps.

Kafka Streams assigns a timestamp to every data record via the TimestampExtractor interface. These per-record timestamps describe the progress of a stream with regards to time and are leveraged by time-dependent operations such as window operations. As a result, this time will only advance when a new record arrives at the processor. We call this data-driven time the stream time of the application to differentiate with the wall-clock time when this application is actually executing. Concrete implementations of the TimestampExtractor interface will then provide different semantics to the stream time definition. For example retrieving or computing timestamps based on the actual contents of data records such as an embedded timestamp field to provide event time semantics, and returning the current wall-clock time thereby yield processing time semantics to stream time. Developers can thus enforce different notions of time depending on their business needs.

Finally, whenever a Kafka Streams application writes records to Kafka, then it will also assign timestamps to these new records. The way the timestamps are assigned depends on the context:

  • When new output records are generated via processing some input record, for example, context.forward() triggered in the process() function call, output record timestamps are inherited from input record timestamps directly.
  • When new output records are generated via periodic functions such as Punctuator#punctuate(), the output record timestamp is defined as the current internal time (obtained through context.timestamp()) of the stream task.
  • For aggregations, the timestamp of a result update record will be the maximum timestamp of all input records contributing to the result.

You can change the default behavior in the Processor API by assigning timestamps to output records explicitly when calling #forward().

For aggregations and joins, timestamps are computed by using the following rules.

  • For joins (stream-stream, table-table) that have left and right input records, the timestamp of the output record is assigned max(left.ts, right.ts).
  • For stream-table joins, the output record is assigned the timestamp from the stream record.
  • For aggregations, Kafka Streams also computes the max timestamp over all records, per key, either globally (for non-windowed) or per-window.
  • For stateless operations, the input record timestamp is passed through. For flatMap and siblings that emit multiple records, all output records inherit the timestamp from the corresponding input record.

Duality of Streams and Tables

When implementing stream processing use cases in practice, you typically need both streams and also databases. An example use case that is very common in practice is an e-commerce application that enriches an incoming stream of customer transactions with the latest customer information from a database table. In other words, streams are everywhere, but databases are everywhere, too.

Any stream processing technology must therefore provide first-class support for streams and tables. Kafka's Streams API provides such functionality through its core abstractions for streams and tables, which we will talk about in a minute. Now, an interesting observation is that there is actually a close relationship between streams and tables, the so-called stream-table duality. And Kafka exploits this duality in many ways: for example, to make your applications elastic, to support fault-tolerant stateful processing, or to run interactive queries against your application's latest processing results. And, beyond its internal usage, the Kafka Streams API also allows developers to exploit this duality in their own applications.

Before we discuss concepts such as aggregations in Kafka Streams, we must first introduce tables in more detail, and talk about the aforementioned stream-table duality. Essentially, this duality means that a stream can be viewed as a table, and a table can be viewed as a stream. Kafka's log compaction feature, for example, exploits this duality.

A simple form of a table is a collection of key-value pairs, also called a map or associative array. Such a table may look as follows:

img

The stream-table duality describes the close relationship between streams and tables.

  • Stream as Table: A stream can be considered a changelog of a table, where each data record in the stream captures a state change of the table. A stream is thus a table in disguise, and it can be easily turned into a "real" table by replaying the changelog from beginning to end to reconstruct the table. Similarly, in a more general analogy, aggregating data records in a stream - such as computing the total number of pageviews by user from a stream of pageview events - will return a table (here with the key and the value being the user and its corresponding pageview count, respectively).
  • Table as Stream: A table can be considered a snapshot, at a point in time, of the latest value for each key in a stream (a stream's data records are key-value pairs). A table is thus a stream in disguise, and it can be easily turned into a "real" stream by iterating over each key-value entry in the table.

Let's illustrate this with an example. Imagine a table that tracks the total number of pageviews by user (first column of diagram below). Over time, whenever a new pageview event is processed, the state of the table is updated accordingly. Here, the state changes between different points in time - and different revisions of the table - can be represented as a changelog stream (second column).

img

Interestingly, because of the stream-table duality, the same stream can be used to reconstruct the original table (third column):

img

The same mechanism is used, for example, to replicate databases via change data capture (CDC) and, within Kafka Streams, to replicate its so-called state stores across machines for fault-tolerance. The stream-table duality is such an important concept that Kafka Streams models it explicitly via the KStream, KTable, and GlobalKTable interfaces.

Aggregations

An aggregation operation takes one input stream or table, and yields a new table by combining multiple input records into a single output record. Examples of aggregations are computing counts or sum.

In the Kafka Streams DSL, an input stream of an aggregation can be a KStream or a KTable, but the output stream will always be a KTable. This allows Kafka Streams to update an aggregate value upon the out-of-order arrival of further records after the value was produced and emitted. When such out-of-order arrival happens, the aggregating KStream or KTable emits a new aggregate value. Because the output is a KTable, the new value is considered to overwrite the old value with the same key in subsequent processing steps.

Windowing

Windowing lets you control how to group records that have the same key for stateful operations such as aggregations or joins into so-called windows. Windows are tracked per record key.

Windowing operations are available in the Kafka Streams DSL. When working with windows, you can specify a grace period for the window. This grace period controls how long Kafka Streams will wait for out-of-order data records for a given window. If a record arrives after the grace period of a window has passed, the record is discarded and will not be processed in that window. Specifically, a record is discarded if its timestamp dictates it belongs to a window, but the current stream time is greater than the end of the window plus the grace period.

Out-of-order records are always possible in the real world and should be properly accounted for in your applications. It depends on the effective time semantics how out-of-order records are handled. In the case of processing-time, the semantics are "when the record is being processed", which means that the notion of out-of-order records is not applicable as, by definition, no record can be out-of-order. Hence, out-of-order records can only be considered as such for event-time. In both cases, Kafka Streams is able to properly handle out-of-order records.

States

Some stream processing applications don't require state, which means the processing of a message is independent from the processing of all other messages. However, being able to maintain state opens up many possibilities for sophisticated stream processing applications: you can join input streams, or group and aggregate data records. Many such stateful operators are provided by the Kafka Streams DSL.

Kafka Streams provides so-called state stores, which can be used by stream processing applications to store and query data. This is an important capability when implementing stateful operations. Every task in Kafka Streams embeds one or more state stores that can be accessed via APIs to store and query data required for processing. These state stores can either be a persistent key-value store, an in-memory hashmap, or another convenient data structure. Kafka Streams offers fault-tolerance and automatic recovery for local state stores.

Kafka Streams allows direct read-only queries of the state stores by methods, threads, processes or applications external to the stream processing application that created the state stores. This is provided through a feature called Interactive Queries. All stores are named and Interactive Queries exposes only the read operations of the underlying implementation.

PROCESSING GUARANTEES

In stream processing, one of the most frequently asked question is "does my stream processing system guarantee that each record is processed once and only once, even if some failures are encountered in the middle of processing?" Failing to guarantee exactly-once stream processing is a deal-breaker for many applications that cannot tolerate any data-loss or data duplicates, and in that case a batch-oriented framework is usually used in addition to the stream processing pipeline, known as the Lambda Architecture. Prior to 0.11.0.0, Kafka only provides at-least-once delivery guarantees and hence any stream processing systems that leverage it as the backend storage could not guarantee end-to-end exactly-once semantics. In fact, even for those stream processing systems that claim to support exactly-once processing, as long as they are reading from / writing to Kafka as the source / sink, their applications cannot actually guarantee that no duplicates will be generated throughout the pipeline.
Since the 0.11.0.0 release, Kafka has added support to allow its producers to send messages to different topic partitions in a transactional and idempotent manner, and Kafka Streams has hence added the end-to-end exactly-once processing semantics by leveraging these features. More specifically, it guarantees that for any record read from the source Kafka topics, its processing results will be reflected exactly once in the output Kafka topic as well as in the state stores for stateful operations. Note the key difference between Kafka Streams end-to-end exactly-once guarantee with other stream processing frameworks' claimed guarantees is that Kafka Streams tightly integrates with the underlying Kafka storage system and ensure that commits on the input topic offsets, updates on the state stores, and writes to the output topics will be completed atomically instead of treating Kafka as an external system that may have side-effects. For more information on how this is done inside Kafka Streams, see KIP-129.
As of the 2.6.0 release, Kafka Streams supports an improved implementation of exactly-once processing, named "exactly-once v2", which requires broker version 2.5.0 or newer. This implementation is more efficient, because it reduces client and broker resource utilization, like client threads and used network connections, and it enables higher throughput and improved scalability. As of the 3.0.0 release, the first version of exactly-once has been deprecated. Users are encouraged to use exactly-once v2 for exactly-once processing from now on, and prepare by upgrading their brokers if necessary. For more information on how this is done inside the brokers and Kafka Streams, see KIP-447.
To enable exactly-once semantics when running Kafka Streams applications, set the processing.guarantee config value (default value is at_least_once) to StreamsConfig.EXACTLY_ONCE_V2 (requires brokers version 2.5 or newer). For more information, see the Kafka Streams Configs section.

Out-of-Order Handling

Besides the guarantee that each record will be processed exactly-once, another issue that many stream processing application will face is how to handle out-of-order data that may impact their business logic. In Kafka Streams, there are two causes that could potentially result in out-of-order data arrivals with respect to their timestamps:

  • Within a topic-partition, a record's timestamp may not be monotonically increasing along with their offsets. Since Kafka Streams will always try to process records within a topic-partition to follow the offset order, it can cause records with larger timestamps (but smaller offsets) to be processed earlier than records with smaller timestamps (but larger offsets) in the same topic-partition.
  • Within a stream task that may be processing multiple topic-partitions, if users configure the application to not wait for all partitions to contain some buffered data and pick from the partition with the smallest timestamp to process the next record, then later on when some records are fetched for other topic-partitions, their timestamps may be smaller than those processed records fetched from another topic-partition.

For stateless operations, out-of-order data will not impact processing logic since only one record is considered at a time, without looking into the history of past processed records; for stateful operations such as aggregations and joins, however, out-of-order data could cause the processing logic to be incorrect. If users want to handle such out-of-order data, generally they need to allow their applications to wait for longer time while bookkeeping their states during the wait time, i.e. making trade-off decisions between latency, cost, and correctness. In Kafka Streams specifically, users can configure their window operators for windowed aggregations to achieve such trade-offs (details can be found in Developer Guide). As for Joins, users have to be aware that some of the out-of-order data cannot be handled by increasing on latency and cost in Streams yet:

  • For Stream-Stream joins, all three types (inner, outer, left) handle out-of-order records correctly, but the resulted stream may contain unnecessary leftRecord-null for left joins, and leftRecord-null or null-rightRecord for outer joins.
  • For Stream-Table joins, out-of-order records are not handled (i.e., Streams applications don't check for out-of-order records and just process all records in offset order), and hence it may produce unpredictable results.
  • For Table-Table joins, out-of-order records are not handled (i.e., Streams applications don't check for out-of-order records and just process all records in offset order). However, the join result is a changelog stream and hence will be eventually consistent.

Views: 188