Kafka Tool 可视化工具

使用Kafka的小伙伴,有没有为无法直观地查看 Kafka 的 Topic 里的内容而发过愁呢?

下面推荐给大家一款带有可视化页面的Kafka工具:Kafka Tool (目前已经更名为 offset explorer)

Kafka Tool 工具下载

下载地址

http://www.kafkatool.com/download.html

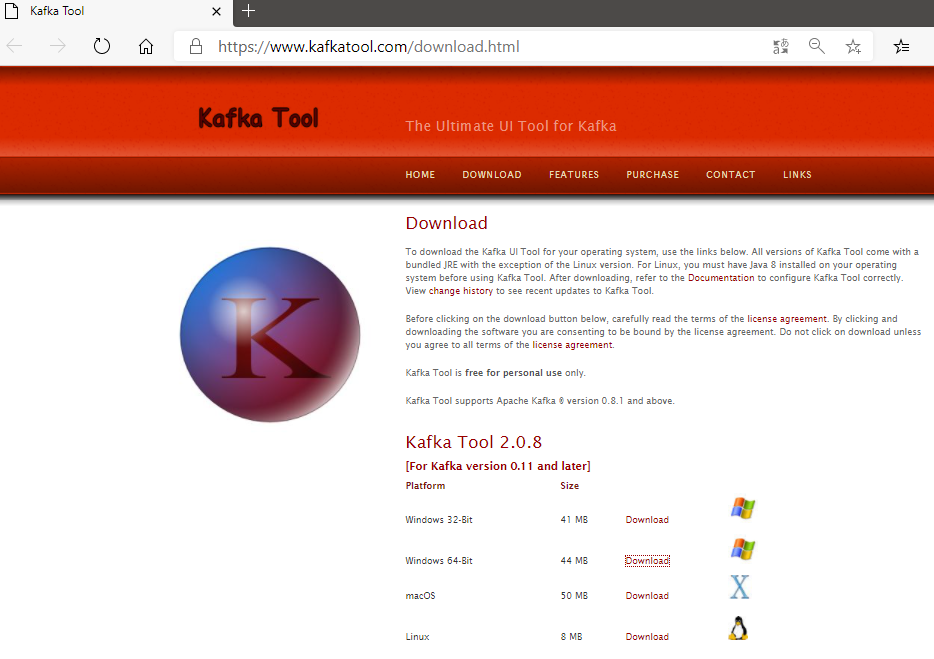
下载界面

不同版本的Kafka对应不同版本的工具,最新的2.0.8版本适合Kafka 0.11和比这更高的版本。

image-20201220144113429

如果是Windows,下载对应的64或者32位的exe文件,一键安装即可。

Kafka Tool 工具使用

1、Kafka 连接配置

1)启动 Kafka Tool

在安装目录下,双击可执行文件 kafkatool.exe,启动 Kafka Tool

img

2)配置 Kafka 连接信息

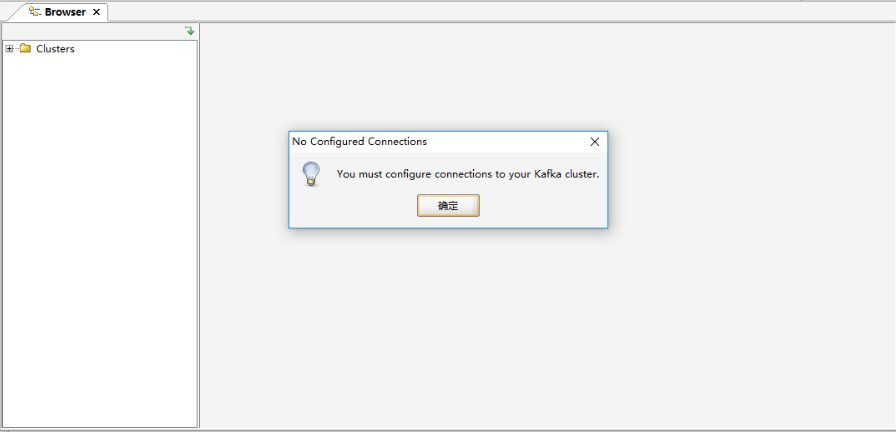
提示配置相应的连接信息

img

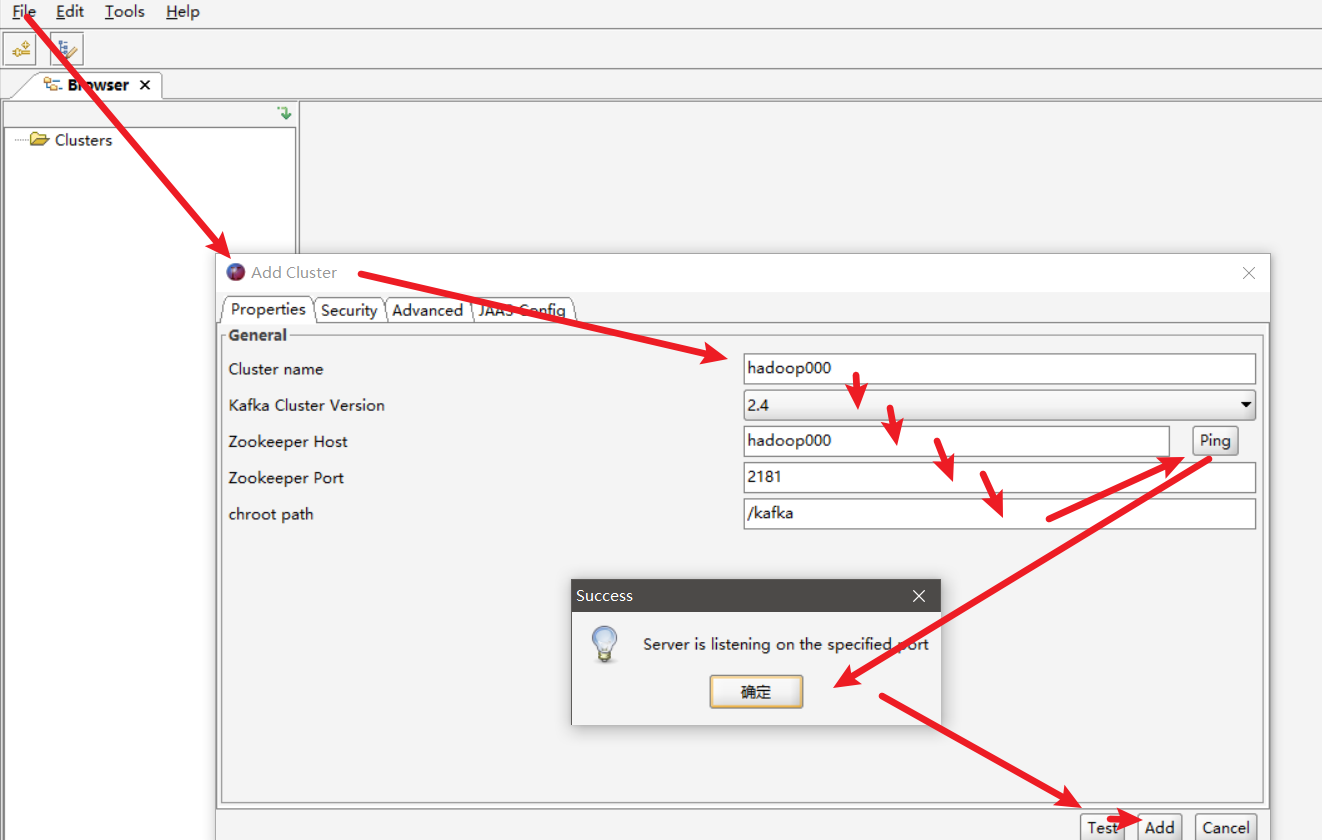
依次填写红框中的信息,点击“Ping” 和 “Test”测试连接情况;测试通过后,点击“Add”进行添加

image-20201220145123007

【注意】这之前需要在 C:\Windows\System32\drivers\etc 下的 hosts 文件中,添加入 kafka 的集群域名

例如,添加如下配置(此处需要根据实际情况配置,配置保存后,需要重启KafkaTools才能读取hosts文件中的内容):

10.10.21.100 hadoop000 
10.10.21.101 hadoop001 
10.10.21.102 hadoop002
10.10.21.103 hadoop003

2、查看 Kafka 数据

1)查看 Kafka 数据

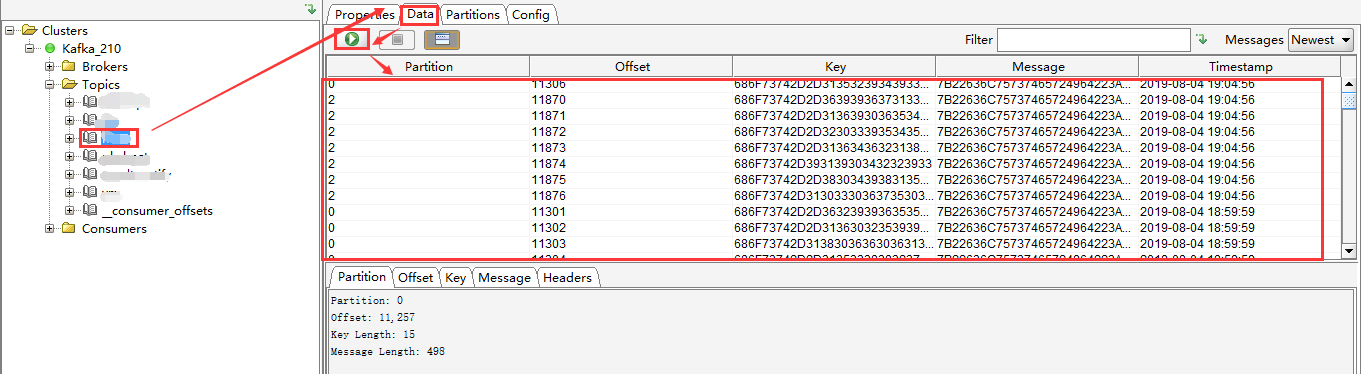
选择一个Topic --> Data,点击查询即可看到数据(但是Key和Message是二进制的,不能直观的看到具体的消息信息,需要设置展示格式)

Messages选择Newest,表示当有新信息来的时候,查看最新的Kafka数据;

结果列表中的每列,通过点击表头,可以按照升序或者降序排序(一般用在时间字段排序,方便查看最新数据)。

img

2)设置 Kafka 数据展示格式

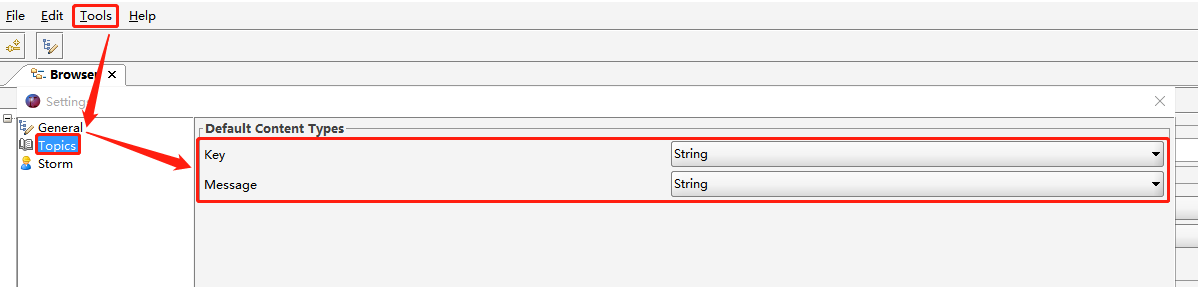
在Tools -->Settings --> Topics,将 Key 和 Message 均设置为String 保存。这样是全局设置,对所有 Topic 均生效。

img

img

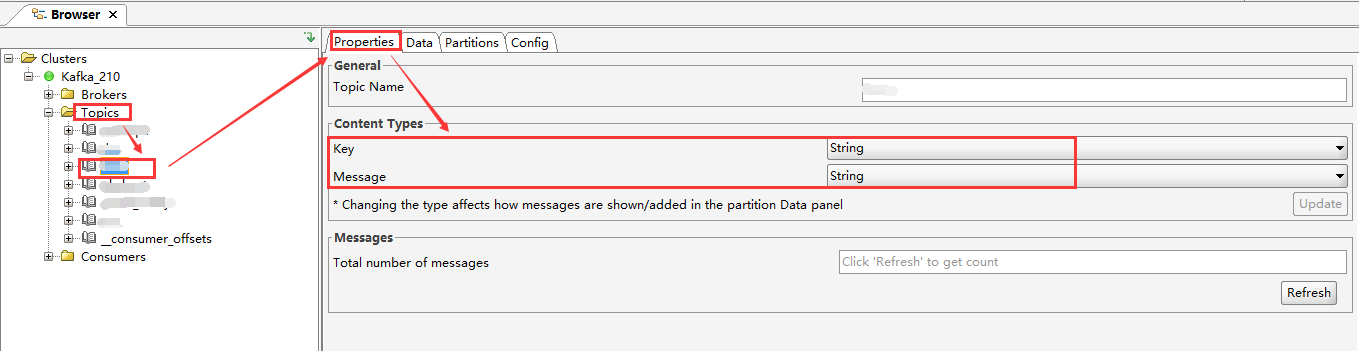
如果只是想单独设置某个 Topic,可以选中某个 Topic,在 Properties --> Content Type 中,将显示格式设置为String,点击 Update --> Refresh 即可生效

img

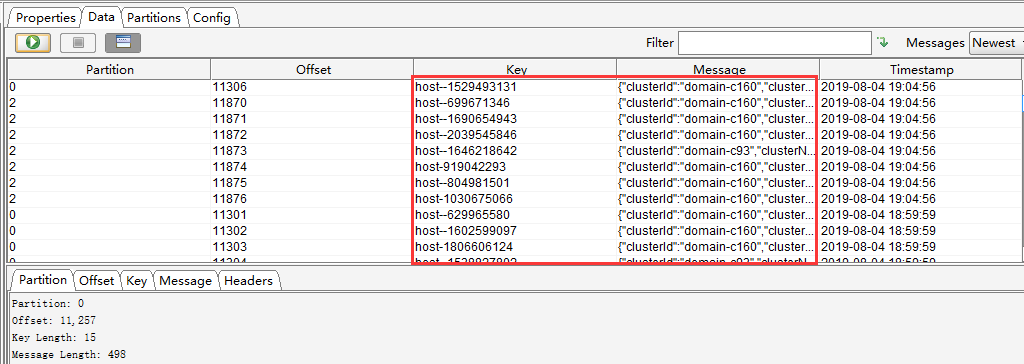
设置后的数据列表如下

img

3)查看具体某一条消息

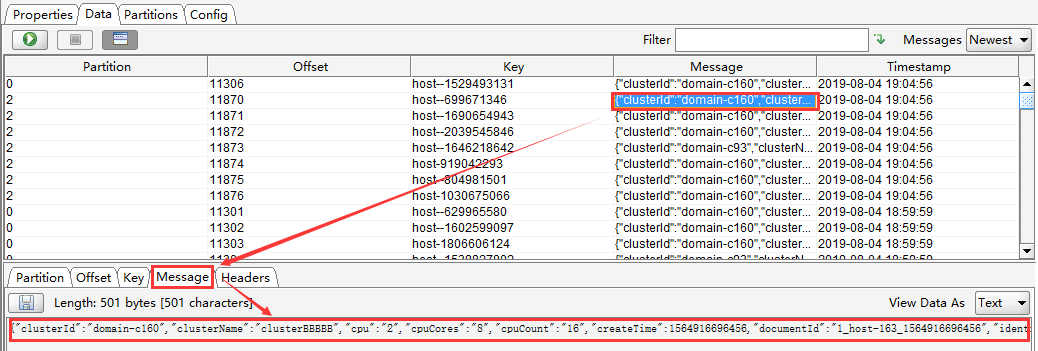
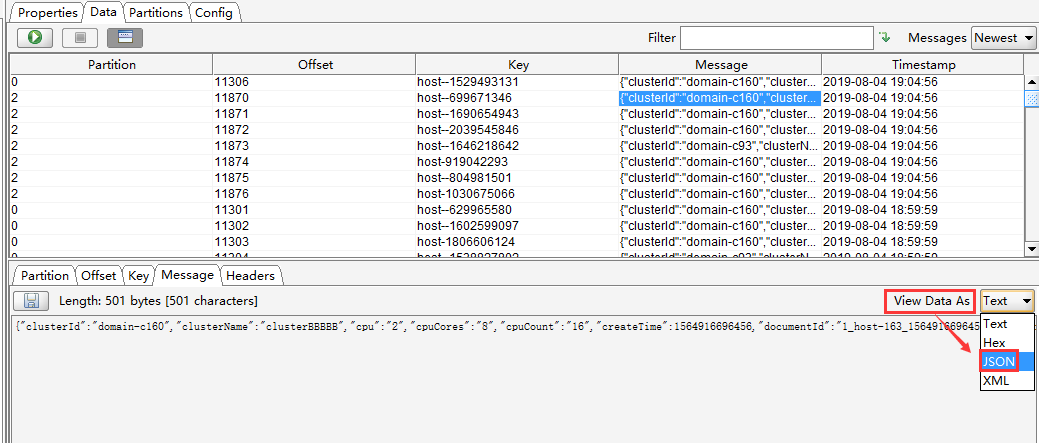
选中某一个message,点击“Message”查看详情,默认是“Text”格式(如果想看到JSON格式,只需要设置下“View Data As”即可)

img

img

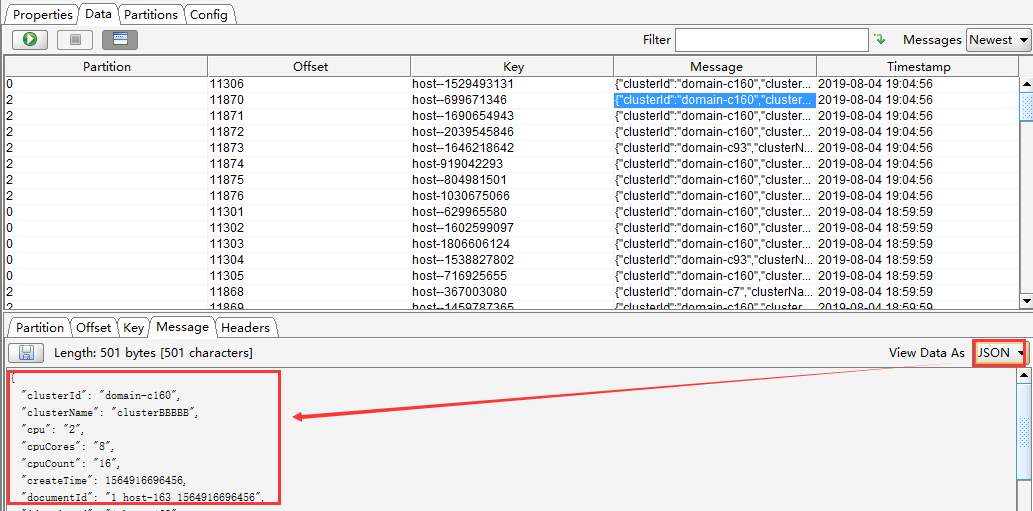
“View Data As”设置为 JSON 后,消息信息格式如下

img

4)过滤查询 Kafka 消息

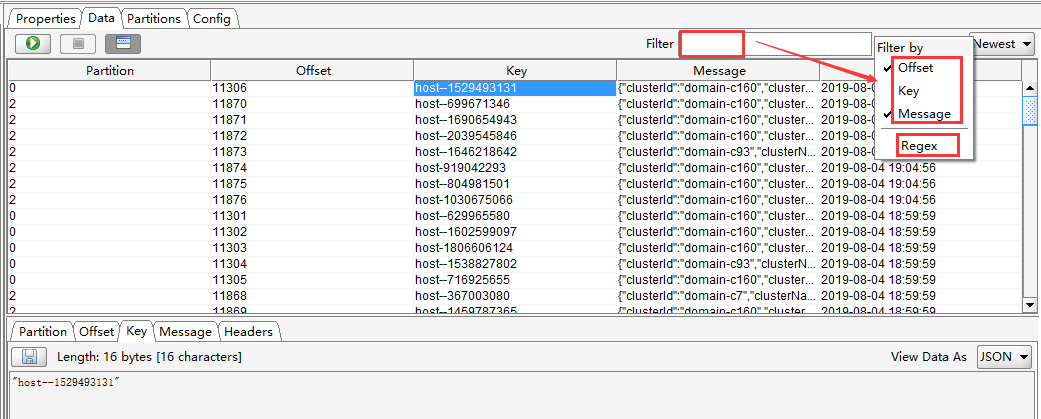
可以按照Offset(偏移量),Key(消息key),Message(消息主体),Regex(正则表达式)进行单个或者组合查询

img

Views: 277

Spring Boot 简介和使用

https://spring.io/projects/spring-framework

Spring Framework 为基于 Java 的现代企业应用程序 (在任何类型的部署平台上)提供了全面的编程和配置模型。

Spring 的一个关键要素是应用程序级别的基础设施支持:Spring 侧重于企业应用程序的"管道",以便团队可以专注于应用程序级的业务逻辑,而无需与特定的部署环境进行不必要的联系。

特性

  • 核心技术: 依赖项注入、事件、资源、i18n、验证、数据绑定、类型转换、SpEL、AOP。
  • 测试:模拟对象,测试上下文框架,Spring MVC 测试。WebTestClient
  • 数据访问: 事务, Dao 支持, Jdbc, ORM(Hibernate,Mybatis(Sql映射))。
  • Spring MVCSpring WebFlux Web 框架。
  • 集成: 远程处理, JMS, JCA, JMX, 电子邮件, 任务, 计划, 缓存。
  • 语言: Java, Kotlin, Groovy, 等动态语言。

Spring Core Technologies

https://docs.spring.io/spring-framework/docs/current/reference/html/core.html

Spring框架核心技术中最重要的是 Spring 框架的控制反转 (IoC) 容器以及面向切面编程 (AOP) 技术。

SpringBoot

https://spring.io/projects/spring-boot

Spring Boot 可轻松创建独立的、生产级 Spring 应用程序,您可以"直接运行(java jar)",而无需提前准备例如Tomcat应用容器服务器。

Spring Boot 启动应用程序只需要最少的Spring相关配置,贯彻“约定大于配置”的理念。

如果您要查找有关特定版本的信息,或有关如何从早期版本升级的说明,请查看项目发行说明部分在我们的维基上。

特性

  • 创建独立的Spring应用
  • 直接嵌入 Tomcat、Jetty 或底图(Undertow,无需部署 WAR 文件)
  • 提供有意见的"启动器"依赖关系,以简化生成配置
  • 尽可能自动配置Spring和第三方库
  • 提供支持生产所需功能,如指标、健康检查和外部配置
  • 绝对没有生成代码,极大减少 XML 配置要求

快速开始

RESTful Web Service

https://spring.io/guides/gs/rest-service/

This guide walks you through the process of creating a “Hello, World” RESTful web service with Spring.

What You Will Build

You will build a service that will accept HTTP GET requests at http://localhost:8080/greeting.

It will respond with a JSON representation of a greeting, as the following listing shows:

{"id":1,"content":"Hello, World!"}

You can customize the greeting with an optional name parameter in the query string, as the following listing shows:

http://localhost:8080/greeting?name=User

The name parameter value overrides the default value of World and is reflected in the response, as the following listing shows:

{"id":1,"content":"Hello, User!"}

What You Need

How to complete this guide

Like most Spring Getting Started guides, you can start from scratch and complete each step or you can bypass basic setup steps that are already familiar to you. Either way, you end up with working code.

To start from scratch, move on to Starting with Spring Initializr.

To skip the basics, do the following:

When you finish, you can check your results against the code in gs-rest-service/complete.

Starting with Spring Initializr

For all Spring applications, you should start with the Spring Initializr. The Initializr offers a fast way to pull in all the dependencies you need for an application and does a lot of the setup for you. This example needs only the Spring Web dependency.

The following listing shows the pom.xml file that is created when you choose Maven:

<?xml version="1.0" encoding="UTF-8"?>
<project xmlns="http://maven.apache.org/POM/4.0.0" xmlns:xsi="http://www.w3.org/2001/XMLSchema-instance"
    xsi:schemaLocation="http://maven.apache.org/POM/4.0.0 https://maven.apache.org/xsd/maven-4.0.0.xsd">
    <modelVersion>4.0.0</modelVersion>
    <parent>
        <groupId>org.springframework.boot</groupId>
        <artifactId>spring-boot-starter-parent</artifactId>
        <version>2.3.0.RELEASE</version>
        <relativePath/> <!-- lookup parent from repository -->
    </parent>
    <groupId>com.example</groupId>
    <artifactId>rest-service</artifactId>
    <version>0.0.1-SNAPSHOT</version>
    <name>rest-service</name>
    <description>Demo project for Spring Boot</description>

    <properties>
        <java.version>1.8</java.version>
    </properties>

    <dependencies>
        <dependency>
            <groupId>org.springframework.boot</groupId>
            <artifactId>spring-boot-starter-web</artifactId>
        </dependency>

        <dependency>
            <groupId>org.springframework.boot</groupId>
            <artifactId>spring-boot-starter-actuator</artifactId>
        </dependency>

        <dependency>
            <groupId>org.springframework.boot</groupId>
            <artifactId>spring-boot-starter-test</artifactId>
            <scope>test</scope>
            <exclusions>
                <exclusion>
                    <groupId>org.junit.vintage</groupId>
                    <artifactId>junit-vintage-engine</artifactId>
                </exclusion>
            </exclusions>
        </dependency>
    </dependencies>

    <build>
        <plugins>
            <plugin>
                <groupId>org.springframework.boot</groupId>
                <artifactId>spring-boot-maven-plugin</artifactId>
            </plugin>
        </plugins>
    </build>

</project>

The following listing shows the build.gradle file that is created when you choose Gradle:

plugins {
    id 'org.springframework.boot' version '2.3.2.RELEASE'
    id 'io.spring.dependency-management' version '1.0.8.RELEASE'
    id 'java'
}

group = 'com.example'
version = '0.0.1-SNAPSHOT'
sourceCompatibility = '1.8'

repositories {
    mavenCentral()
}

dependencies {
    implementation 'org.springframework.boot:spring-boot-starter-web'
    testImplementation('org.springframework.boot:spring-boot-starter-test') {
        exclude group: 'org.junit.vintage', module: 'junit-vintage-engine'
    }
}

test {
    useJUnitPlatform()
}

Create a Resource Representation Class

Now that you have set up the project and build system, you can create your web service.

Begin the process by thinking about service interactions.

The service will handle GET requests for /greeting, optionally with a name parameter in the query string. The GET request should return a 200 OK response with JSON in the body that represents a greeting. It should resemble the following output:

{
    "id": 1,
    "content": "Hello, World!"
}

The id field is a unique identifier for the greeting, and content is the textual representation of the greeting.

To model the greeting representation, create a resource representation class. To do so, provide a plain old Java object with fields, constructors, and accessors for the id and content data, as the following listing (from src/main/java/com/example/restservice/Greeting.java) shows:

package com.example.restservice;

public class Greeting {

    private final long id;
    private final String content;

    public Greeting(long id, String content) {
        this.id = id;
        this.content = content;
    }

    public long getId() {
        return id;
    }

    public String getContent() {
        return content;
    }
}
This application uses the Jackson JSON library to automatically marshal instances of type Greeting into JSON. Jackson is included by default by the web starter.

Create a Resource Controller

In Spring’s approach to building RESTful web services, HTTP requests are handled by a controller. These components are identified by the @RestController annotation, and the GreetingController shown in the following listing (from src/main/java/com/example/restservice/GreetingController.java) handles GET requests for /greeting by returning a new instance of the Greeting class:

package com.example.restservice;

import java.util.concurrent.atomic.AtomicLong;

import org.springframework.web.bind.annotation.GetMapping;
import org.springframework.web.bind.annotation.RequestParam;
import org.springframework.web.bind.annotation.RestController;

@RestController
public class GreetingController {

    private static final String template = "Hello, %s!";
    private final AtomicLong counter = new AtomicLong();

    @GetMapping("/greeting")
    public Greeting greeting(@RequestParam(value = "name", defaultValue = "World") String name) {
        return new Greeting(counter.incrementAndGet(), String.format(template, name));
    }
}

This controller is concise and simple, but there is plenty going on under the hood. We break it down step by step.

The @GetMapping annotation ensures that HTTP GET requests to /greeting are mapped to the greeting() method.

There are companion annotations for other HTTP verbs (e.g. @PostMapping for POST). There is also a @RequestMapping annotation that they all derive from, and can serve as a synonym (e.g. @RequestMapping(method=GET)).

@RequestParam binds the value of the query string parameter name into the name parameter of the greeting() method. If the name parameter is absent in the request, the defaultValue of World is used.

The implementation of the method body creates and returns a new Greeting object with id and content attributes based on the next value from the counter and formats the given name by using the greeting template.

A key difference between a traditional MVC controller and the RESTful web service controller shown earlier is the way that the HTTP response body is created. Rather than relying on a view technology to perform server-side rendering of the greeting data to HTML, this RESTful web service controller populates and returns a Greeting object. The object data will be written directly to the HTTP response as JSON.

This code uses Spring @RestController annotation, which marks the class as a controller where every method returns a domain object instead of a view. It is shorthand for including both @Controller and @ResponseBody.

The Greeting object must be converted to JSON. Thanks to Spring’s HTTP message converter support, you need not do this conversion manually. Because Jackson 2 is on the classpath, Spring’s MappingJackson2HttpMessageConverter is automatically chosen to convert the Greeting instance to JSON.

@SpringBootApplication is a convenience annotation that adds all of the following:

  • @Configuration: Tags the class as a source of bean definitions for the application context.
  • @EnableAutoConfiguration: Tells Spring Boot to start adding beans based on classpath settings, other beans, and various property settings. For example, if spring-webmvc is on the classpath, this annotation flags the application as a web application and activates key behaviors, such as setting up a DispatcherServlet.
  • @ComponentScan: Tells Spring to look for other components, configurations, and services in the com/example package, letting it find the controllers.

The main() method uses Spring Boot’s SpringApplication.run() method to launch an application. Did you notice that there was not a single line of XML? There is no web.xml file, either. This web application is 100% pure Java and you did not have to deal with configuring any plumbing or infrastructure.

Build an executable JAR

You can run the application from the command line with Gradle or Maven. You can also build a single executable JAR file that contains all the necessary dependencies, classes, and resources and run that. Building an executable jar makes it easy to ship, version, and deploy the service as an application throughout the development lifecycle, across different environments, and so forth.

If you use Gradle, you can run the application by using ./gradlew bootRun. Alternatively, you can build the JAR file by using ./gradlew build and then run the JAR file, as follows:

java -jar build/libs/gs-rest-service-0.1.0.jar

If you use Maven, you can run the application by using ./mvnw spring-boot:run. Alternatively, you can build the JAR file with ./mvnw clean package and then run the JAR file, as follows:

java -jar target/gs-rest-service-0.1.0.jar
The steps described here create a runnable JAR. You can also build a classic WAR file.

Logging output is displayed. The service should be up and running within a few seconds.

Test the Service

Now that the service is up, visit http://localhost:8080/greeting, where you should see:

{"id":1,"content":"Hello, World!"}

Provide a name query string parameter by visiting http://localhost:8080/greeting?name=User. Notice how the value of the content attribute changes from Hello, World! to Hello, User!, as the following listing shows:

{"id":2,"content":"Hello, User!"}

This change demonstrates that the @RequestParam arrangement in GreetingController is working as expected. The name parameter has been given a default value of World but can be explicitly overridden through the query string.

Notice also how the id attribute has changed from 1 to 2. This proves that you are working against the same GreetingController instance across multiple requests and that its counter field is being incremented on each call as expected.

Summary

Congratulations! You have just developed a RESTful web service with Spring.

See Also

The following guides may also be helpful:

Views: 601

Apache ECharts 介绍和使用

Apache ECharts
一个基于 JavaScript 的开源可视化图表库

5 分钟上手 ECharts

获取 ECharts

你可以通过以下几种方式获取 Apache EChartsTM。

引入 ECharts

通过标签方式直接引入构建好的 echarts 文件

<!DOCTYPE html>
<html>
<head>
    <meta charset="utf-8">
    <!-- 引入 ECharts 文件 -->
    <script type="text/javascript" src="https://cdn.jsdelivr.net/npm/echarts/dist/echarts.min.js"></script>
</head>
</html>

绘制一个简单的图表

在绘图前我们需要为 ECharts 准备一个具备高宽的 DOM 容器。

<body>
    <!-- 为 ECharts 准备一个具备大小(宽高)的 DOM -->
    <div id="main" style="width: 600px;height:400px;"></div>
</body>

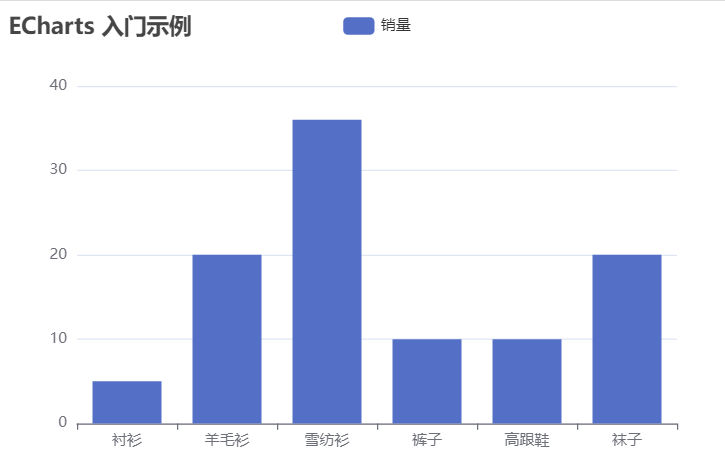
然后就可以通过 echarts.init 方法初始化一个 echarts 实例并通过 setOption 方法生成一个简单的柱状图,下面是完整代码。

<!DOCTYPE html>
<html>
<head>
    <meta charset="utf-8">
    <title>ECharts</title>
    <!-- 引入 echarts.js -->
    <script src="echarts.min.js"></script>
</head>
<body>
    <!-- 为ECharts准备一个具备大小(宽高)的Dom -->
    <div id="main" style="width: 600px;height:400px;"></div>
    <script type="text/javascript">
        // 基于准备好的dom,初始化echarts实例
        var myChart = echarts.init(document.getElementById('main'));

        // 指定图表的配置项和数据
        var option = {
            title: {
                text: 'ECharts 入门示例'
            },
            tooltip: {},
            legend: {
                data:['销量']
            },
            xAxis: {
                data: ["衬衫","羊毛衫","雪纺衫","裤子","高跟鞋","袜子"]
            },
            yAxis: {},
            series: [{
                name: '销量',
                type: 'bar',
                data: [5, 20, 36, 10, 10, 20]
            }]
        };

        // 使用刚指定的配置项和数据显示图表。
        myChart.setOption(option);
    </script>
</body>
</html>

这样你的第一个图表就诞生了!

file

ECharts 基础概念概览

本文介绍 Apache EChartsTM 最基本的名词和概念。

echarts 实例

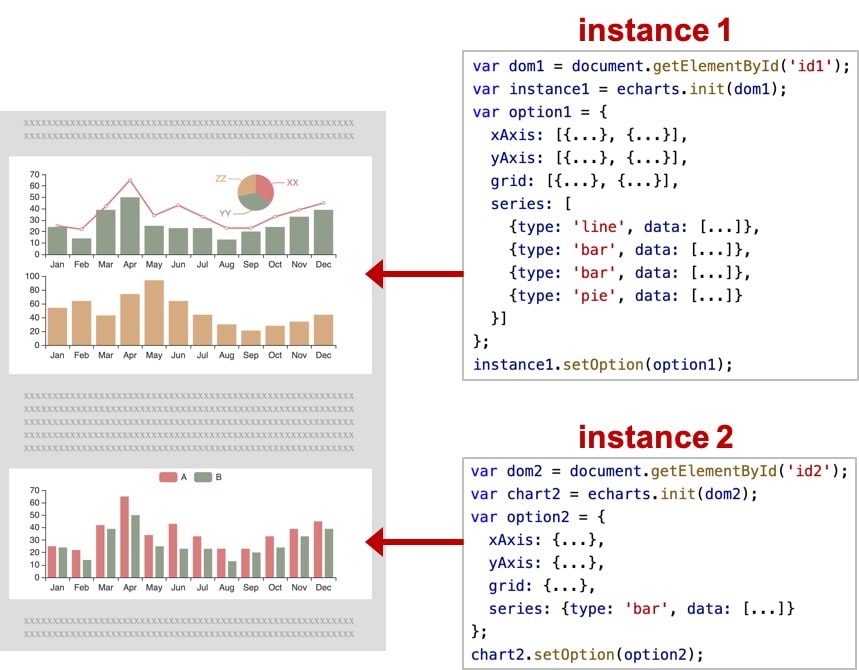
一个网页中可以创建多个 echarts 实例。每个 echarts 实例 中可以创建多个图表和坐标系等等(用 option 来描述)。准备一个 DOM 节点(作为 echarts 的渲染容器),就可以在上面创建一个 echarts 实例。每个 echarts 实例独占一个 DOM 节点。

img

系列(series)

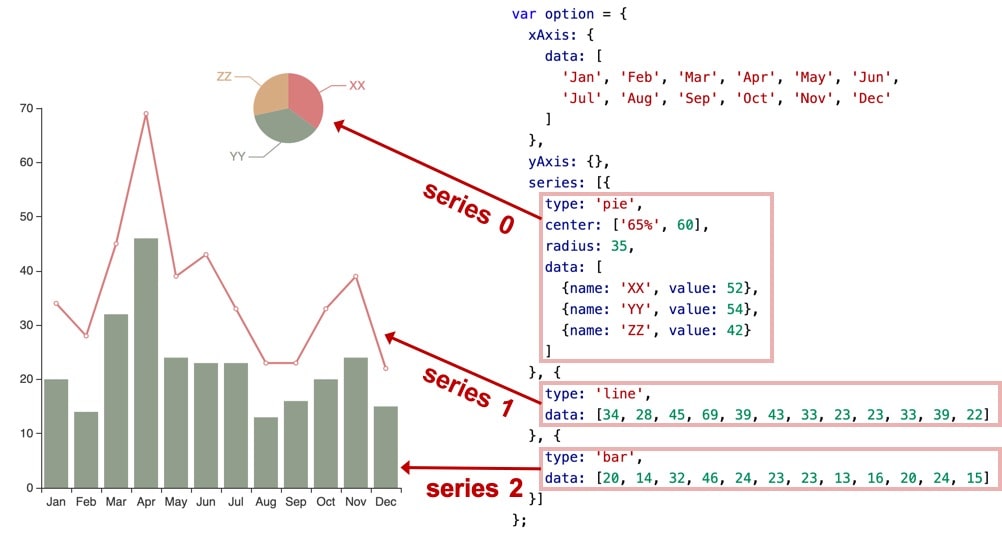
系列series)是很常见的名词。在 echarts 里,系列series)是指:一组数值以及他们映射成的图。“系列”这个词原本可能来源于“一系列的数据”,而在 echarts 中取其扩展的概念,不仅表示数据,也表示数据映射成为的图。所以,一个 系列 包含的要素至少有:一组数值、图表类型(series.type)、以及其他的关于这些数据如何映射成图的参数。

echarts 里系列类型(series.type)就是图表类型。系列类型(series.type)至少有:line(折线图)、bar(柱状图)、pie(饼图)、scatter(散点图)、graph(关系图)、tree(树图)、...

如下图,右侧的 option 中声明了三个 系列series):pie(饼图系列)、line(折线图系列)、bar(柱状图系列),每个系列中有他所需要的数据(series.data)。

img

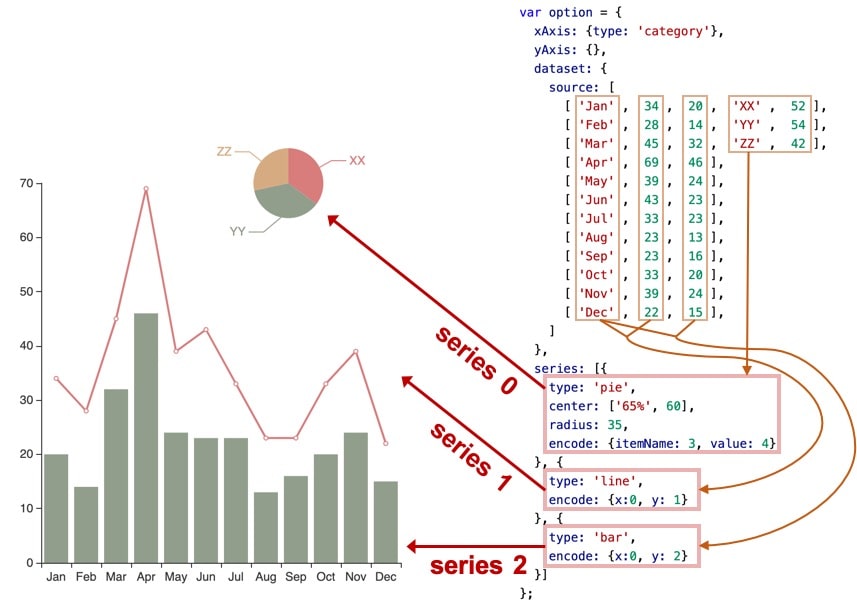
类同地,下图中是另一种配置方式,系列的数据从 dataset 中取:

img

组件(component)

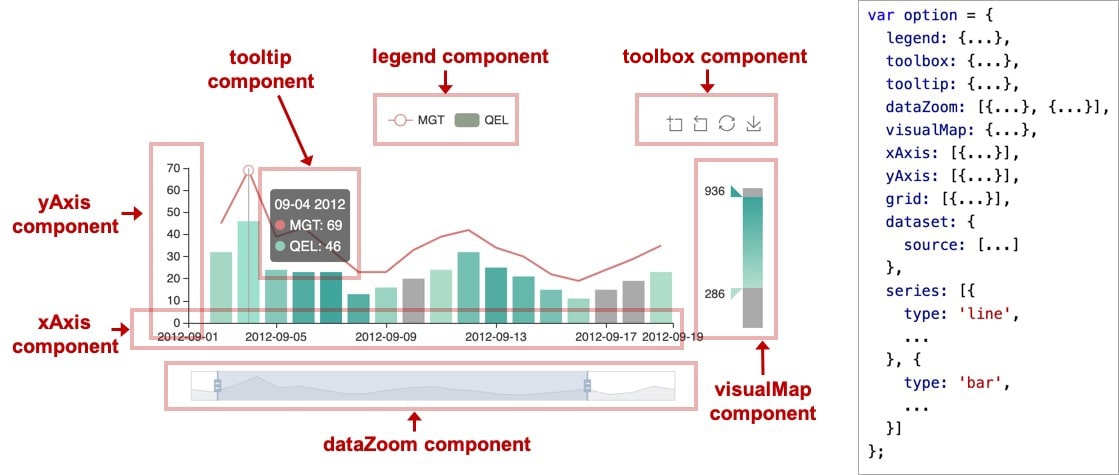
在系列之上,echarts 中各种内容,被抽象为“组件”。例如,echarts 中至少有这些组件:xAxis(直角坐标系 X 轴)、yAxis(直角坐标系 Y 轴)、grid(直角坐标系底板)、angleAxis(极坐标系角度轴)、radiusAxis(极坐标系半径轴)、polar(极坐标系底板)、geo(地理坐标系)、dataZoom(数据区缩放组件)、visualMap(视觉映射组件)、tooltip(提示框组件)、toolbox(工具栏组件)、series(系列)、...

我们注意到,其实系列(series)也是一种组件,可以理解为:系列是专门绘制“图”的组件。

如下图,右侧的 option 中声明了各个组件(包括系列),各个组件就出现在图中。

img

注:因为系列是一种特殊的组件,所以有时候也会出现 “组件和系列” 这样的描述,这种语境下的 “组件” 是指:除了 “系列” 以外的其他组件。

用 option 描述图表

上面已经出现了 option 这个概念。echarts 的使用者,使用 option 来描述其对图表的各种需求,包括:有什么数据、要画什么图表、图表长什么样子、含有什么组件、组件能操作什么事情等等。简而言之,option 表述了:数据数据如何映射成图形交互行为

// 创建 echarts 实例。
var dom = document.getElementById('dom-id');
var chart = echarts.init(dom);

// 用 option 描述 <code>数据数据如何映射成图形交互行为 等。
// option 是个大的 JavaScript 对象。
var option = {
    // option 每个属性是一类组件。
    legend: {...},
    grid: {...},
    tooltip: {...},
    toolbox: {...},
    dataZoom: {...},
    visualMap: {...},
    // 如果有多个同类组件,那么就是个数组。例如这里有三个 X 轴。
    xAxis: [
        // 数组每项表示一个组件实例,用 type 描述“子类型”。
        {type: 'category', ...},
        {type: 'category', ...},
        {type: 'value', ...}
    ],
    yAxis: [{...}, {...}],
    // 这里有多个系列,也是构成一个数组。
    series: [
        // 每个系列,也有 type 描述“子类型”,即“图表类型”。
        {type: 'line', data: [['AA', 332], ['CC', 124], ['FF', 412], ... ]},
        {type: 'line', data: [2231, 1234, 552, ... ]},
        {type: 'line', data: [[4, 51], [8, 12], ... ]}
    }]
};

// 调用 setOption 将 option 输入 echarts,然后 echarts 渲染图表。
chart.setOption(option);

系列里的 series.data 是本系列的数据。而另一种描述方式,系列数据从 dataset 中取:

var option = {
    dataset: {
        source: [
            [121, 'XX', 442, 43.11],
            [663, 'ZZ', 311, 91.14],
            [913, 'ZZ', 312, 92.12],
            ...
        ]
    },
    xAxis: {},
    yAxis: {},
    series: [
        // 数据从 dataset 中取,encode 中的数值是 dataset.source 的维度 index (即第几列)
        {type: 'bar', encode: {x: 1, y: 0}},
        {type: 'bar', encode: {x: 1, y: 2}},
        {type: 'scatter', encode: {x: 1, y: 3}},
        ...
    ]
};

组件的定位

不同的组件、系列,常有不同的定位方式。

[类 CSS 的绝对定位]

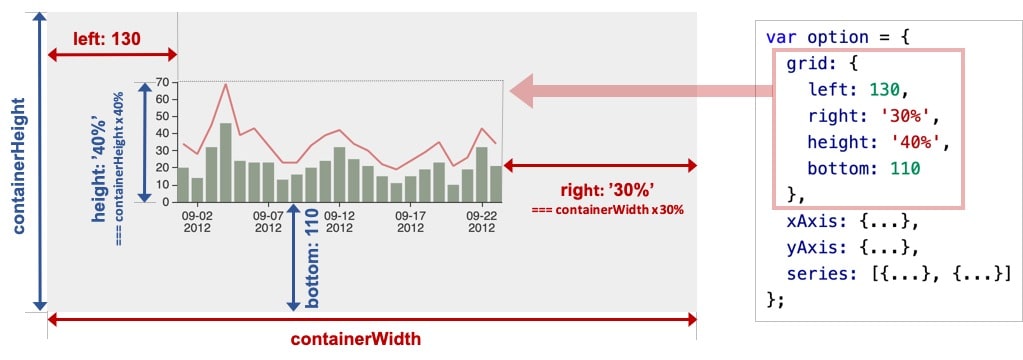
多数组件和系列,都能够基于 top / right / down / left / width / height 绝对定位。 这种绝对定位的方式,类似于 CSS 的绝对定位(position: absolute)。绝对定位基于的是 echarts 容器 DOM 节点。

其中,他们每个值都可以是:

  • 绝对数值(例如 bottom: 54 表示:距离 echarts 容器底边界 54 像素)。
  • 或者基于 echarts 容器高宽的百分比(例如 right: '20%' 表示:距离 echarts 容器右边界的距离是 echarts 容器宽度的 20%)。

如下图的例子,对 grid 组件(也就是直角坐标系的底板)设置 leftrightheightbottom 达到的效果。

img

我们可以注意到,left right width 是一组(横向)、top bottom height 是另一组(纵向)。这两组没有什么关联。每组中,至多设置两项就可以了,第三项会被自动算出。例如,设置了 leftright 就可以了,width 会被自动算出。

[中心半径定位]

少数圆形的组件或系列,可以使用“中心半径定位”,例如,pie(饼图)、sunburst(旭日图)、polar(极坐标系)。

中心半径定位,往往依据 center(中心)、radius(半径)来决定位置。

[其他定位]

少数组件和系列可能有自己的特殊的定位方式。在他们的文档中会有说明。

坐标系

很多系列,例如 line(折线图)、bar(柱状图)、scatter(散点图)、heatmap(热力图)等等,需要运行在 “坐标系” 上。坐标系用于布局这些图,以及显示数据的刻度等等。例如 echarts 中至少支持这些坐标系:直角坐标系极坐标系地理坐标系(GEO)单轴坐标系日历坐标系 等。其他一些系列,例如 pie(饼图)、tree(树图)等等,并不依赖坐标系,能独立存在。还有一些图,例如 graph(关系图)等,既能独立存在,也能布局在坐标系中,依据用户的设定而来。

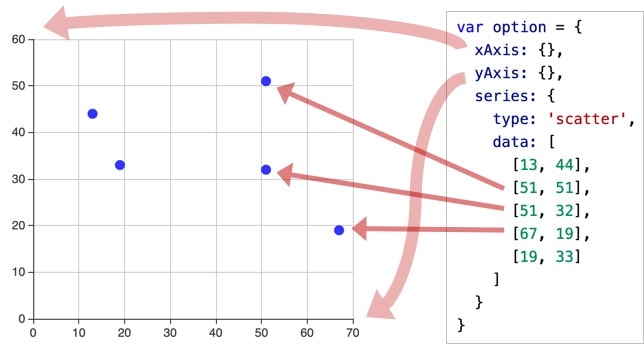
一个坐标系,可能由多个组件协作而成。我们以最常见的直角坐标系来举例。直角坐标系中,包括有 xAxis(直角坐标系 X 轴)、yAxis(直角坐标系 Y 轴)、grid(直角坐标系底板)三种组件。xAxisyAxisgrid 自动引用并组织起来,共同工作。

我们来看下图,这是最简单的使用直角坐标系的方式:只声明了 xAxisyAxis 和一个 scatter(散点图系列),echarts 暗自为他们创建了 grid 并关联起他们:

img

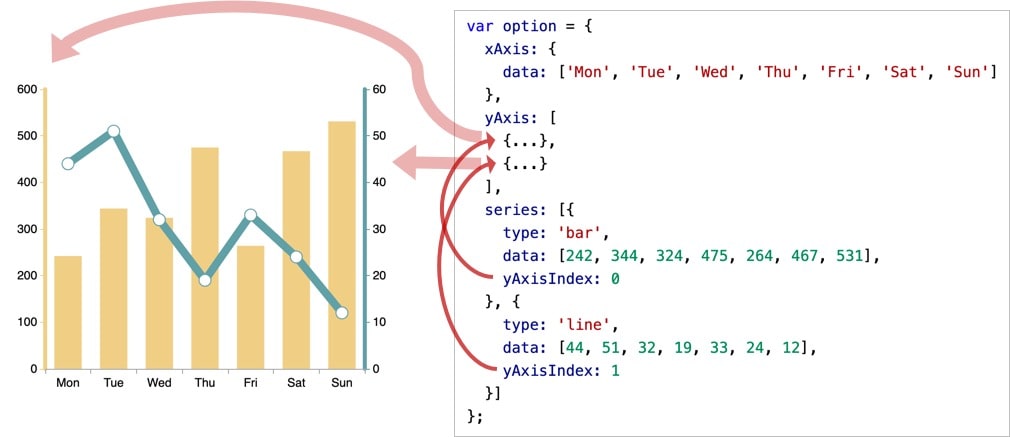
再来看下图,两个 yAxis,共享了一个 xAxis。两个 series,也共享了这个 xAxis,但是分别使用不同的 yAxis,使用 yAxisIndex 来指定它自己使用的是哪个 yAxis

img

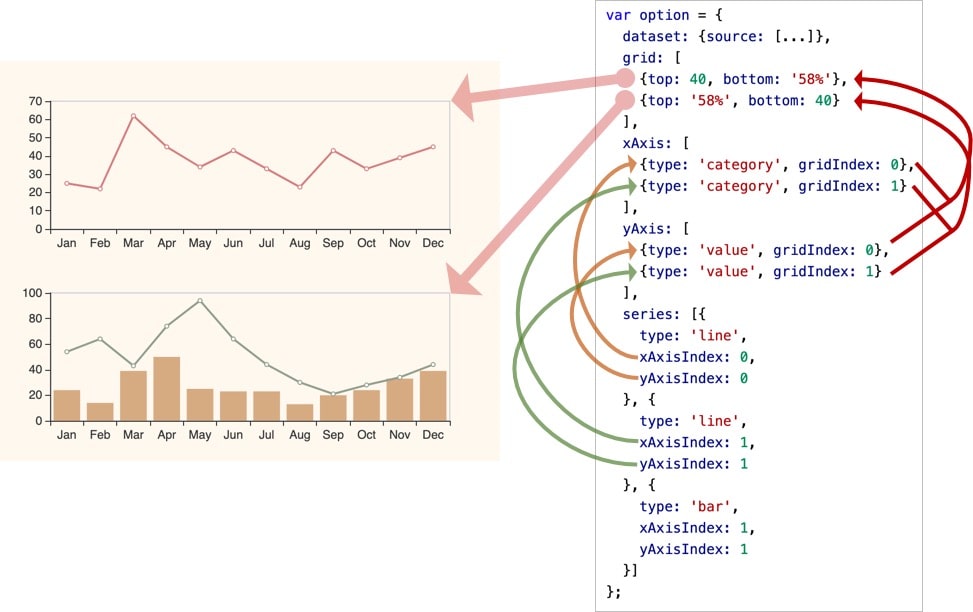
再来看下图,一个 echarts 实例中,有多个 grid,每个 grid 分别有 xAxisyAxis,他们使用 xAxisIndexyAxisIndexgridIndex 来指定引用关系:

img

另外,一个系列,往往能运行在不同的坐标系中。例如,一个 scatter(散点图)能运行在 直角坐标系极坐标系地理坐标系(GEO) 等各种坐标系中。同样,一个坐标系,也能承载不同的系列,如上面出现的各种例子,直角坐标系 里承载了 line(折线图)、bar(柱状图)等等。

ECharts 高级

ECharts API文档

ECharts Option说明

ECharts 官方示例

Views: 529

Kakfa管理操作的相关命令

主题操作

kafka-topics.sh脚本可以用来管理主题.

--topic 指定操作的主题名,除了创建之外都可以使用正则表达式,但是要使用\转义。另外命名不要使用两个下划线开头(__表示系统内建的主题,比如__consumer_offset),主题命名中不要将.和_混用(kafka会将.最终转换成_)。

创建主题

kafka-topics.sh --bootstrap-server hadoop000:9092 --create --topic test-1 --partitions 2 --replication-factor 2

注意: --bootstrap-server 后不要使用localhost, 而是跟上主机名

kafka-topics.sh --bootstrap-server hadoop000:9092 --create --topic test-2 --partitions 2 --replication-factor 2

--zookeeper localhost:2181/kafka 这样的写法从Kafka 2.2版本开始废弃,新版本kafka推荐使用--bootstrap-server替换

其中localhost:2181/kafka 来自于 kafka的server.propertieszookeeper.connect的配置

描述主题

列出所有主题详情

kafka-topics.sh --bootstrap-server hadoop000:9092 --describe

支持正则表达式

 ~]$ kafka-topics.sh --bootstrap-server hadoop000:9092 --describe --topic test-\.\+

修改主题

alter不能修改副本因子。分区数只能增加,不能减少

kafka-topics.sh --bootstrap-server hadoop000:9092 --alter --topic test-1 --partitions 3

删除主题

--delete 只是标记主题为删除状态, 并不会马上删除, 如果你希望立即从zookeeper中删除此主题的信息, 可以在配置文件 server.properties 添加配置 delete.topic.enable=true

kafka-topics.sh --bootstrap-server hadoop000:9092 --delete --topic test-2

列出主题

只列出主题名称, 不带详细信息

kafka-topics.sh --bootstrap-server hadoop000:9092 --list

消费者操作

使用 kafka-consumer-groups.sh 工具,我们可以列出、描述或删除消费者组。消费者组可以被手动删除,也可以在该组最后一次提交的偏移量到期时被自动删除。手动删除仅在组中没有任何活动成员时有效。

列出消费者群组

> bin/kafka-consumer-groups.sh --bootstrap-server hadoop000:9092 --list
test-consumer-group-1
test-consumer-group-2
test-consumer-group-3

如果使用新的消费者客户端,要列出消费者组,可以使用--bootstrap-server和--list选项。因为新的客户端已经删除了--zookeeper选项。

描述消费者群组

> bin/kafka-consumer-groups.sh --bootstrap-server hadoop000:9092 
--describe --group my-group

TOPIC PARTITION CURRENT-OFFSET LOG-END-OFFSET LAG CONSUMER-ID HOST CLIENTID
topic1 0  854144 855809 1665 consumer1-3fc8d6f1-581a-4472-bdf3-3515b4aee8c1 /127.0.0.1 consumer1
topic2 0  460537  803290  342753  consumer1-3fc8d6f1-581a-4472-bdf3-3515b4aee8c1 /127.0.0.1 consumer1 
topic3 2  243655  398812  155157  consumer4-117fe4d3-c6c1-4178-8ee9-eb4a3954bee0 /127.0.0.1 consumer4

删除消费者群组

> bin/kafka-consumer-groups.sh --bootstrap-server localhost:9092 
--delete --group my-group --group my-other-group
Deletion of requested consumer groups('my-group', 'my-other-group') was successful.

当要删除的消费者组不为空时,执行上面命令你将得到以下错误: GroupNotEmptyException

消费偏移量管理

删除偏移量

删除某个主题的某个消费者组的偏移量

> kafka-consumer-groups.sh --bootstrap-server hadoop000:9092 --delete-offsets --group my-group --topic my-topic-1 --topic my-topic-2
TOPIC                          PARTITION       STATUS 
my-topic-1                     0               Successful
my-topic-2                     0               Successful

○当要删除的消费者组不为空时,执行上面命令你将得到以下错误: GroupNotEmptyException

重置偏移量

要重置消费者组的偏移量,可以使用“--reset-offsets”选项。此选项一次只支持一个消费者组。它需要定义以下范围: --all-topic 或 --topic。必须选择一个作用域,除非使用 “--from-file”从文件导入的方式。

> bin/kafka-consumer-groups.sh --bootstrap-server localhost:9092 --reset-offsets --group consumergroup1 --topic topic1 --to-latest
TOPIC                          PARTITION  NEW-OFFSET
topic1                         0 

如果您使用的是旧的高级消费者,也就是消费者组元数据是存储在ZooKeeper中(即配置了offset .storage=ZooKeeper),则需要使用--zooKeeper而不是--bootstrap-server

配置项 描述
–-to-datetime 重置为某个时间点的偏移量.格式: 'YYYY-MM-DDTHH:mm:SS.sss'
--to-earliest : 重置为最早的偏移量
--to-latest : 重置为最近的偏移量
--shift-by : 将当前的偏移量偏移n个单位, n可以为正数也可以是负数
--from-file : 利用CSV文件中的数据重置偏移量
--to-current : R将偏移量重置为当前值
--by-duration : 重置偏移量为从当前时间戳开始的时长, 格式: 'PnDTnHnMnS'
--to-offset : 重置偏移量为指定的值

动态配置修改

从Kafka 1.1.0 开始有了动态配置修改的新特性。动态意味着在修改了Broker的配置后,我们不需要重新启动Broker来使其生效。

这个新特性包含在一个名为kafka-configs.sh的命令行工具脚本中。一旦使用这个工具设置了配置参数,新的更改将永久存储在zookeeper集群中。

覆盖主题默认配置

有许多应用于主题的配置,可以针对单个主题更改这些配置以适应集群中的不同用例。大多数配置都在代理配置中指定了缺省值,除非设置配置覆盖,否则将应用该缺省值。

格式

kafka-configs.sh --bootstrap-server <broker_list> --alter --entity-type topics --entity-name <topic name> --add-config <key>= <value>[,<key>=<value>...]

例子

# 下面的示例将my-topic主题的留存时间设置为1小时,即3600000ms:
$ kafka-configs.sh --bootstrap-server hadoop000:9092 --alter --entity-type topics --entity-name my-topic --add-config retention.ms=3600000

主题的有效可覆盖配置

配置(Key 说明
cleanup.policy 如果设置为compact,则topic中 的消息将被丢弃,仅保留具有给定key的最新消息(日志压缩)。
compression.type broker将消息写入磁盘时使用的压缩类型,可以用gzip、snappy和lz4.
delete.retention.ms 压缩日志墓碑消息的最长存放时间
file.delete.delay.ms 从磁盘中删除此topic的日志端和索引之前需要等待的多长时间
配置(Key 说明
flush.messages 在强制将此topic的消息刷到磁盘之前接收的消息数
flush.ms 在强制将此topic的消息刷到磁盘之前需要的时间,单位是毫秒
index.interval.bytes 日志段索引中的条目之间可以产生多少字节的消息
max.message.bytes 此topic中当个消息的大小
retention.bytes 为topic保留的消息量的总字节数
retention.ms topic中消息保留的最长时间,单位是毫秒

描述覆盖的配置

可以使用命令行工具kafka-configs.sh来检查主题或客户机的特定配置。显示覆盖的配置需要使用--describe选项。例如,一下代码显示名为my-topic的主题的所有覆盖过的配置

> kafka-configs.sh --bootstrap-server <broker_list> --describe --entity-type topics --entity-name my-topic

Configs for topic 'my-topic' are retention.ms=3600000

覆盖客户端默认配置

Kafka客户端(生产者和消费者)唯一可以覆盖的配置是生产者和消费者的配额,即允许具有指定客户端ID的所有客户端在每个broker上每秒生产或者消费的字节数。

格式

> kafka-configs.sh --bootstrap-server <broker_list> --alter --entity-type clients --entity-name <client ID> --add-config <key>=<value>[,<key>=<value>...]

Kafka客户端的有效配置

配置key 描述
producer_bytes_rate The amount of messages, in bytes, that a singe client ID is allowed to produce to a single broker in one second.
consumer_bytes_rate The amount of messages, in bytes, that a single client ID is allowed to consume from a single broker in one second.

如何把Broker中的生产者客户端ID为client_a的配额producer_byte_rate设置成20MB/秒?

> bin/kafka-configs.sh
 --bootstrap-server hadoop000:9092 
 --alter
 --entity-type clients 
 --entity-name client_a
 --add-config 'producer_bytes_rate=20971520'

注意:

  • --add-config 可以同时指定多个配置, 配置之间使用逗号分割

  • 要指定生产者或者消费者的client_id,如果是Java APIs可以为客户端添加配置client.id, 如果是控制台生产者或者消费者可以使用--producer.config--consumer.config进行指定配置文件并且在配置文件中指定client.id.

移除覆盖的配置

可以完全删除动态配置,这将导致集群配置恢复到默认值,要删除配置覆盖,请使用--alter命令以及--delete-config命令。

下面的示例可以删除一个名为my-topic的主题的覆盖后的retention.ms配置, 删除后retention.ms将恢复为默认值:

kafka-configs.sh --bootstrap-server hadoop000:9092 --alter --entity-type topics --entity-name my-topic --delete-config retention.ms

Completed updating config for entity: topic 'my-topic'.

Views: 642

Storm – 使用Trident实现词频统计并提供实时查询

为什么使用Trident

逐个处理单个tuple会增加很多开销,因此storm中引入Trident实现batch处理.

Trident优点是:

  • 批次处理消息
  • 减少持久化的开销
  • 结合Trident State能可靠保证每个消息只被处理一次

Trident的 State

Trident 在进行聚合操作时需要缓存中间结果, 可以看做Trident的状态(State).
Trident状态既可以保留在topology的内部,比如说内存中,也可以放到外部存储当中,比如说Memcached或者Cassandra数据库中.

Trident 允许以一种容错的方式来管理状态, 可以保证当遇到重试或错误时状态的更新是幂等的, 以此来实现EOS(Exactly only semantics)。

注:在数据统计分析中,幂等性是一个很重要的指标,因为它可以保证即使数据被处理了多次,但是站在结果的角度看和处理一次完全一样。

使用Trident实现词频统计

这里我们词频统计使用Trident拓扑实现.
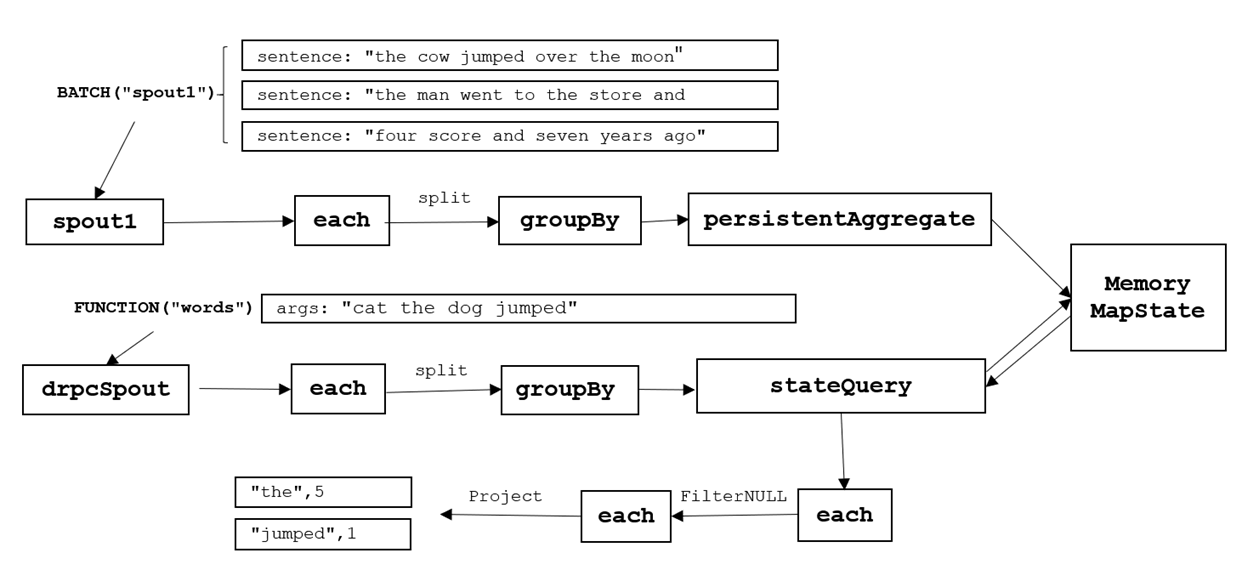
这里使用Storm提供的MemoryMapState管理状态(每个单词的实时统计个数), 顾名思义MemoryMapState管理的状态是保存在内存中的. 状态可以通过方法stateQuery进行实时查询.

然后提供一个DRPC服务, 客户端可以指定需要查询词频的单词有哪些.

本地提交模式

数据源

在这个例子中,我们使用FixedBatchSpout 对象模拟数据源来发送一句一句的文本内容。输入数据源也可以和Kestrel或者Kafka这样的消息队列对接, Trident在处理输入流的时候会转换成若干个tuple组成的batch来处理。这个 FixedBatchSpoutmaxBatchSize为5.

FixedBatchSpout spout = new FixedBatchSpout(new Fields("sentence"), 5,
                new Values("the cow jumped over the moon"),
                new Values("the man went to the store and bought some candy"),
                new Values("four score and seven years ago"),
                new Values("how many apples can you eat"),
                new Values("to be or not to be the person"));
        spout.setCycle(false);

Trident实现词频统计

接下来我们创建TridentTopology计算词频, 并将实时统计的结果保存在TridentState中:

TridentTopology topology = new TridentTopology();

        Config conf = new Config();
        conf.setMaxSpoutPending(20);
        conf.setNumWorkers(3);

        LocalDRPC drpc = new LocalDRPC();
        LocalCluster localCluster = new LocalCluster();

        TridentState wordCounts =
                topology.newStream("spout1", spout).parallelismHint(16)
                        .each(new Fields("sentence"), new Split(), new Fields("word"))
                        .groupBy(new Fields("word"))
                        .persistentAggregate(new MemoryMapState.Factory(), new Count(), new Fields("count"))
                        .parallelismHint(3);

解析:

  • TridentTopologynewStream方法传入了一个spout对象,spout对象会从外部读取数据并输出到当前topology当中,从而在topology中创建了一个新的数据流.
  • Trident会在Zookeeper中保存一小部分状态信息来追踪数据的处理情况,而在代码中我们指定的字符串“spout1”就是Zookeeper中用来存储metadata信息的Znode节点.
  • persistentAggregate方法会把数据流转换成一个TridentState对象, TridentState记录了单词的实时词频。

处理过程:

  • 根据空格拆分sentence,并将拆分出的每个单词作为一个tuple输出
  • 根据“word”字段进行groupBy操作
  • persistentAggregate会帮助你把计数的结果进行存储

提供DRPC服务实现实时词频查询

通过newDRPCStream可以接受DRPC客户端请求的参数:

topology.newDRPCStream("words", drpc)
                .each(new Fields("args"), new Split(), new Fields("word"))
                .groupBy(new Fields("word"))
                .stateQuery(wordCounts, new Fields("word"), new MapGet(), new Fields("count"))
                .each(new Fields("count"), new FilterNull())
                .project(new Fields("word", "count"))
                .aggregate(new Fields("count"), new Sum(), new Fields("sum"));

解析:

  • 对参数按照空格切分后作为word字段发射出去, 再对word 进行groupBy操作.
  • 使用stateQuery来在上面代码中创建的TridentState对象上进行查询。
  • stateQuery利用MapGet来获取每个单词的出现个数。
  • 由于DRPC stream是使用跟TridentState完全同样的group方式(按照“word”字段进行group),每个单词的查询会被路由到TridentState的相应分区去执行。
  • FilterNull这个过滤器把从未出现过的单词给去掉,
  • 并使用Sum这个聚合器将这些词频统计结果累加起来。最终,Trident会自动把这个结果发送回等待的客户端。

提交到集群

为了更快看到结果, 这里使用本地提交方式:

        localCluster.submitTopology(topoName, conf, topology.build());

DRPC本地客户端发起实时查询

下面这部分实现了一个低延时的单词数量的分布式实时DRPC查询。这个查询以一个用空格分割的单词列表为输入,并返回这些单词事实出现次数。

这些查询是像普通的RPC调用那样被执行的,要说不同的话,那就是他们在后台是并行执行的。下面是执行DRPC实时查询的一个例子:

        for (int i = 0; i < 10; i++) {
            System.out.println("DRPC RESULT: " + drpc.execute("words", "cat the dog jumped"));
            Thread.sleep(1000);
        }

        localCluster.shutdown();
        drpc.shutdown();

解析:

  • 发起DRPC请求, 请求的参数是"cat the dog jumped", 每隔1秒查询一次, 共10次.

Trident在如何最大程度的保证执行topogloy性能方面是非常智能的。在topology中会自动的发生两件非常有意思的事情:

  • 更新状态和读取状态操作 (比如说 persistentAggregate 和 stateQuery) 会自动的是batch的形式操作状态。
  • 如果有20次更新需要被同步到存储中,Trident会自动的把这些操作汇总到一起批处理,只做一次读写操作,而不是进行20次读写操作。

因此你可以在很方便的执行计算的同时,保证了非常好的性能。

Trident 的聚合器已经是被优化的非常好了的。Trident并不是简单的把一个group中所有的tuples都发送到同一个机器上面进行聚合,而是在发送之前已经进行过一次局部的聚合。打个比方,Count聚合器会先在每个partition上面进行count,然后把每个分片count汇总到一起就得到了最终 的count。这个技术其实就跟MapReduce里面的combiner是一个思想。

完整代码代码:

import org.apache.storm.Config;
import org.apache.storm.LocalCluster;
import org.apache.storm.LocalDRPC;
import org.apache.storm.trident.TridentState;
import org.apache.storm.trident.TridentTopology;
import org.apache.storm.trident.operation.BaseFunction;
import org.apache.storm.trident.operation.TridentCollector;
import org.apache.storm.trident.operation.builtin.Count;
import org.apache.storm.trident.operation.builtin.FilterNull;
import org.apache.storm.trident.operation.builtin.MapGet;
import org.apache.storm.trident.testing.FixedBatchSpout;
import org.apache.storm.trident.testing.MemoryMapState;
import org.apache.storm.trident.tuple.TridentTuple;
import org.apache.storm.tuple.Fields;
import org.apache.storm.tuple.Values;

/**
 * 将wordcount结果持久化到数据库
 */
public class AxTridentWordCountLocally {

    public static void main(String[] args) throws Exception {
        String topoName = "wordCounter";

        FixedBatchSpout spout = new FixedBatchSpout(new Fields("sentence"), 5,
                new Values("the cow jumped over the moon"),
                new Values("the man went to the store and bought some candy"),
                new Values("four score and seven years ago"),
                new Values("how many apples can you eat"),
                new Values("to be or not to be the person"));
        spout.setCycle(false);

        TridentTopology topology = new TridentTopology();

        Config conf = new Config();
        conf.setMaxSpoutPending(20);
        conf.setNumWorkers(3);

        LocalDRPC localDRPC = new LocalDRPC();
        LocalCluster localCluster = new LocalCluster();

        /*
         * 根据数据源拆分单词后,然后分区操作,在每个分区上又进行分组(hash算法),然后在每个分组上进行聚合
         * 所以这里可能有多个分区,每个分区有多个分组,然后在多个分组上进行聚合
         * 用来进行group的字段会以key的形式存在于State当中,聚合后的结果会以value的形式存储在State当中
         */
        TridentState wordCounts = topology.newStream("spout1", spout).parallelismHint(16)
                .each(new Fields("sentence"), new Split(), new Fields("word"))
                .groupBy(new Fields("word"))
                .persistentAggregate(new MemoryMapState.Factory(), new Count(), new Fields("count"))
                .parallelismHint(3);

        topology.newDRPCStream("words", localDRPC).each(new Fields("args"), new Split(), new Fields("word"))
                .groupBy(new Fields("word"))
                .stateQuery(wordCounts, new Fields("word"), new MapGet(), new Fields("count"))
                .each(new Fields("count"), new FilterNull())
                .project(new Fields("word", "count"));

        localCluster.submitTopology(topoName, conf, topology.build()); //异步

        for (int i = 0; i < 10; i++) {
            System.out.println("DRPC RESULT: " + localDRPC.execute("words", "cat the dog jumped"));
            Thread.sleep(1000);
        }

        localCluster.shutdown();
        localDRPC.shutdown();
    }

    public static class Split extends BaseFunction {
        @Override
        public void execute(TridentTuple tuple, TridentCollector collector) {
            String sentence = tuple.getString(0);
            for (String word : sentence.split(" ")) {
                collector.emit(new Values(word));
            }
        }
    }
}

执行结果

在执行上述代码之后,可能输出如下所示:

DRPC RESULT: []
DRPC RESULT: [["the",30],["jumped",6]]
DRPC RESULT: [["the",84],["jumped",16]]
DRPC RESULT: [["jumped",26],["the",130]]
DRPC RESULT: [["jumped",30],["the",149]]
DRPC RESULT: [["jumped",40],["the",199]]
DRPC RESULT: [["the",245],["jumped",49]]
DRPC RESULT: [["jumped",59],["the",295]]
DRPC RESULT: [["the",345],["jumped",69]]
DRPC RESULT: [["the",394],["jumped",79]]

数据流向示意图

file

远程提交模式

import org.apache.storm.Config;
import org.apache.storm.StormSubmitter;
import org.apache.storm.generated.StormTopology;
import org.apache.storm.trident.TridentState;
import org.apache.storm.trident.TridentTopology;
import org.apache.storm.trident.operation.BaseFunction;
import org.apache.storm.trident.operation.TridentCollector;
import org.apache.storm.trident.operation.builtin.Count;
import org.apache.storm.trident.operation.builtin.FilterNull;
import org.apache.storm.trident.operation.builtin.MapGet;
import org.apache.storm.trident.testing.FixedBatchSpout;
import org.apache.storm.trident.testing.MemoryMapState;
import org.apache.storm.trident.tuple.TridentTuple;
import org.apache.storm.tuple.Fields;
import org.apache.storm.tuple.Values;
import org.apache.storm.utils.DRPCClient;

public class CxTridentWordCountRemotely {
    public static StormTopology buildTopology() {
        FixedBatchSpout spout = new FixedBatchSpout(new Fields("sentence"), 3, new Values("the cow jumped over the moon"),
                new Values("the man went to the store and bought some candy"),
                new Values("four score and seven years ago"),
                new Values("how many apples can you eat"), new Values("to be or not to be the person"));
        spout.setCycle(true);

        TridentTopology topology = new TridentTopology();

        TridentState wordCounts = topology.newStream("spout1", spout).parallelismHint(16).each(new Fields("sentence"),
                new Split(), new Fields("word"))
                .groupBy(new Fields("word")).persistentAggregate(new MemoryMapState.Factory(),
                        new Count(), new Fields("count"))
                .parallelismHint(16);

        topology.newDRPCStream("words").each(new Fields("args"), new Split(), new Fields("word"))
                .groupBy(new Fields("word"))
                .stateQuery(wordCounts, new Fields("word"), new MapGet(), new Fields("count"))
                .each(new Fields("count"), new FilterNull())
                .project(new Fields("word", "count"));
        return topology.build();
    }

    public static void main(String[] args) throws Exception {
        Config conf = new Config();
        conf.setMaxSpoutPending(20);
        String topoName = "wordCounter";
        if (args.length > 0) {
            topoName = args[0];
        }
        conf.setNumWorkers(3);
        StormSubmitter.submitTopologyWithProgressBar(topoName, conf, buildTopology());
        try (DRPCClient drpc = DRPCClient.getConfiguredClient(conf)) {
            for (int i = 0; i < 10; i++) {
                System.out.println("DRPC RESULT: " + drpc.execute("words", "cat the dog jumped"));
                Thread.sleep(1000);
            }
        }
    }
    public static class Split extends BaseFunction {
        @Override
        public void execute(TridentTuple tuple, TridentCollector collector) {
            String sentence = tuple.getString(0);
            for (String word : sentence.split(" ")) {
                collector.emit(new Values(word));
            }
        }
    }
}

打成jar包上传到集群

Views: 629