HBase的JavaAPI操作
- HBase是一个分布式的NoSql数据库,在实际工作当中,我们一般都可以通过JavaAPI来进行各种数据的操作,包括创建表,以及数据的增删改查等等
创建maven工程
- 讲如下内容作为maven工程中pom.xml的repositories的内容
- 自动导包
 <?xml version="1.0" encoding="UTF-8"?>
<project xmlns="http://maven.apache.org/POM/4.0.0"
         xmlns:xsi="http://www.w3.org/2001/XMLSchema-instance"
         xsi:schemaLocation="http://maven.apache.org/POM/4.0.0 http://maven.apache.org/xsd/maven-4.0.0.xsd">
    <parent>
        <artifactId>XZK</artifactId>
        <groupId>org.example</groupId>
        <version>1.0-SNAPSHOT</version>
    </parent>
    <modelVersion>4.0.0</modelVersion>

    <artifactId>HbaseApi1</artifactId>
    <dependencies>
        <dependency>
            <groupId>org.apache.hadoop</groupId>
            <artifactId>hadoop-client</artifactId>
            <version>3.1.4</version>
        </dependency>
        <dependency>
            <groupId>org.apache.hadoop</groupId>
            <artifactId>hadoop-auth</artifactId>
            <version>3.1.4</version>
        </dependency>
        <!-- https://mvnrepository.com/artifact/org.apache.hbase/hbase-client -->
        <dependency>
            <groupId>org.apache.hbase</groupId>
            <artifactId>hbase-client</artifactId>
            <version>2.2.6</version>
        </dependency>
        <dependency>
            <groupId>org.apache.hbase</groupId>
            <artifactId>hbase-server</artifactId>
            <version>2.2.6</version>
        </dependency>
        <dependency>
            <groupId>junit</groupId>
            <artifactId>junit</artifactId>
            <version>4.12</version>
            <scope>test</scope>
        </dependency>
        <dependency>
            <groupId>org.testng</groupId>
            <artifactId>testng</artifactId>
            <version>6.14.3</version>
            <scope>test</scope>
        </dependency>
        <dependency>
            <groupId>org.testng</groupId>
            <artifactId>testng</artifactId>
            <version>6.14.3</version>
            <scope>compile</scope>
        </dependency>
    </dependencies>
    <build>
        <plugins>
            <plugin>
                <groupId>org.apache.maven.plugins</groupId>
                <artifactId>maven-compiler-plugin</artifactId>
                <version>3.0</version>
                <configuration>
                    <source>1.8</source>
                    <target>1.8</target>
                    <encoding>UTF-8</encoding>
                </configuration>
            </plugin>
            <plugin>
                <groupId>org.apache.maven.plugins</groupId>
                <artifactId>maven-shade-plugin</artifactId>
                <version>2.2</version>
                <executions>
                    <execution>
                        <phase>package</phase>
                        <goals>
                            <goal>shade</goal>
                        </goals>
                        <configuration>
                            <filters>
                                <filter>
                                    <artifact>*:*</artifact>
                                    <excludes>
                                        <exclude>META-INF/*.SF</exclude>
                                        <exclude>META-INF/*.DSA</exclude>
                                        <exclude>META-INF/*/RSA</exclude>
                                    </excludes>
                                </filter>
                            </filters>
                        </configuration>
                    </execution>
                </executions>
            </plugin>
        </plugins>
    </build>

</project>
创建myuser表
    //操作数据库  第一步:获取连接  第二步:获取客户端对象   第三步:操作数据库  第四步:关闭
    /**
     * 创建一张表  myuser  两个列族  f1   f2
     */
    @Test
    public void createTable() throws IOException {
        Configuration configuration = HBaseConfiguration.create();
        //连接HBase集群不需要指定HBase主节点的ip地址和端口号
        configuration.set("hbase.zookeeper.quorum","hadoop100:2181,hadoop101:2181,hadoop102:2181");
        //创建连接对象
        Connection connection = ConnectionFactory.createConnection(configuration);
        //获取连接对象,创建一张表
        //获取管理员对象,来对手数据库进行DDL的操作
        Admin admin = connection.getAdmin();
        //指定我们的表名
        TableName myuser = TableName.valueOf("myuser");
        HTableDescriptor hTableDescriptor = new HTableDescriptor(myuser);
        //指定两个列族
        HColumnDescriptor f1 = new HColumnDescriptor("f1");
        HColumnDescriptor f2 = new HColumnDescriptor("f2");
        hTableDescriptor.addFamily(f1);
        hTableDescriptor.addFamily(f2);

        admin.createTable(hTableDescriptor);
        admin.close();
        connection.close();
    }
向表中添加数据
    private Connection connection ;
    private final String TABLE_NAME = "myuser";
    private Table table ;

    @Before
    public void initTable () throws IOException {
        Configuration configuration = HBaseConfiguration.create();
        configuration.set("hbase.zookeeper.quorum","hadoop100:2181,hadoop101:2181");
        connection = ConnectionFactory.createConnection(configuration);
        table = connection.getTable(TableName.valueOf(TABLE_NAME));
    }

    @After
    public void close() throws IOException {
        table.close();
        connection.close();
    }

    /**
     *  向myuser表当中添加数据
     */
    @Test
    public void addData() throws IOException {
        //获取表
        //Table table = connection.getTable(TableName.valueOf(TABLE_NAME));
        Put put = new Put("0001".getBytes());//创建put对象,并指定rowkey值
        put.addColumn("f1".getBytes(),"name".getBytes(),"zhangsan".getBytes());
        put.addColumn("f1".getBytes(),"age".getBytes(), Bytes.toBytes(18));
        put.addColumn("f1".getBytes(),"id".getBytes(), Bytes.toBytes(25));
        put.addColumn("f1".getBytes(),"address".getBytes(), Bytes.toBytes("地球人"));
        table.put(put);
        table.close();
    }
查询数据

    /**
     * hbase的批量插入数据
     */
    @Test
    public void batchInsert() throws IOException {
        // 创建put对象,并指定rowkey
        Put put = new Put("0002".getBytes());

        put.addColumn("f1".getBytes(),"id".getBytes(),Bytes.toBytes(1));
        put.addColumn("f1".getBytes(),"name".getBytes(),Bytes.toBytes("曹操"));
        put.addColumn("f1".getBytes(),"age".getBytes(),Bytes.toBytes(30));
        put.addColumn("f2".getBytes(),"sex".getBytes(),Bytes.toBytes("1"));
        put.addColumn("f2".getBytes(),"address".getBytes(),Bytes.toBytes("沛国谯县"));
        put.addColumn("f2".getBytes(),"phone".getBytes(),Bytes.toBytes("16888888888"));
        put.addColumn("f2".getBytes(),"say".getBytes(),Bytes.toBytes("helloworld"));

        Put put2 = new Put("0003".getBytes());
        put2.addColumn("f1".getBytes(),"id".getBytes(),Bytes.toBytes(2));
        put2.addColumn("f1".getBytes(),"name".getBytes(),Bytes.toBytes("刘备"));
        put2.addColumn("f1".getBytes(),"age".getBytes(),Bytes.toBytes(32));
        put2.addColumn("f2".getBytes(),"sex".getBytes(),Bytes.toBytes("1"));
        put2.addColumn("f2".getBytes(),"address".getBytes(),Bytes.toBytes("幽州涿郡涿县"));
        put2.addColumn("f2".getBytes(),"phone".getBytes(),Bytes.toBytes("17888888888"));
        put2.addColumn("f2".getBytes(),"say".getBytes(),Bytes.toBytes("talk is cheap , show me the code"));

        Put put3 = new Put("0004".getBytes());
        put3.addColumn("f1".getBytes(),"id".getBytes(),Bytes.toBytes(3));
        put3.addColumn("f1".getBytes(),"name".getBytes(),Bytes.toBytes("孙权"));
        put3.addColumn("f1".getBytes(),"age".getBytes(),Bytes.toBytes(35));
        put3.addColumn("f2".getBytes(),"sex".getBytes(),Bytes.toBytes("1"));
        put3.addColumn("f2".getBytes(),"address".getBytes(),Bytes.toBytes("下邳"));
        put3.addColumn("f2".getBytes(),"phone".getBytes(),Bytes.toBytes("12888888888"));
        put3.addColumn("f2".getBytes(),"say".getBytes(),Bytes.toBytes("what are you 弄啥嘞!"));

        Put put4 = new Put("0005".getBytes());
        put4.addColumn("f1".getBytes(),"id".getBytes(),Bytes.toBytes(4));
        put4.addColumn("f1".getBytes(),"name".getBytes(),Bytes.toBytes("诸葛亮"));
        put4.addColumn("f1".getBytes(),"age".getBytes(),Bytes.toBytes(28));
        put4.addColumn("f2".getBytes(),"sex".getBytes(),Bytes.toBytes("1"));
        put4.addColumn("f2".getBytes(),"address".getBytes(),Bytes.toBytes("四川隆中"));
        put4.addColumn("f2".getBytes(),"phone".getBytes(),Bytes.toBytes("14888888888"));
        put4.addColumn("f2".getBytes(),"say".getBytes(),Bytes.toBytes("出师表你背了嘛"));

        Put put5 = new Put("0006".getBytes());
        put5.addColumn("f1".getBytes(),"id".getBytes(),Bytes.toBytes(5));
        put5.addColumn("f1".getBytes(),"name".getBytes(),Bytes.toBytes("司马懿"));
        put5.addColumn("f1".getBytes(),"age".getBytes(),Bytes.toBytes(27));
        put5.addColumn("f2".getBytes(),"sex".getBytes(),Bytes.toBytes("1"));
        put5.addColumn("f2".getBytes(),"address".getBytes(),Bytes.toBytes("哪里人有待考究"));
        put5.addColumn("f2".getBytes(),"phone".getBytes(),Bytes.toBytes("15888888888"));
        put5.addColumn("f2".getBytes(),"say".getBytes(),Bytes.toBytes("跟诸葛亮死掐"));

        Put put6 = new Put("0007".getBytes());
        put6.addColumn("f1".getBytes(),"id".getBytes(),Bytes.toBytes(5));
        put6.addColumn("f1".getBytes(),"name".getBytes(),Bytes.toBytes("xiaobubu—吕布"));
        put6.addColumn("f1".getBytes(),"age".getBytes(),Bytes.toBytes(28));
        put6.addColumn("f2".getBytes(),"sex".getBytes(),Bytes.toBytes("1"));
        put6.addColumn("f2".getBytes(),"address".getBytes(),Bytes.toBytes("内蒙人"));
        put6.addColumn("f2".getBytes(),"phone".getBytes(),Bytes.toBytes("15788888888"));
        put6.addColumn("f2".getBytes(),"say".getBytes(),Bytes.toBytes("貂蝉去哪了"));

        List<Put> listPut = new ArrayList<Put>();
        listPut.add(put);
        listPut.add(put2);
        listPut.add(put3);
        listPut.add(put4);
        listPut.add(put5);
        listPut.add(put6);

        table.put(listPut);
    }
Get查询
- 按照rowkey进行查询,获取所有列的所有值
- 查询主键rowkey为0003的人
/**
     * 查询rowkey为0003的人
     * get -> Result
     */
    @Test
    public void getData() throws IOException {
        // Table table = connection.getTable(TableName.valueOf(TABLE_NAME));
        // 通过get对象,指定rowkey
        Get get = new Get(Bytes.toBytes("0001"));
        get.addFamily("f1".getBytes());//限制只查询f1列族下面所有列的值
        // 查询f2  列族 phone  这个字段
        get.addColumn("f2".getBytes(), "phone".getBytes());
        // 通过get查询,返回一个result对象,所有的字段的数据都是封装在result里面了
        Result result = table.get(get);
        List<Cell> cells = result.listCells();  //获取一条数据所有的cell,所有数据值都是在cell里面 的

        if (cells != null) {
            for (Cell cell : cells) {
                // 获取列族名
                byte[] familyName = CellUtil.cloneFamily(cell);
                // 获取列名
                byte[] columnName = CellUtil.cloneQualifier(cell);
                // 获取rowKey
                byte[] rowKey = CellUtil.cloneRow(cell);
                // 获取cell值
                byte[] cellValue = CellUtil.cloneValue(cell);
                // 需要判断字段的数据类型,使用对应的转换的方法,才能够获取到值
                if ("age".equals(Bytes.toString(columnName)) || "id".equals(Bytes.toString(columnName))) {
                    System.out.println(Bytes.toString(familyName));
                    System.out.println(Bytes.toString(columnName));
                    System.out.println(Bytes.toString(rowKey));
                    System.out.println(Bytes.toInt(cellValue));
                } else {
                    System.out.println(Bytes.toString(familyName));
                    System.out.println(Bytes.toString(columnName));
                    System.out.println(Bytes.toString(rowKey));
                    System.out.println(Bytes.toString(cellValue));
                }
            }
            table.close();
        }
    }
Scan查询
    /**
     * 不知道rowkey的具体值,我想查询rowkey范围值是0003  到0006
     * select * from myuser  where age > 30  and id < 8  and name like 'zhangsan'
     *
     */
    @Test
    public void scanData() throws IOException {
        // 获取table
        // Table table = connection.getTable(TableName.valueOf(TABLE_NAME));
        Scan scan = new Scan();// 没有指定startRow以及stopRow  全表扫描
        // 只扫描f1列族
        scan.addFamily("f1".getBytes());
        // 只扫描f2列族: phone  这个字段
        scan.addColumn("f2".getBytes(), "phone".getBytes());
        scan.withStartRow("0003".getBytes());
        scan.withStopRow("0007".getBytes());  // 前闭后开
        // 通过getScanner查询获取到了表里面所有的数据,是多条数据
        ResultScanner scanner = table.getScanner(scan);
        // 遍历ResultScanner 得到每一条数据,每一条数据都是封装在result对象里面了
        for (Result result : scanner) {
            List<Cell> cells = result.listCells();
            for (Cell cell : cells) {
                byte[] family_name = CellUtil.cloneFamily(cell);
                byte[] qualifier_name = CellUtil.cloneQualifier(cell);
                byte[] rowkey = CellUtil.cloneRow(cell);
                byte[] value = CellUtil.cloneValue(cell);
                //判断id和age字段,这两个字段是整形值
                if ("age".equals(Bytes.toString(qualifier_name)) || "id".equals(Bytes.toString(qualifier_name))) {
                    System.out.println("数据的rowkey为" + Bytes.toString(rowkey) + "======数据的列族为" + Bytes.toString(family_name) + "======数据的列名为" + Bytes.toString(qualifier_name) + "==========数据的值为" + Bytes.toInt(value));
                } else {
                    System.out.println("数据的rowkey为" + Bytes.toString(rowkey) + "======数据的列族为" + Bytes.toString(family_name) + "======数据的列名为" + Bytes.toString(qualifier_name) + "==========数据的值为" + Bytes.toString(value));
                }
            }
        }
        table.close();
    }
HBase过滤器查询
过滤器
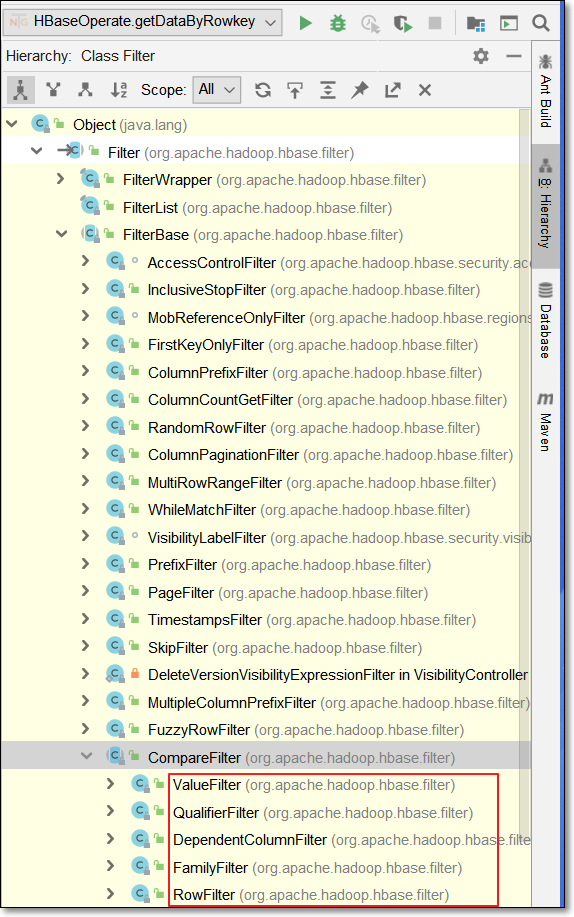
比较过滤器使用
LESS  <
LESS_OR_EQUAL <=
EQUAL =
NOT_EQUAL <>   不等于
GREATER_OR_EQUAL >=
GREATER >
NO_OP 排除所有
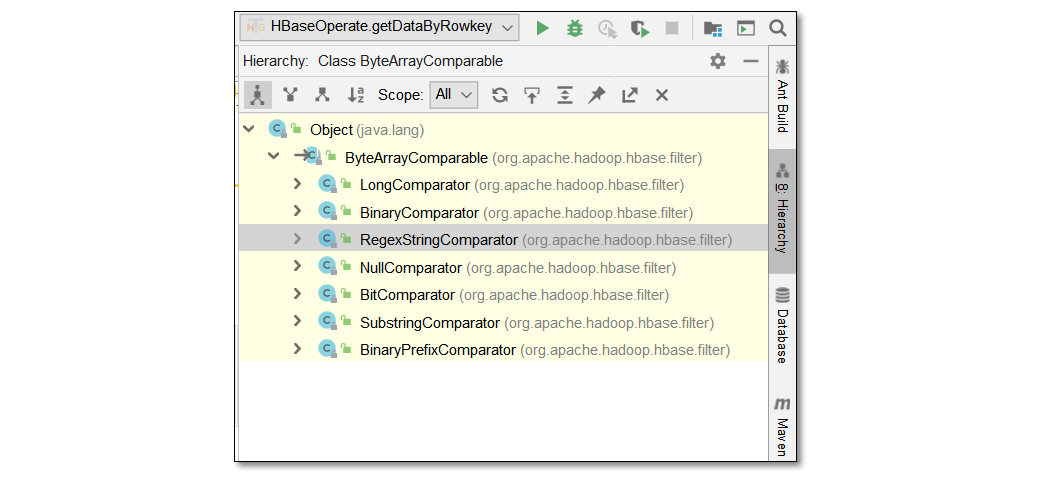
BinaryComparator  按字节索引顺序比较指定字节数组,采用Bytes.compareTo(byte[])
BinaryPrefixComparator 跟前面相同,只是比较左端前缀的数据是否相同
NullComparator 判断给定的是否为空
BitComparator 按位比较
RegexStringComparator 提供一个正则的比较器,仅支持 EQUAL 和非EQUAL
SubstringComparator 判断提供的子串是否出现在中
1、rowKey过滤器RowFilter
- 通过RowFilter过滤比rowKey 0003小的所有值出来
    /**
     * 查询所有的rowkey比0003小的所有的数据
     */
    @Test
    public void rowFilter() throws IOException {
        // Table table = connection.getTable(TableName.valueOf(TABLE_NAME));
        Scan scan = new Scan();
        // 获取我们比较对象
        BinaryComparator binaryComparator = new BinaryComparator("0003".getBytes());
        /*
         * rowFilter需要加上两个参数
         * 第一个参数就是我们的比较规则
         * 第二个参数就是我们的比较对象
         */
        RowFilter rowFilter = new RowFilter(CompareFilter.CompareOp.LESS, binaryComparator);
        // 为我们的scan对象设置过滤器
        scan.setFilter(rowFilter);
        ResultScanner scanner = table.getScanner(scan);
        for (Result result : scanner) {
            List<Cell> cells = result.listCells();
            for (Cell cell : cells) {
                byte[] family_name = CellUtil.cloneFamily(cell);
                byte[] qualifier_name = CellUtil.cloneQualifier(cell);
                byte[] rowkey = CellUtil.cloneRow(cell);
                byte[] value = CellUtil.cloneValue(cell);
                // 判断id和age字段,这两个字段是整形值
                if ("age".equals(Bytes.toString(qualifier_name)) || "id".equals(Bytes.toString(qualifier_name))) {
                    System.out.println("数据的rowkey为" + Bytes.toString(rowkey) + "======数据的列族为" + Bytes.toString(family_name) + "======数据的列名为" + Bytes.toString(qualifier_name) + "==========数据的值为" + Bytes.toInt(value));
                } else {
                    System.out.println("数据的rowkey为" + Bytes.toString(rowkey) + "======数据的列族为" + Bytes.toString(family_name) + "======数据的列名为" + Bytes.toString(qualifier_name) + "==========数据的值为" + Bytes.toString(value));
                }
            }
        }
    }
2、列族过滤器FamilyFilter
    /**
     * 通过familyFilter来实现列族的过滤
     * 需要过滤,列族名包含f2
     * f1  f2   hello   world
     */
    @Test
    public void familyFilter() throws IOException {
         // Table table = connection.getTable(TableName.valueOf(TABLE_NAME));
        Scan scan = new Scan();
        SubstringComparator substringComparator = new SubstringComparator("f2");
        // 通过familyfilter来设置列族的过滤器
        FamilyFilter familyFilter = new FamilyFilter(CompareFilter.CompareOp.EQUAL, substringComparator);
        scan.setFilter(familyFilter);
        ResultScanner scanner = table.getScanner(scan);
        for (Result result : scanner) {
            List<Cell> cells = result.listCells();
            for (Cell cell : cells) {
                byte[] familyName = CellUtil.cloneFamily(cell);
                byte[] qualifierName = CellUtil.cloneQualifier(cell);
                byte[] rowKey = CellUtil.cloneRow(cell);
                byte[] value = CellUtil.cloneValue(cell);
                // 判断id和age字段,这两个字段是整形值
                if ("age".equals(Bytes.toString(qualifierName)) || "id".equals(Bytes.toString(qualifierName))) {
                    System.out.println("数据的rowkey为" + Bytes.toString(rowKey) + "======数据的列族为" + Bytes.toString(familyName) + "======数据的列名为" + Bytes.toString(qualifierName) + "==========数据的值为" + Bytes.toInt(value));
                } else {
                    System.out.println("数据的rowkey为" + Bytes.toString(rowKey) + "======数据的列族为" + Bytes.toString(familyName) + "======数据的列名为" + Bytes.toString(qualifierName) + "==========数据的值为" + Bytes.toString(value));
                }
            }
        }
    }
3、列过滤器QualifierFilter
/**
     * 列名过滤器 只查询包含name列的值
     */
    @Test
    public void  qualifierFilter() throws IOException {
        Scan scan = new Scan();
        SubstringComparator substringComparator = new SubstringComparator("name");
        // 定义列名过滤器,只查询列名包含name的列
        QualifierFilter qualifierFilter = new QualifierFilter(CompareFilter.CompareOp.EQUAL, substringComparator);
        scan.setFilter(qualifierFilter);
        ResultScanner scanner = table.getScanner(scan);
        printResult(scanner);
    }
  public void printResult(ResultScanner scanner) {
      for (Result result : scanner) {
         List<Cell> cells = result.listCells();
         for (Cell cell : cells) {
            byte[] family_name = CellUtil.cloneFamily(cell);
            byte[] qualifier_name = CellUtil.cloneQualifier(cell);
            byte[] rowkey = CellUtil.cloneRow(cell);
            byte[] value = CellUtil.cloneValue(cell);
            //判断id和age字段,这两个字段是数值
            if("age".equals(Bytes.toString(qualifier_name))  || "id".equals(Bytes.toString(qualifier_name))){
               System.out.println("rowkey: " + Bytes.toString(rowkey) + ";列族: " + Bytes.toString(family_name) + ";列名: " + Bytes.toString(qualifier_name) + ";数据: " + Bytes.toInt(value));
            }else{
               System.out.println("rowkey: " + Bytes.toString(rowkey) + ";列族: " + Bytes.toString(family_name) + ";列名: " + Bytes.toString(qualifier_name) + ";数据: " + Bytes.toString(value));
            }
         }
      }
   }
4、列值过滤器ValueFilter
    /**
     * 查询哪些字段值  包含数字8
     */
    @Test
    public void contains8() throws IOException {
        Scan scan = new Scan();
        SubstringComparator substringComparator = new SubstringComparator("8");
        // 列值过滤器,过滤列值当中包含数字8的所有的列
        ValueFilter valueFilter = new ValueFilter(CompareFilter.CompareOp.EQUAL, substringComparator);
        scan.setFilter(valueFilter);
        ResultScanner scanner = table.getScanner(scan);
        printResult(scanner);
    }
专用过滤器使用
1、单列值过滤器 SingleColumnValueFilter
    /**
     */
    @Test
    public void singleColumnValueFilter() throws IOException {
        // 查询 f1  列族 name  列  值为刘备的数据
        Scan scan = new Scan();
        // 单列值过滤器,过滤  f1 列族  name  列  值为刘备的数据
        SingleColumnValueFilter singleColumnValueFilter = new SingleColumnValueFilter("f1".getBytes(), "name".getBytes(), CompareFilter.CompareOp.EQUAL, "刘备".getBytes());
        scan.setFilter(singleColumnValueFilter);
        ResultScanner scanner = table.getScanner(scan);
        printResult(scanner);
    }
2、列值排除过滤器SingleColumnValueExcludeFilter
- 与SingleColumnValueFilter相反
- 如果指定列的值符合filter条件,则会排除掉row中指定的列,其他的列全部返回
- 如果列不存在或不符合filter条件,则不返回row中的列
3、rowkey前缀过滤器PrefixFilter
    /**
     * 查询rowkey前缀以  00开头的所有的数据
     */
    @Test
    public  void  prefixFilter() throws IOException {
        Scan scan = new Scan();
        //过滤rowkey以  00开头的数据
        PrefixFilter prefixFilter = new PrefixFilter("00".getBytes());
        scan.setFilter(prefixFilter);
        ResultScanner scanner = table.getScanner(scan);
        printResult(scanner);
    }
4、分页过滤器PageFilter
/**
     * HBase当中的分页
     */
    @Test
    public void hbasePageFilter() throws IOException {
               int pageNum = 3;
        int pageSize = 2;
        Scan scan = new Scan();
        String startRow = "";
        // 扫描数据的调试 扫描五条数据
        int scanDatas = (pageNum - 1) * pageSize + 1;
        scan.setMaxResultSize(scanDatas);//设置一步往前扫描多少条数据
        PageFilter filter = new PageFilter(scanDatas);
        scan.setFilter(filter);
        ResultScanner scanner = table.getScanner(scan);
        for (Result result : scanner) {
            // 获取rowkey
            byte[] row = result.getRow();
            // 最后一次startRow的值就是0005
            startRow = Bytes.toString(row);// 循环遍历我们所有获取到的数据的rowkey
            // 最后一条数据的rowkey就是我们需要的起始的rowkey
        }
        // 获取第三页的数据
        scan.withStartRow(startRow.getBytes());
        scan.setMaxResultSize(pageSize);//设置我们扫描多少条数据
        PageFilter filter1 = new PageFilter(pageSize);
        scan.setFilter(filter1);
        ResultScanner scanner1 = table.getScanner(scan);
        printResult(scanner1);
    }
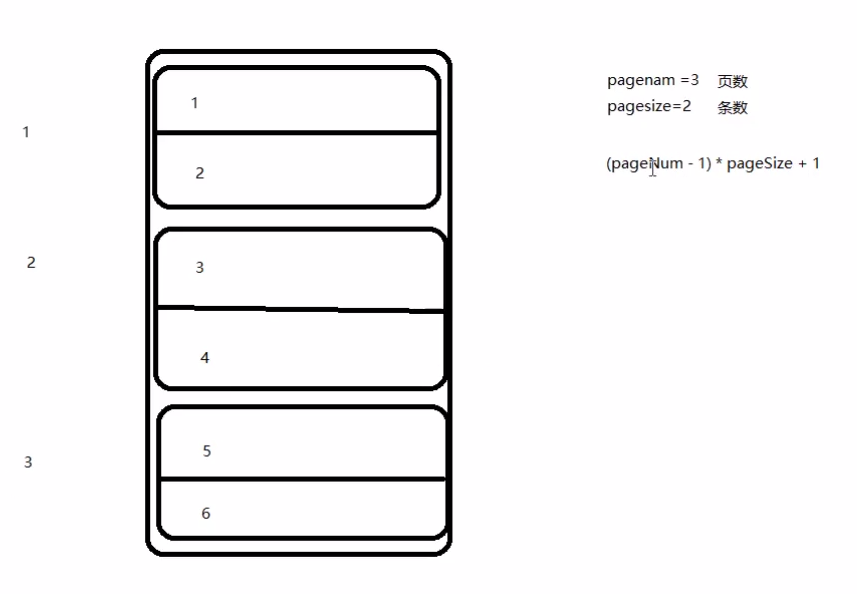
说明:
pageSize = 2设置每页展示2条数据 pageNum = 3设置查询第3页数据- 计算查询首条记录的索引
(pageNum - 1) * pageSize + 1
5、多过滤器综合查询FilterList
- 需求:使用
SingleColumnValueFilter查询f1列族,name为刘备的数据,并且同时满足rowkey的前缀以00开头的数据(PrefixFilter)
    /**
     * 查询  f1 列族  name  为刘备数据值
     * 并且rowkey 前缀以  00开头数据
     */
    @Test
    public  void filterList() throws IOException {
        Scan scan = new Scan();
        SingleColumnValueFilter singleColumnValueFilter = new SingleColumnValueFilter("f1".getBytes(), "name".getBytes(), CompareFilter.CompareOp.EQUAL, "刘备".getBytes());
        PrefixFilter prefixFilter = new PrefixFilter("00".getBytes());
        FilterList filterList = new FilterList();
        filterList.addFilter(singleColumnValueFilter);
        filterList.addFilter(prefixFilter);
        scan.setFilter(filterList);
        ResultScanner scanner = table.getScanner(scan);
         printResult(scanner);
    }
说明:
SingleColumnValueFilter单列过滤器, 比较列值是否等于刘备prefixFilter前缀过滤器用于匹配rowKey是否以00开头
Views: 29