电商日志分析项目 – 01 环境搭建和项目部署

一、CentOS7下MySQL-5.7使用yum方式安装:


Centos7的MySQL安装

卸载mariaDb

mysql被oracle收购后为了防止mysql有可能变成闭源,因此mysql创始人maria就开源做了一个mariaDb, centos7是自带使用了这个数据库的.因此安装mysql之前,应当首先卸载mariadb数据库:

$ sudo yum list installed | grep mariadb    #检查mariadb是否已安装

$ sudo yum list installed | grep mariadb
mariadb-libs.x86_64                     1:5.5.56-2.el7                 @anaconda

$ sudo yum -y remove mariadb*    #全部卸载

同理如果是已经安装过其他版本的MySQL,安装新的版本之前也需要按照如上方法进行卸载。

安装MySQL

下载mysql的YUM源: https://dev.mysql.com/downloads/repo/yum/

YUM源的官方安装说明:https://dev.mysql.com/doc/mysql-yum-repo-quick-guide/en/

下载源mysql的YUM源,官网提供的是最新的MySQL8.0的源,内含其他较低版本的源

wget -P /home/hadoop/softwares https://dev.mysql.com/get/mysql80-community-release-el7-3.noarch.rpm  --no-check-certificate

由于我们是下载到/home/hadoop/softwares目录下,所以先切换到该目录下:

cd /home/hadoop/softwares

安装mysql的YUM源:

sudo rpm -ivh mysql80-community-release-el7-3.noarch.rpm

检查mysql的YUM源是否安装成功:

sudo yum repolist enabled | grep mysql

mysql-connectors-community/x86_64       MySQL Connectors Community           175
mysql-tools-community/x86_64            MySQL Tools Community                120
mysql80-community/x86_64                MySQL 8.0 Community Server           211

选择要启用的mysql版本

查看源里包含的mysql版本,执行:

sudo yum repolist all | grep mysql

mysql-cluster-7.5-community/x86_64 MySQL Cluster 7.5 Community      禁用
mysql-cluster-7.5-community-source MySQL Cluster 7.5 Community - So 禁用
mysql-cluster-7.6-community/x86_64 MySQL Cluster 7.6 Community      禁用
mysql-cluster-7.6-community-source MySQL Cluster 7.6 Community - So 禁用
mysql-cluster-8.0-community/x86_64 MySQL Cluster 8.0 Community      禁用
mysql-cluster-8.0-community-source MySQL Cluster 8.0 Community - So 禁用
mysql-connectors-community/x86_64  MySQL Connectors Community       启用:    175
mysql-connectors-community-source  MySQL Connectors Community - Sou 禁用
mysql-tools-community/x86_64       MySQL Tools Community            启用:    120
mysql-tools-community-source       MySQL Tools Community - Source   禁用
mysql-tools-preview/x86_64         MySQL Tools Preview              禁用
mysql-tools-preview-source         MySQL Tools Preview - Source     禁用
mysql55-community/x86_64           MySQL 5.5 Community Server       禁用
mysql55-community-source           MySQL 5.5 Community Server - Sou 禁用
mysql56-community/x86_64           MySQL 5.6 Community Server       禁用
mysql56-community-source           MySQL 5.6 Community Server - Sou 禁用
mysql57-community/x86_64           MySQL 5.7 Community Server       禁用
mysql57-community-source           MySQL 5.7 Community Server - Sou 禁用
mysql80-community/x86_64           MySQL 8.0 Community Server       启用:    211
mysql80-community-source           MySQL 8.0 Community Server - Sou 禁用

可以通过类似下面的语句来启动和禁用某些版本,比如这里是禁用默认启用的MySQL8.0的源,转而启用我们需要安装的MySQL5.7的源。

或者通过修改/etc/yum.repos.d/mysql-community.repo文件,改变默认安装的mysql版本。比如要安装5.7版本,将8.0源的enabled=1改成enabled=0,然后再将5.7源的enabled=0改成enabled=1即可。

sudo yum-config-manager --enable mysql57-community
sudo yum-config-manager --disable mysql80-community

要使用yum-config-manager命令, 需要先安装yum-utils: sudo yum install yum-utils

注意: 同一时间只允许enable一个MySQL版本。

如果只需要安装MySQL5.7的版本,也可以不看上面,直接本地安装指定的远程MySQL5.7源

yum localinstall https://dev.mysql.com/get/mysql57-community-release-el7-9.noarch.rpm

查看当前的启用的 MySQL 版本:

yum repolist enabled | grep mysql

mysql-connectors-community/x86_64       MySQL Connectors Community           175
mysql-tools-community/x86_64            MySQL Tools Community                120
mysql57-community/x86_64                MySQL 5.7 Community Server           464

安装MySQL

sudo yum install -y mysql-community-server

已加载插件:fastestmirror
mysql-connectors-community                                             | 2.6 kB  00:00:00     
mysql-tools-community                                                  | 2.6 kB  00:00:00     
mysql57-community                                                      | 2.6 kB  00:00:00     
mysql57-community/x86_64/prima FAILED                                          
http://repo.mysql.com/yum/mysql-5.7-community/el/7/x86_64/repodata/cae8c564a11e5fca11dbe958c273358f206f1bba-primary.sqlite.bz2: [Errno 14] curl#7 - "Failed connect to repo.mysql.com:80; Connection refused"
正在尝试其它镜像。
mysql57-community/x86_64/primary_db                                    | 247 kB  00:00:00     
Loading mirror speeds from cached hostfile
 * base: mirrors.aliyun.com
 * extras: mirrors.aliyun.com
 * updates: mirrors.aliyun.com
正在解决依赖关系
--> 正在检查事务
---> 软件包 mysql-community-server.x86_64.0.5.7.32-1.el7 将被 安装
--> 正在处理依赖关系 mysql-community-common(x86-64) = 5.7.32-1.el7,它被软件包 mysql-community-server-5.7.32-1.el7.x86_64 需要
--> 正在处理依赖关系 mysql-community-client(x86-64) >= 5.7.9,它被软件包 mysql-community-server-5.7.32-1.el7.x86_64 需要
--> 正在检查事务
---> 软件包 mysql-community-client.x86_64.0.5.7.32-1.el7 将被 安装
--> 正在处理依赖关系 mysql-community-libs(x86-64) >= 5.7.9,它被软件包 mysql-community-client-5.7.32-1.el7.x86_64 需要
---> 软件包 mysql-community-common.x86_64.0.5.7.32-1.el7 将被 安装
--> 正在检查事务
---> 软件包 mysql-community-libs.x86_64.0.5.7.32-1.el7 将被 安装
--> 解决依赖关系完成

依赖关系解决

==============================================================================================
 Package                      架构         版本                 源                       大小
==============================================================================================
正在安装:
 mysql-community-server       x86_64       5.7.32-1.el7         mysql57-community       173 M
为依赖而安装:
 mysql-community-client       x86_64       5.7.32-1.el7         mysql57-community        25 M
 mysql-community-common       x86_64       5.7.32-1.el7         mysql57-community       308 k
 mysql-community-libs         x86_64       5.7.32-1.el7         mysql57-community       2.3 M

事务概要
==============================================================================================
安装  1 软件包 (+3 依赖软件包)

总下载量:201 M
安装大小:875 M

....

已安装:
  mysql-community-server.x86_64 0:5.7.32-1.el7                                                

作为依赖被安装:
  mysql-community-client.x86_64 0:5.7.32-1.el7  
  mysql-community-common.x86_64 0:5.7.32-1.el7 
  mysql-community-libs.x86_64 0:5.7.32-1.el7 

启动MySQL服务

systemctl start mysqld.service # 或 service mysqld start

配置开机启动

systemctl enable mysqld.service

查看运行状态

systemctl status mysqld.service

mysql      2574      1  1 23:49 ?        00:00:00 /usr/sbin/mysqld --daemonize --pid-file=/var/run/mysqld/mysqld.pid

查看到进程信息

netstat -anpl  | grep mysql

查看端口,可以看出mysql server的进程mysqld所使用的默认端口即3306

$ sudo netstat -anpl | grep tcp
tcp        0      0 0.0.0.0:22              0.0.0.0:*               LISTEN      1412/sshd         
tcp        0     52 192.168.186.103:22      192.168.186.1:54058     ESTABLISHED 2287/sshd: hadoop 
tcp6       0      0 :::3306                 :::*                    LISTEN      2574/mysqld       
tcp6       0      0 192.168.186.103:3888    :::*                    LISTEN      2060/java         
tcp6       0      0 :::22                   :::*                    LISTEN      1412/sshd         
tcp6       0      0 :::37791                :::*                    LISTEN      2060/java         
tcp6       0      0 :::2181                 :::*                    LISTEN      2060/java 

找到临时密码

但是要登陆mysql,我们需要root密码,这个密码是安装时随机生成在MySQL的服务器日志中的

grep "temporary password" /var/log/mysqld.log

2020-02-26T17:05:45.104999Z 1 [Note] A temporary password is generated for root@localhost: bl/!6qaU.wuX

登录MySQL

# 回车后输入在日志中找到的临时root登录密码登录
mysql -u roop -p 

问题: 日志里没有找到临时密码, 或者密码不能登录,可能的原因就是之前安装过MySQL

解决办法:

sudo rm -rf /var/lib/mysql

再重启服务后就可以在日志文件中找到重新生成的临时密码了

systemctl restart mysqld.service

$ cat /var/log/mysqld.log | grep "temporary password"
2020-02-26T17:05:45.104999Z 1 [Note] A temporary password is generated for root@localhost: bl/!6qaU.wuX
2020-08-01T16:07:26.941916Z 1 [Note] A temporary password is generated for root@localhost: x/ttqh=)_6Z/

也可以直接使用明文密码登陆,像这样

mysql -uroop -p"x/ttqh=)_6Z/"

初始密码我们可以这样操作,因为很快我们会将将其改为其他的密码。

但是正常使用时不建议这样 不安全

黑客可以使用history命令查看到你在命令行的输入获取到你的MySQL的root密码

另外MySQL报错在/var下面的log目录下可以查看


如果是虚拟机环境为了方便可以选择配置跳过密码验证

vim /etc/my.cnf

添加以下代码

default-authentication-plugin=mysql_native_password #配置文件本来就有去掉注释即可
symbolic-links=0
skip-grant-tables #跳过密码验证

第一次登陆后系统会很快提示你修改掉默认密码

mysql> show databases;
ERROR 1820 (HY000): You must reset your password using ALTER USER statement before executing this statement.

尝试修改密码(虚拟机可以设置简单密码,如果是购买的服务器则需设置复杂密码并修改默认端口号)

mysql> alter user 'root'@'localhost' identified by 'niit1234';
ERROR 1819 (HY000): Your password does not satisfy the current policy requirements

密码安全策略

但是基于密码策略,所设置的密码必须要包含大小写字母、数字和字符。

修改策略并设置简单密码

将策略要求置为0(LOW),长度要求置为1

mysql> set global validate_password_policy=0;
mysql> set global validate_password_length=1;

关于密码安全策略:

通过show命令查看当前的策略

mysql> show variables like 'validate_password%';

+--------------------------------------+--------+
| Variable_name                        | Value  |
+--------------------------------------+--------+
| validate_password_check_user_name    | OFF    |
| validate_password_dictionary_file    |        |
| validate_password_length             | 8      |
| validate_password_mixed_case_count   | 1      |
| validate_password_number_count       | 1      |
| validate_password_policy             | MEDIUM |
| validate_password_special_char_count | 1      |
+--------------------------------------+--------+
7 rows in set (0.00 sec)

1) validate_password_policy:密码安全策略,默认MEDIUM策略

策略 检查规则
0 or LOW Length
1 or MEDIUM Length; numeric, lowercase/uppercase, and special characters
2 or STRONG Length; numeric, lowercase/uppercase, and special characters; dictionary file

2)validate_password_dictionary_file:密码策略文件,策略为STRONG才需要

3)validate_password_length:密码最少长度

4)validate_password_mixed_case_count:大小写字符长度,至少1个

5)validate_password_number_count :数字至少1个

6)validate_password_special_char_count:特殊字符至少1个

这样以后就可以使用新密码登陆了

开启远程登陆

mysql命令的-h选项可以设置需要远程登陆mysql的服务器的ip地址

如果是本地的话可以使用127.0.0.1或者直接省略

但是远程访问因为安全原因默认是关闭的

mysql> select Host,User from user;
+-----------+---------------+
| Host      | User          |
+-----------+---------------+
| localhost | mysql.session |
| localhost | mysql.sys     |
| localhost | root          |
+-----------+---------------+
3 rows in set (0.00 sec)

这里可以看到host都是localhost,这就是因为这些账号只有本地访问的权限

我们需要将root的访问权限扩大都允许任意方式访问(包括远程访问)

GRANT ALL PRIVILEGES ON *.* TO 'root'@'%'IDENTIFIED BY 'niit1234' WITH GRANT OPTION;

也可以创建一个专门用来支持远程访问的单独用户

GRANT ALL PRIVILEGES ON *.* TO 'remote'@'%' IDENTIFIED BY 'niit1234' WITH GRANT OPTION; 

如果你想允许用户myuser从ip为192.168.1.6的主机连接到mysql服务器,并使用mypassword作为密码

若你想限制能连接到mysql服务器的客户端所在的IP地址为'192.168.1.6'

并使用mypassword作为密码,则命令如下:

GRANT ALL PRIVILEGES ON . TO 'mysqluser'@'192.168.1.6'IDENTIFIED BY 'mypassword' WITH GRANT OPTION;

使修改生效

现在虽然修改了远程访问权限,但是还没有生效

我们需要刷新权限(或者重启服务),当然直接在mysql执行环境刷新权限是更好的方法

mysql>FLUSH PRIVILEGES;

然后我们可以试试使用navicat远程连接虚拟机中mysql试试

navicat虽然是收费的还是可以下载到破解的版本

最后一点

如果你的服务器开启了防火墙也可能导致远程无法连接

因为mysql默认使用3306端口,我们需要开放这个端口给mysql客户端连接

修改编码

默认安装的设置对中文的支持不好,一般需要修改成utf8,但这里我们修改成utf8mb4编码,因为它是uft8的超集,减少更多乱码的问题,也是推荐使用的编码,比如需要插入emoji字符在数据库中,utf8的显示就会出现问题,而utf8mb4则没有问题。

首先查看当前的编码:

mysql> show variables like '%char%';
+--------------------------------------+----------------------------+
| Variable_name                        | Value                      |
+--------------------------------------+----------------------------+
| character_set_client                 | utf8                       |
| character_set_connection             | utf8                       |
| character_set_database               | latin1                     |
| character_set_filesystem             | binary                     |
| character_set_results                | utf8                       |
| character_set_server                 | latin1                     |
| character_set_system                 | utf8                       |
| character_sets_dir                   | /usr/share/mysql/charsets/ |
| validate_password_special_char_count | 1                          |
+--------------------------------------+----------------------------+
9 rows in set (0.00 sec)

为了修改编码,我们需要修改mysql的核心配置文件如下:

[hadoop@hadoop000 download]$ sudo vim /etc/my.cnf

# For advice on how to change settings please see
# http://dev.mysql.com/doc/refman/5.7/en/server-configuration-defaults.html

[mysqld]
#
# Remove leading # and set to the amount of RAM for the most important data
# cache in MySQL. Start at 70% of total RAM for dedicated server, else 10%.
# innodb_buffer_pool_size = 128M
#
# Remove leading # to turn on a very important data integrity option: logging
# changes to the binary log between backups.
# log_bin
#
# Remove leading # to set options mainly useful for reporting servers.
# The server defaults are faster for transactions and fast SELECTs.
# Adjust sizes as needed, experiment to find the optimal values.
# join_buffer_size = 128M
# sort_buffer_size = 2M
# read_rnd_buffer_size = 2M
datadir=/var/lib/mysql
socket=/var/lib/mysql/mysql.sock

# Disabling symbolic-links is recommended to prevent assorted security risks
symbolic-links=0

log-error=/var/log/mysqld.log

# 默认服务器内部操作字符集
character-set-server=utf8mb4
# 默认服务器内部操作字符集校对规则
collation-server=utf8mb4_general_ci
# 默认的存储引擎
default-storage-engine=InnoDB
# 初始化连接时设置以下字符集:
# character_set_client
# character_set_results
# character_set_connection
init_connect='set names utf8mb4'

[client]
default-character-set=utf8mb4

[mysql]
default-character-set=utf8mb4
  • 30行以下为手动添加的配置

验证

mysql> show variables like '%char%';
+--------------------------------------+----------------------------+
| Variable_name                        | Value                      |
+--------------------------------------+----------------------------+
| character_set_client                 | utf8mb4                    |
| character_set_connection             | utf8mb4                    |
| character_set_database               | utf8mb4                    |
| character_set_filesystem             | binary                     |
| character_set_results                | utf8mb4                    |
| character_set_server                 | utf8mb4                    |
| character_set_system                 | utf8                       |
| character_sets_dir                   | /usr/share/mysql/charsets/ |
| validate_password_special_char_count | 1                          |
+--------------------------------------+----------------------------+
9 rows in set (0.00 sec)
  • character_set_client 是指客户端发送过来的语句的编码
  • character_set_database 是指服务器内部使用的编码
  • character_set_connection 是指mysqld收到客户端的语句后,要转换到的编码
  • character_set_results 是指server执行语句后,返回给客户端的数据的编码
  • character_set_system是元数据编码,无需修改
  • character_set_filesystem是文件系统的编码,2进制存储最有效,不能修改

rpm-bundle的离线安装

下载rpm-bundle包


$ wget http://mirrors.163.com/mysql/Downloads/MySQL-5.7/mysql-5.7.33-1.el7.x86_64.rpm-bundle.tar
$  tar xvf mysql-5.7.33-1.el7.x86_64.rpm-bundle.tar
$  mkdir mysql-jars
$  mv mysql-comm*.rpm mysql-jars/
$  cd mysql-jars/
$ ls
mysql-community-client-5.7.33-1.el7.x86_64.rpm
mysql-community-common-5.7.33-1.el7.x86_64.rpm
mysql-community-libs-5.7.33-1.el7.x86_64.rpm
mysql-community-libs-compat-5.7.33-1.el7.x86_64.rpm
mysql-community-server-5.7.33-1.el7.x86_64.rpm

依次手动安装

sudo rpm -ivh mysql-community-common-5.7.33-1.el7.x86_64.rpm
sudo rpm -ivh mysql-community-libs-5.7.33-1.el7.x86_64.rpm
sudo rpm -ivh mysql-community-libs-compat-5.7.33-1.el7.x86_64.rpm
sudo rpm -ivh mysql-community-client-5.7.33-1.el7.x86_64.rpm
sudo rpm -ivh mysql-community-server-5.7.33-1.el7.x86_64.rpm

CentOS7下MySQL-5.7使用yum方式卸载

1、停止MySQL
命令:systemctl stop mysqld
2、查看已安装的mysql
命令:rpm -qa | grep -i mysql
3、卸载mysql,依次卸载第2步骤所列出的有关MySQL的安装包,如
命令:yum remove -y mysql-community-server-5.6.36-2.el7.x86_64
4、删除mysql相关目录
1)使用命令查看mysql相关的文件目录:find / -name mysql
2)依次删除所查到的目录,命令:rm -rf /xxx/xxx/mysql

二、CentOS7下Nginx的安装:


Nginx安装

安装前确认是否已经安装过

sudo yum search nginx

Nginx文档http://nginx.org/en/docs/

Installation on Linux, nginx packages from nginx.org can be used.

Installation instructions
RHEL/CentOS
Debian
Ubuntu
SLES
Alpine

以 CentOS为例进行安装

Install the prerequisites:

sudo yum install yum-utils

To set up the yum repository, create the file named /etc/yum.repos.d/nginx.repo with the following contents:

sudo vi /etc/yum.repos.d/nginx.repo

内容如下:

[nginx-stable]
name=nginx stable repo
baseurl=http://nginx.org/packages/centos/$releasever/$basearch/
gpgcheck=1
enabled=1
gpgkey=https://nginx.org/keys/nginx_signing.key
module_hotfixes=true

[nginx-mainline]
name=nginx mainline repo
baseurl=http://nginx.org/packages/mainline/centos/$releasever/$basearch/
gpgcheck=1
enabled=0
gpgkey=https://nginx.org/keys/nginx_signing.key
module_hotfixes=true

By default, the repository for stable nginx packages is used. If you would like to use mainline nginx packages, run the following command:

sudo yum-config-manager --enable nginx-mainline

To install nginx, run the following command:

sudo yum install -y nginx

When prompted to accept the GPG key, verify that the fingerprint matches 573B FD6B 3D8F BC64 1079 A6AB ABF5 BD82 7BD9 BF62, and if so, accept it.

常用命令

解释 命令
安装服务 yum install nginx
启动服务 service nginx start
停止服务 service nginx stop
重载服务 service nginx reload

配置完成后启动服务

sudo service nginx start

如果服务器已经启动,当配置发生变化可以直接使用重载服务来更新配置,运维常用,因为不需要停止服务就可以重载新的配置。

三、部署前端网站到nginx下


电商网站的静态文件都放在shop文件夹中,将此文件夹上传到虚拟机的/opt/data/目录下,

对nginx默认配置文件进行改名

$ cd /etc/nginx/conf.d/
$ mv default.conf shop.conf

修改如下


server {
    listen       80;
    server_name  hadoop100;
    root   /opt/data/;

    location /shop/ {
        index  index.html;
        access_log  /var/log/nginx/access.log  main;
    }

    #error_page  404              /404.html;

    # redirect server error pages to the static page /50x.html
    error_page   500 502 503 504  /50x.html;
    location = /50x.html {
        root   /usr/share/nginx/html;
    }

}

重新加载nginx配置,执行:

$ sudo nginx -s reload

在浏览器中验证下是否可以访问到网站,输入:

http://hadoop100/shop/

效果如下:
file

四、Tomcat的安装


准备:安装Java JDK1.8

这里安装openjdk是因为比较简单, 工作场合一定要使用oracle提供的jdk1.8

sudo yum -y install java-1.8.0-openjdk*

这样安装的好处就是环境变量都配好了

可以直接查看版本 java -version

Tomcat安装

下载页面: https://tomcat.apache.org/download-90.cgi

文档:https://tomcat.apache.org/tomcat-9.0-doc/index.html

下载链接

wget https://mirrors.tuna.tsinghua.edu.cn/apache/tomcat/tomcat-9/v9.0.41/bin/apache-tomcat-9.0.41.tar.gz

解压到后改名tomcat9

tar -zxvf apache-tomcat-9.0.41.tar.gz
mv apache-tomcat-9.0.41 /opt/pkg/tomcat9

由于tomcat的端口8080和大数据环境中的jetty端口冲突,这里修改tomcat的端口位18080

[hadoop@hadoop100 ~]$ cat /opt/pkg/tomcat9/conf/server.xml

...
    <Connector port="18080" protocol="HTTP/1.1"
               connectionTimeout="20000"
               redirectPort="8443" />

启动 进入 /bin目录下 运行startup.sh脚本文件

bin]$ ./startup.sh 
...
Tomcat started.

检查tomcat进程信息

$ bin]$ ps -ef | grep tomcat
hadoop    15142      1  1 14:41 pts/0    00:00:05 /home/hadoop/app/jdk1.8.0_211/bin/java -Djava.util.logging.config.file=/home/hadoop/app/tomcat9/conf/logging.properties -Djava.util.logging.manager=org.apache.juli.ClassLoaderLogManager -Djdk.tls.ephemeralDHKeySize=2048 -Djava.protocol.handler.pkgs=org.apache.catalina.webresources -Dorg.apache.catalina.security.SecurityListener.UMASK=0027 -Dignore.endorsed.dirs= -classpath /home/hadoop/app/tomcat9/bin/bootstrap.jar:/home/hadoop/app/tomcat9/bin/tomcat-juli.jar -Dcatalina.base=/home/hadoop/app/tomcat9 -Dcatalina.home=/home/hadoop/app/tomcat9 -Djava.io.tmpdir=/home/hadoop/app/tomcat9/temp org.apache.catalina.startup.Bootstrap start
hadoop    15296  15064  0 14:47 pts/0    00:00:00 grep --color=auto tomcat

检查对应的监听端口信息

netstat -anpt | grep 15142

修改conf/tomcat-users.xml添加tomcat用户

添加如下内容
<!--  
  <role rolename="tomcat"/>
  <role rolename="role1"/>
  <user username="tomcat" password="tomcat" roles="tomcat"/>
  <user username="both" password="tomcat" roles="tomcat,role1"/>
  <user username="role1" password="tomcat" roles="role1"/>
-->
  <role rolename="manager-gui"/>
  <role rolename="manager-script" />
  <user username="admin" password="123123" roles="manager-gui,manager-script" />
</tomcat-users>

为了能够正常访问tomcat管理界面, 修改webapps/manager/META-INF目录下的context.xml,在allow行的末尾加上\d+.\d+.\d+.\d+表示允许所有主机访问。

<Context antiResourceLocking="false" privileged="true" >
  <Valve className="org.apache.catalina.valves.RemoteAddrValve"
         allow="127\.\d+\.\d+\.\d+|::1|0:0:0:0:0:0:0:1|\d+\.\d+\.\d+\.\d+" />
  <Manager sessionAttributeValueClassNameFilter="java\.lang\.(?:Boolean|Integer|Long|Number|String)|org\.apache\.catalina\.filters\.CsrfPreventionFilter\$LruCache(?:\$1)?|java\.util\.(?:Linked)?HashMap"/>
</Context>

重启tomcat9生效

bin/shutdown.sh
...
bin/startup.sh
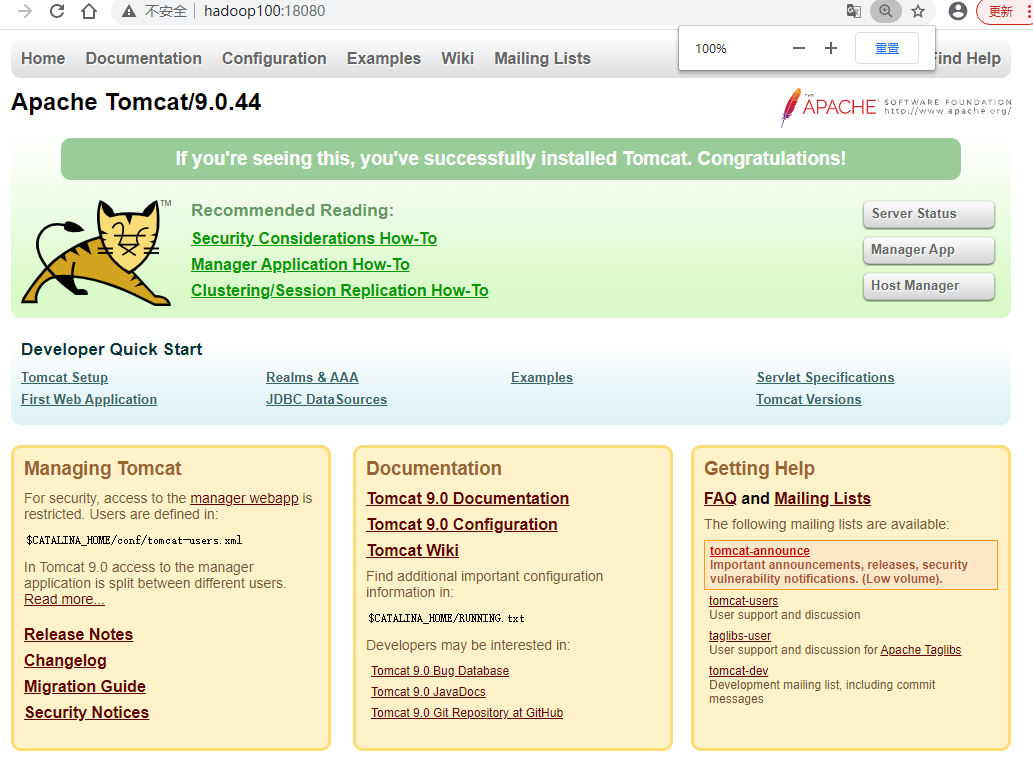
6)验证,在浏览器输入: <code>http://hadoop100:8080/

或者在命令行里面输入:netstat -anop|grep 18080
file

五、电商后台系统部署到Tomcat服务器上


在MySQL创建数据库shop,将项目所需的sql数据导入,如:

mysql> source /opt/data/shop.sql

将代码导入到eclipse或者idea中

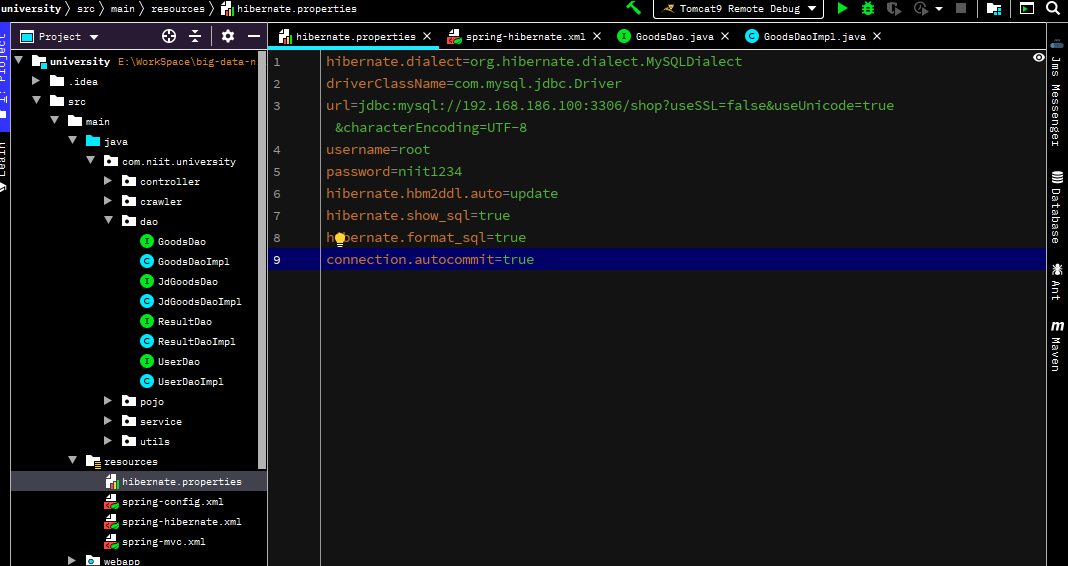
将代码数据库连接相关配置hibernate.properties做如下修改:

  • 修改数据库名及地址为服务器的数据库名及地址
  • 修改数据库用户明、密码为服务器的用户密码

file

选择export->war

上传war包至Linux服务器

修改war包名位university.war

将war包移动到Tomcat安装目录下的webapp目录下

启动或重启Tomcat

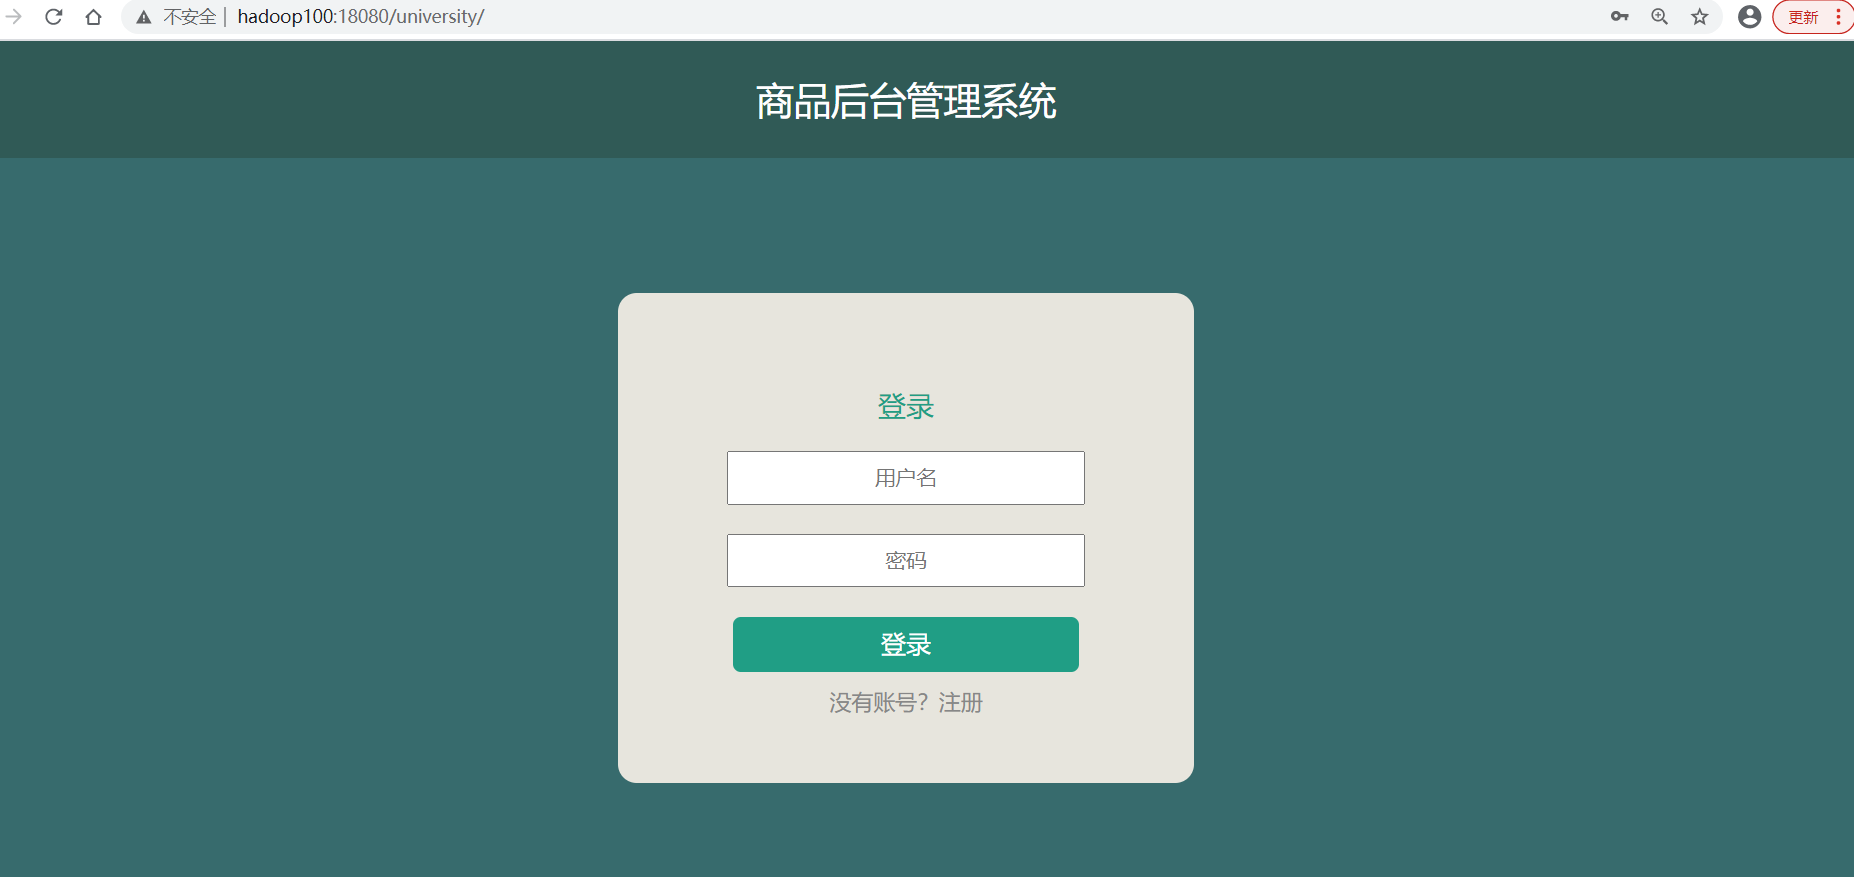
打开浏览器进行验证:
file

配置nginx反向代理

18080端口的访问方式不太方便,另外也需要解决nginx下部署的静态页面调用后台服务的跨域问题,这里需要设置nginx方向代理,修改nginx配置文件如下:

server {
    listen       80;
    server_name  hadoop100;
    root   /opt/data/;

    location /shop/ {
        index  index.html;
        access_log  /var/log/nginx/access.log  main;
    }

    location /university/ {
        proxy_pass http://hadoop100:18080/university/;
    }

    #error_page  404              /404.html;

    # redirect server error pages to the static page /50x.html
    error_page   500 502 503 504  /50x.html;
    location = /50x.html {
        root   /usr/share/nginx/html;
    }

}

重新加载nginx配置

sudo nginx -s reload

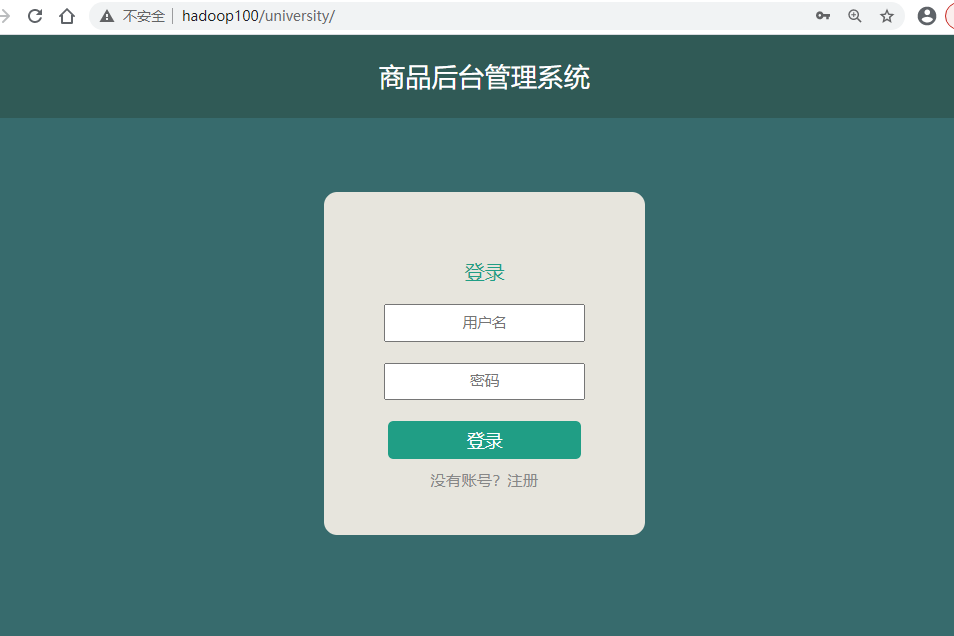
现在可以通过http://hadoop100/university/访问后台界面
file

如果访问失败可以查看错误日志

sudo vi /var/log/nginx/error.log 

如果发现502错误:

2020/11/18 16:12:39 [crit] 16376#16376: *1 connect() to 127.0.0.1:8080 failed (13: Permission denied) while connecting to upstream, client: 192.168.186.1, server: hadoop000, request: "GET /favicon.ico HTTP/1.1", upstream: "http://127.0.0.1:8080/favicon.ico", host: "hadoop000", referrer: "http://hadoop000/"

此时需要考虑把linux操作系统默认的强制访问安全限制设置为禁用。

关闭SElinux即可

  1. 临时关闭 SElinux

    sudo setenforce 0
  2. 永久关闭 SElinux

    sudo vim /etc/selinux/config
    SELINUX=disabled

修改之后就可以正常访问了

通过http://hadoop100/shop访问前端界面,可以看见数据可以正常加载了.

file

至此商城项目的前后端就配置完了, 商城的nginx服务器日志保存在/var/log/nginx/access.log ,接下来我们将使用httpd提供的ab压测工具来快速生成大量访问日志.

Views: 144

大数据岗位需求情况分析(一)数据爬取和分析

file
百度搜索官网

使用八爪鱼网络数据采集器爬取数据

使用手机号注册账号

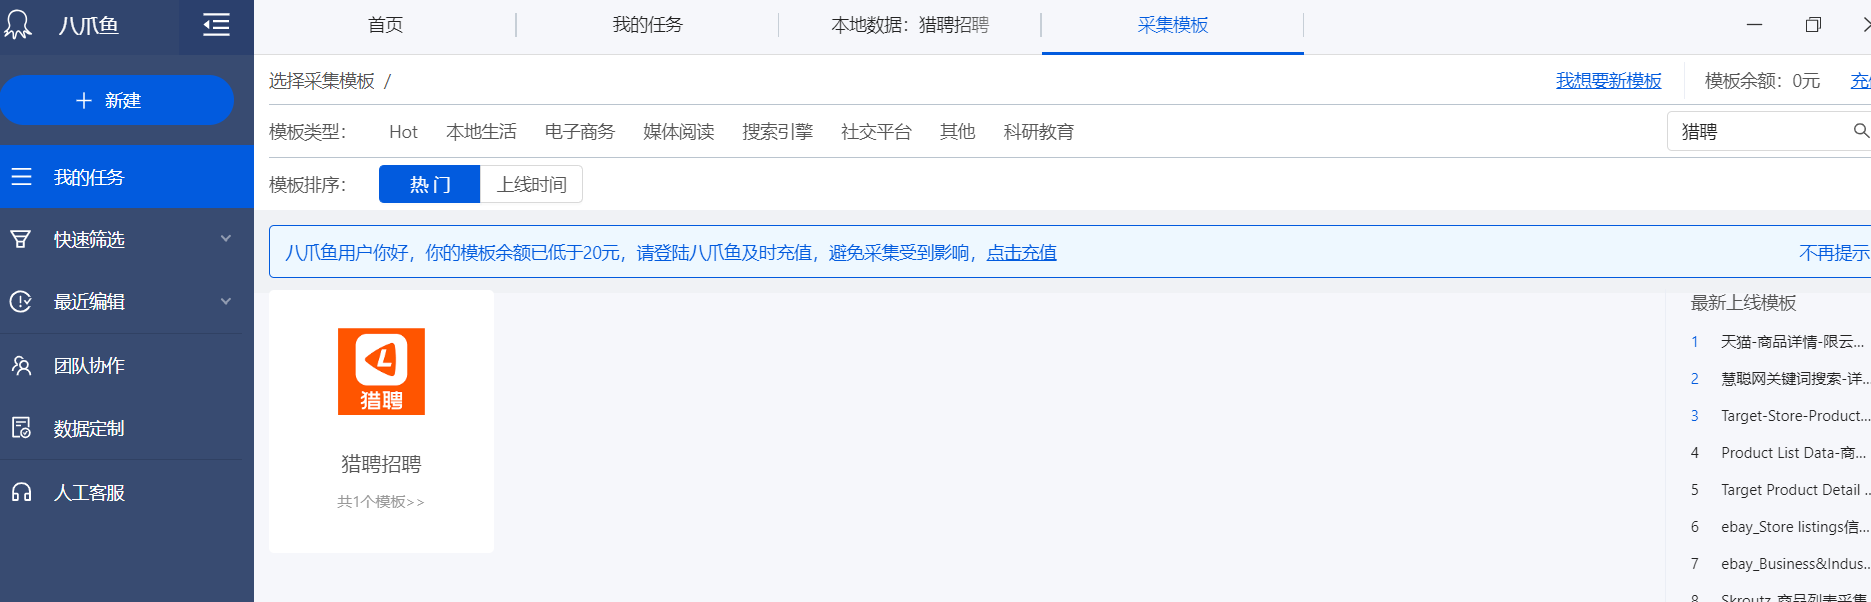
利用现有模板创建采集任务(免费用户不能设置定时采集以及云采集)
这里选择的是猎聘招聘网
file
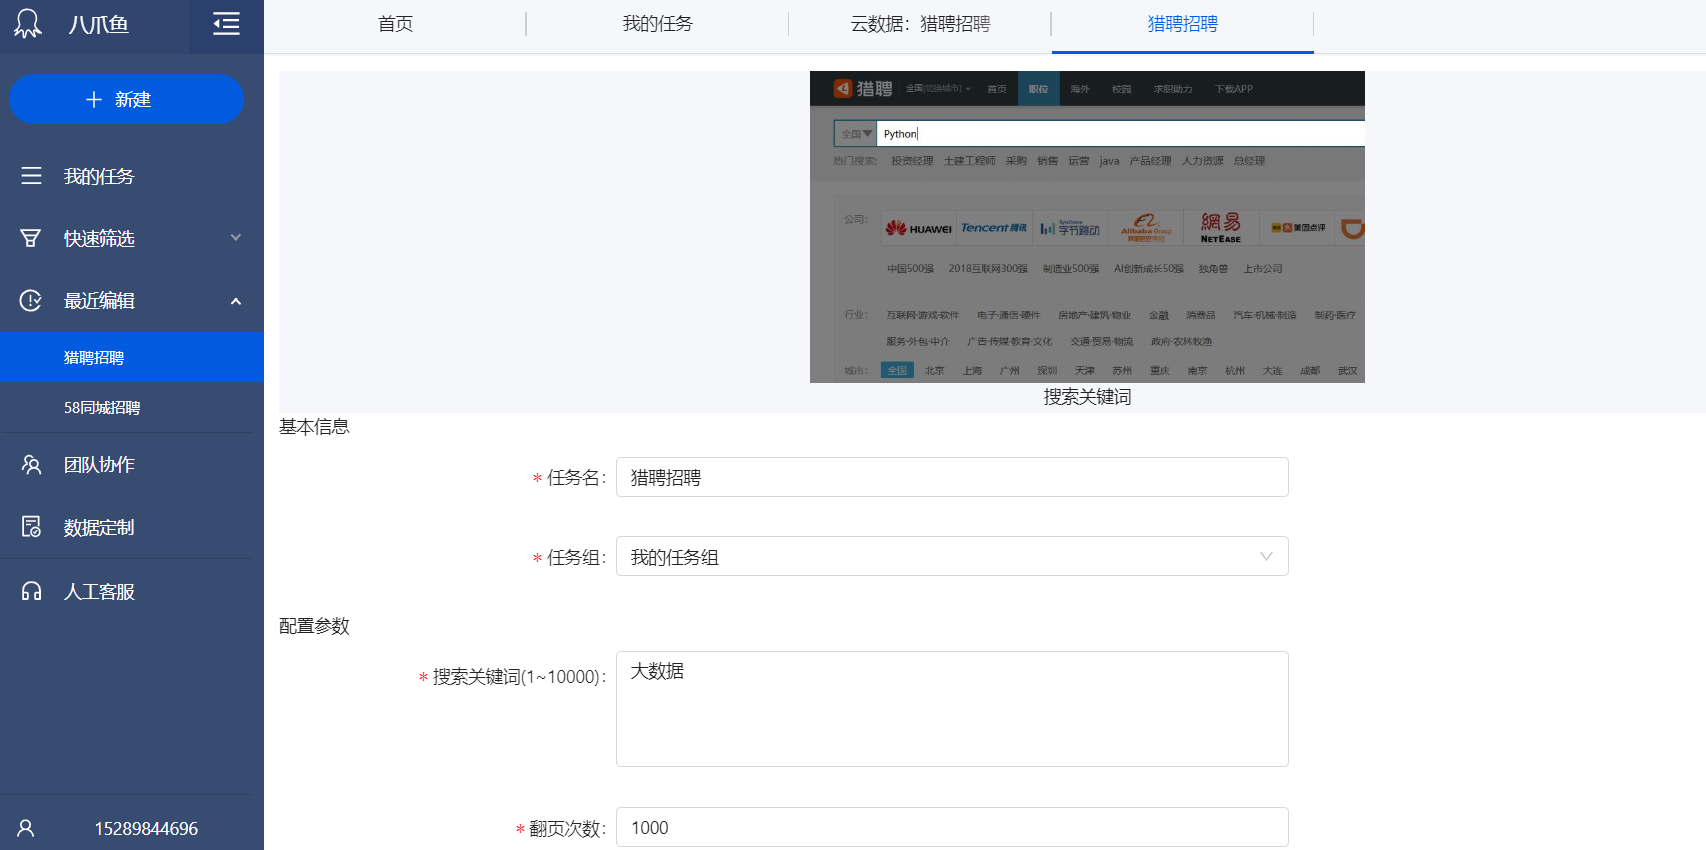
设置查询关键词,这里使用”大数据“作为关键词
关键词可以写多行,并设置翻页次数
file
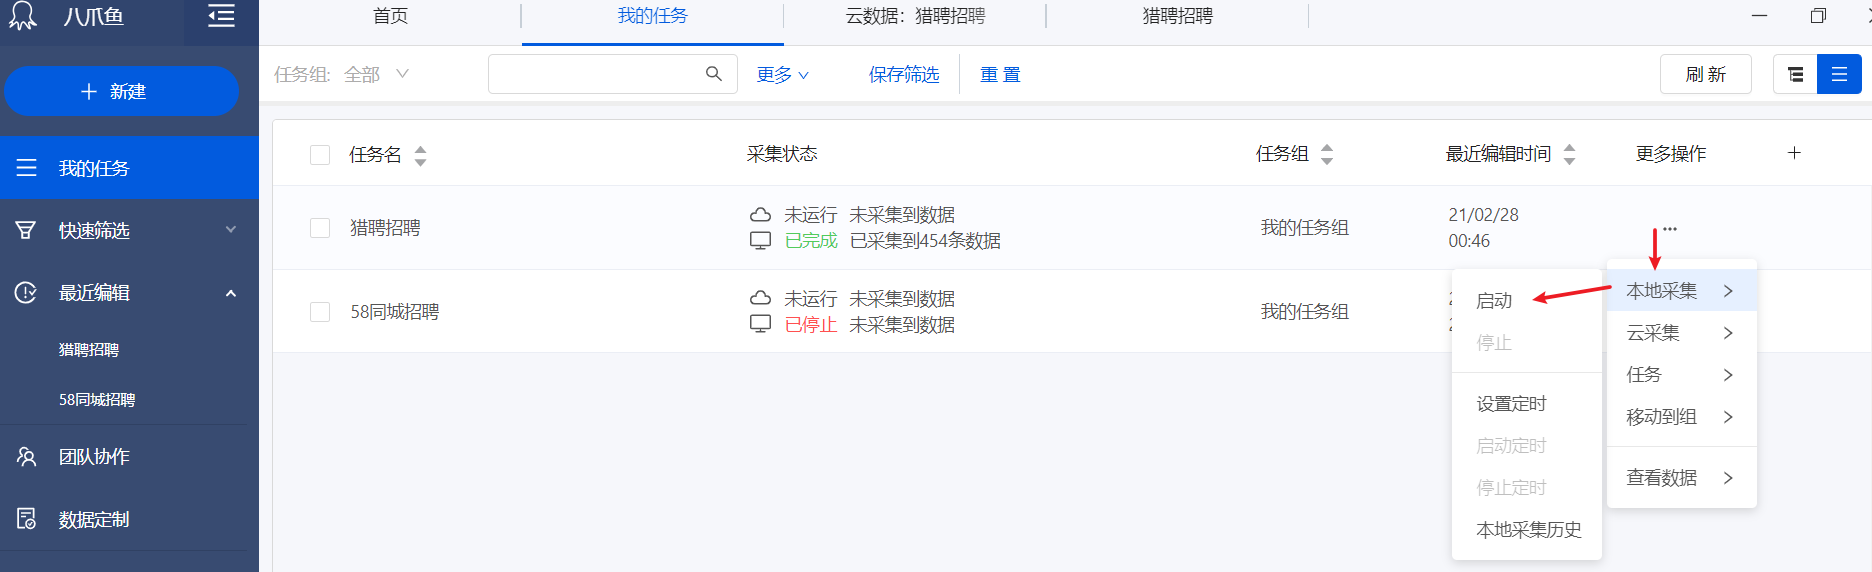
启动本地采集任务
file

如果IP被禁,过一段时间再次开启,多次执行就会累计足够数据
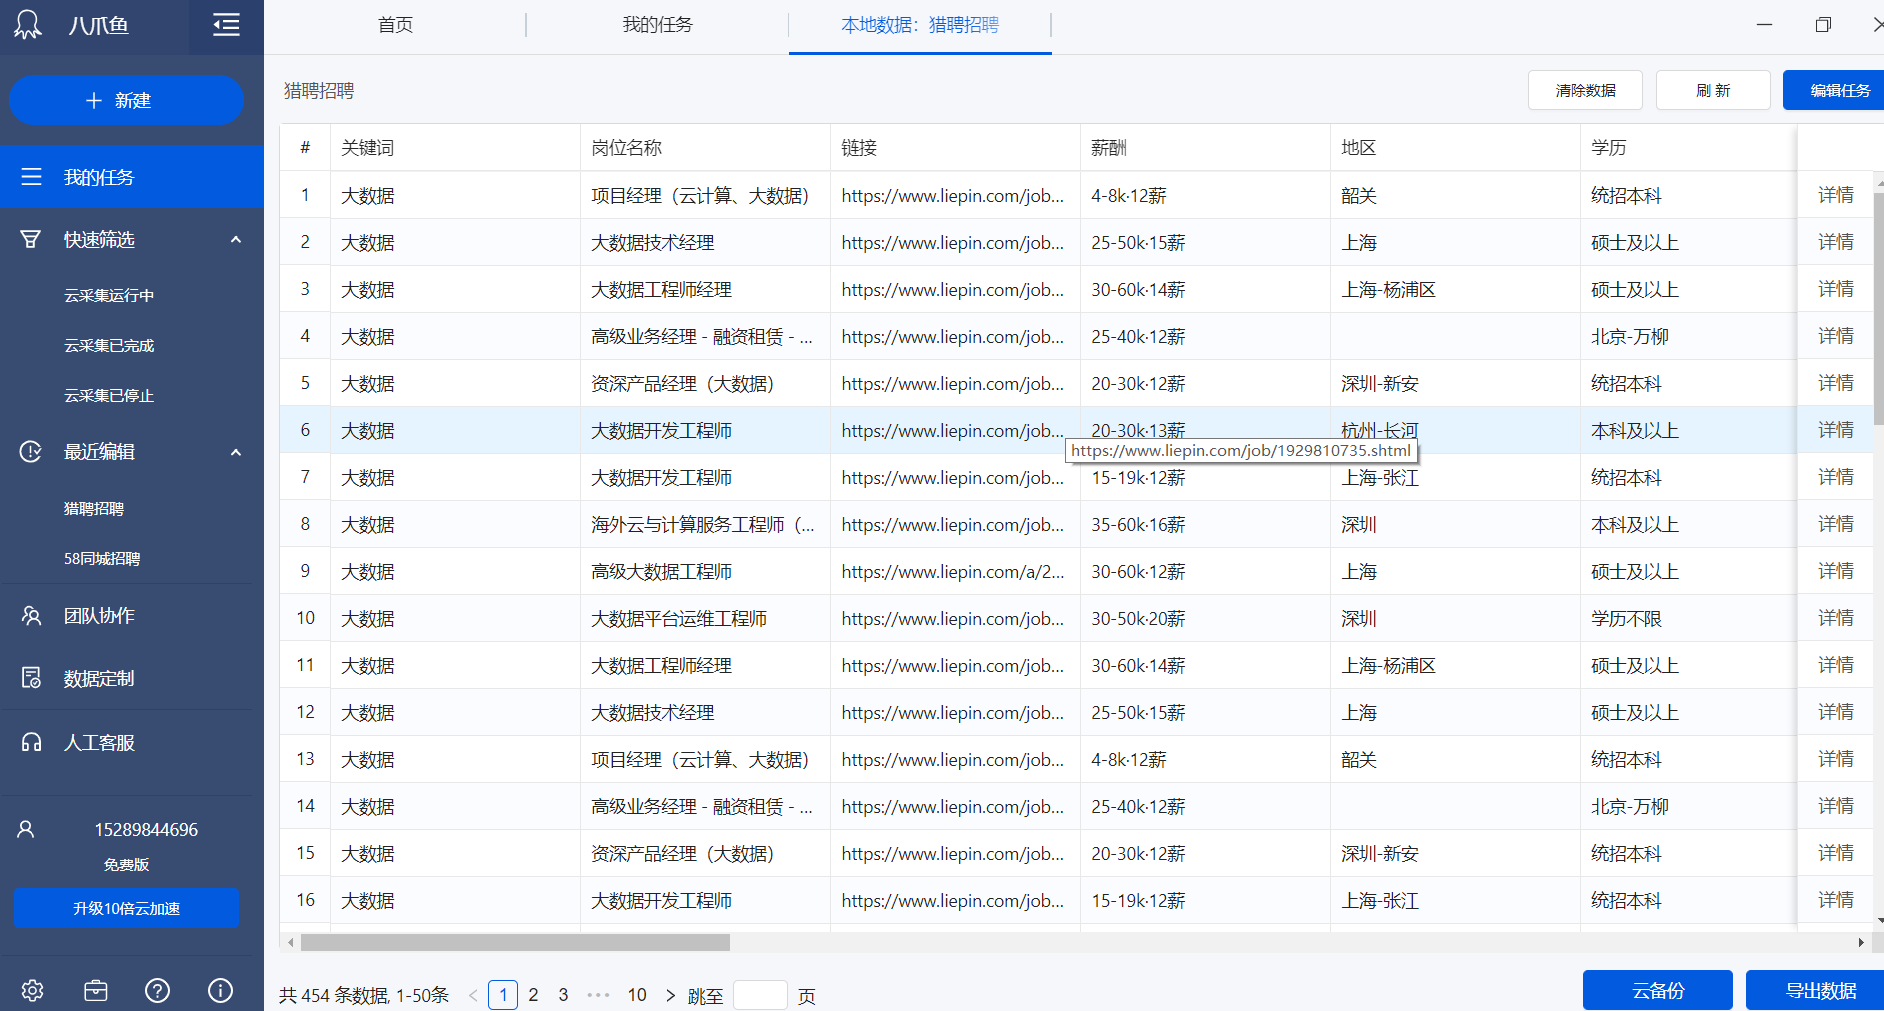
查看本地采集的数据
file

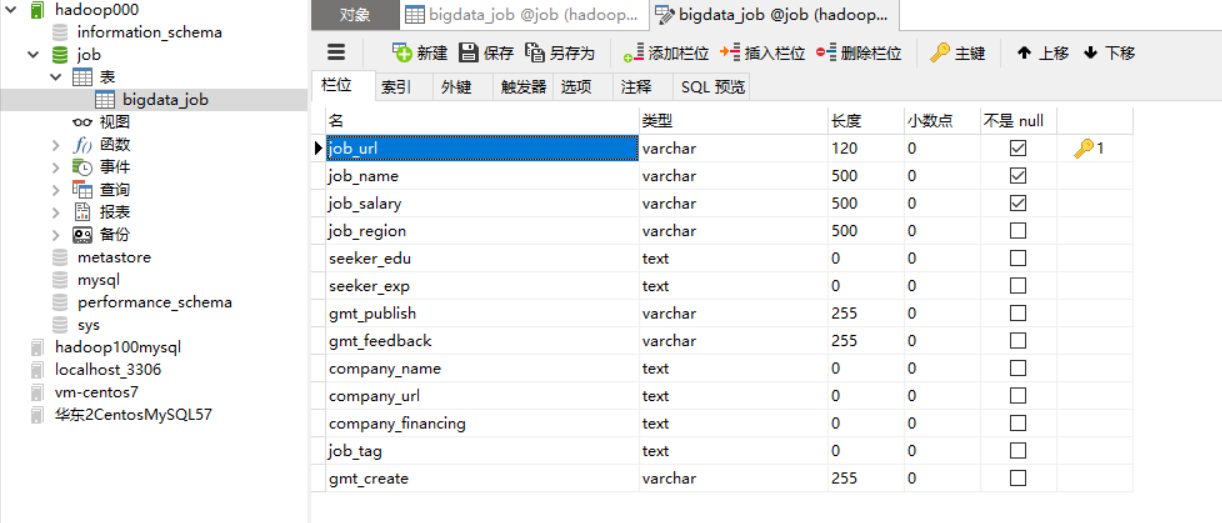
在远程数据库创建数据库,选取感兴趣的列建表
file

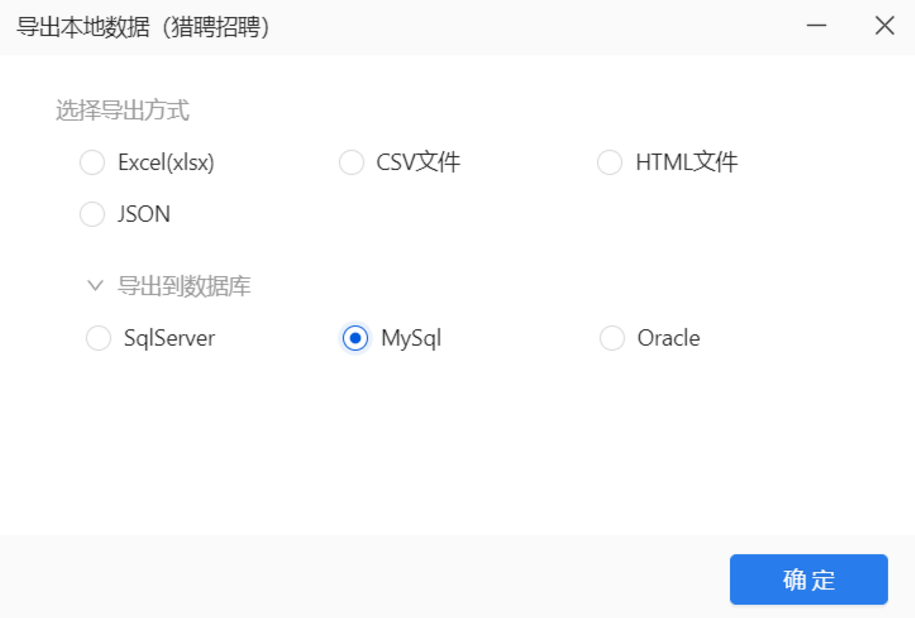
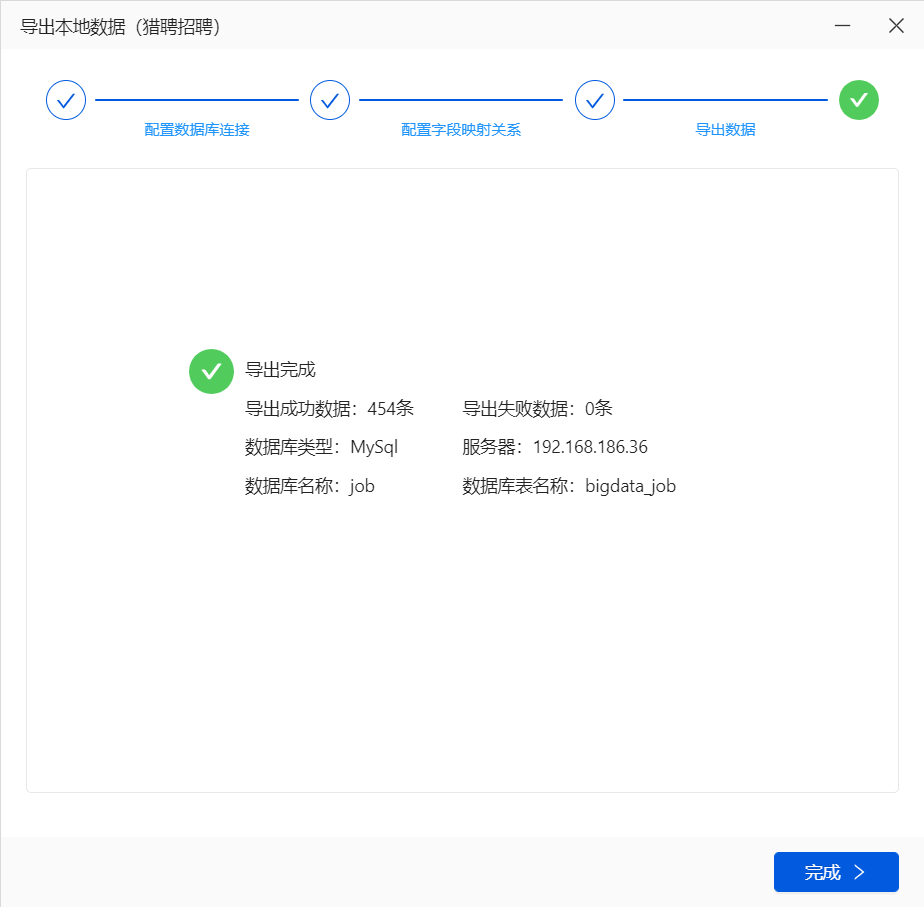
使用八爪鱼自带功能导出到远程MySQL数据库 (如果需要特殊处理可以导出CSV,处理后再导入数据库)
file

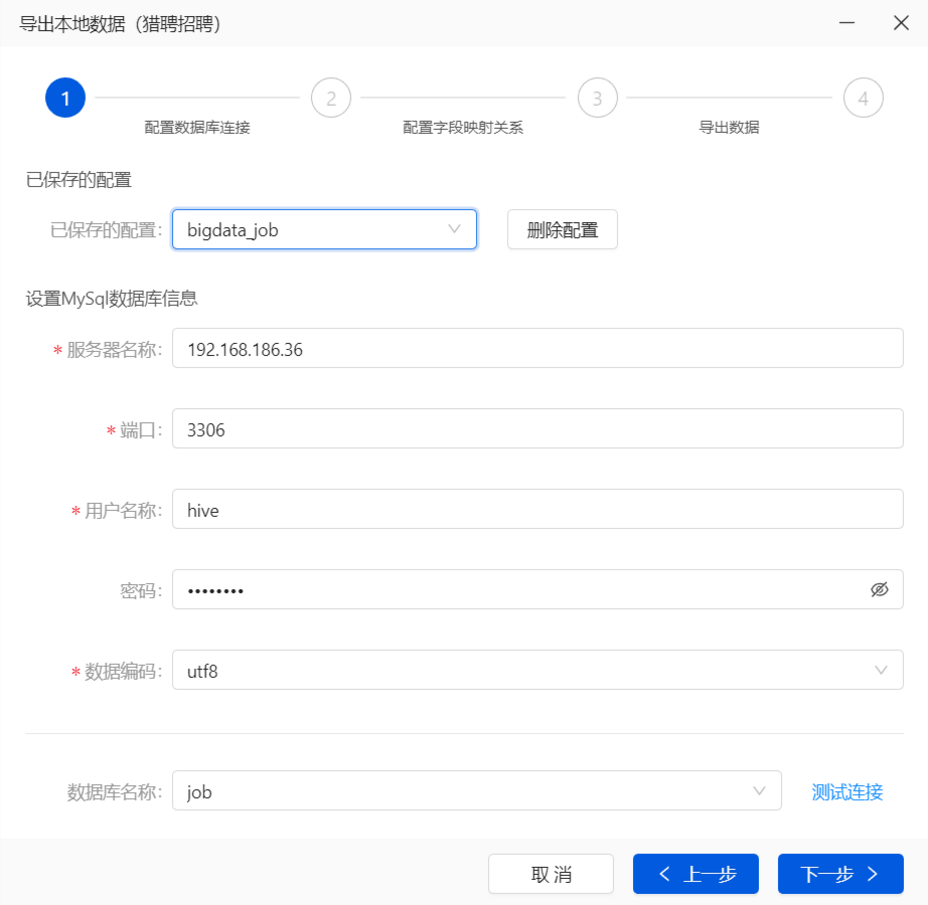
连接配置
file

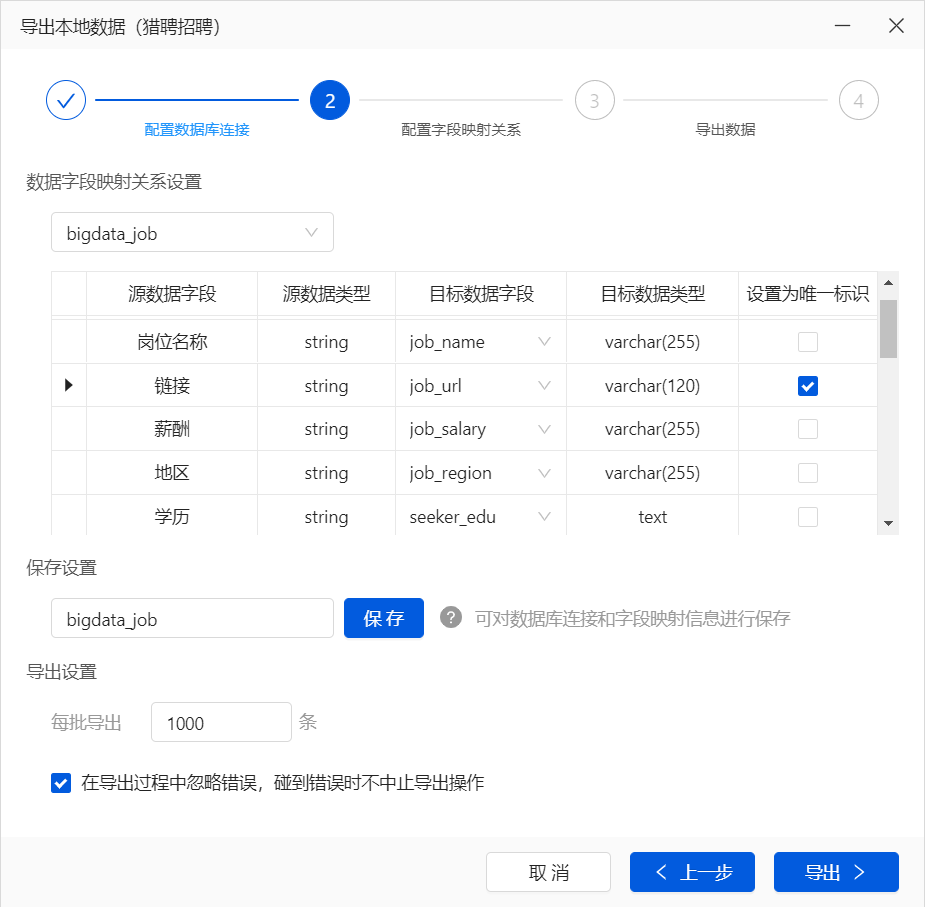
找到唯一且不为空不重复的列作为主键,创建正确的映射关系是导出成功的前提
file

每批导出可以适当减少,因为同一批次中的数据如果有一个导出失败,整个批次也会失败。
file

如果还是不能导入,检查数据库表的编码是否支持中文,如果是latin则改成UTF8

导出csv格式再导入MySQL

发现八爪鱼采集的数据中包含回车空格的多余的字符,最好提前处理号再导出,否则导入到Hive时数据会混乱。

也可以在导入hive时使用参数--hive-drop-import-delims去掉两边多余的空格和回车

另外薪水字段的格式不方便后续分析,可以额外添加三个字段,分别放上解析出来的结果。

工作地点有的包含区名,不方便后续分析,可以额外添加一个city字段。

以上对原始数据的处理本是属于数据清洗的过程,一般是通过Hive完成的。这里由于数据采集是通过八爪鱼获得的,里面没有任何业务数据,所以为了方便直接在MySQL表上面添加了几个字段,方便后续的分析。

创建maven工程如下:

<project xsi:schemaLocation="http://maven.apache.org/POM/4.0.0 http://maven.apache.org/maven-v4_0_0.xsd"
         xmlns:xsi="http://www.w3.org/2001/XMLSchema-instance" xmlns="http://maven.apache.org/POM/4.0.0">
        <modelVersion>4.0.0</modelVersion>
    <groupId>org.example</groupId>
    <artifactId>java_csv_to_mysql</artifactId>
    <version>1.0-SNAPSHOT</version>
    <name>java_csv_to_mysql Tapestry 5 Application</name>
    <properties>
        <java.version>1.8</java.version>
    </properties>
    <dependencies>
        <dependency>
            <groupId>net.sourceforge.javacsv</groupId>
            <artifactId>javacsv</artifactId>
            <version>2.0</version>
        </dependency>
        <dependency>
            <groupId>com.alibaba</groupId>
            <artifactId>druid</artifactId>
            <version>1.0.26</version>
        </dependency>
        <dependency>
            <groupId>mysql</groupId>
            <artifactId>mysql-connector-java</artifactId>
            <version>5.1.46</version>
        </dependency>
    </dependencies>
</project>

由于需要导入到MySQL,创建工具类

package com.niit.csv;

import java.sql.*;
import java.util.ResourceBundle;

public class DbUtils {

    private static  Connection connection = null;
    private static  PreparedStatement pps = null;
    private static  ResultSet rs = null;
    private static final String url;
    private static final String username;
    private static final String password;
    private static final String driver;
    public static final int BATCH_SIZE;

    static {
        ResourceBundle bundle = ResourceBundle.getBundle("db");
        url = bundle.getString("url");
        username = bundle.getString("username");
        password = bundle.getString("password");
        driver = bundle.getString("driver");
        BATCH_SIZE = Integer.parseInt(bundle.getString("batchSIze"));

        try {
            Class.forName(driver);
        } catch (ClassNotFoundException e) {
            e.printStackTrace();
        }
    }

    public static Connection getConnection() {
        try {
            connection = DriverManager.getConnection(url, username, password);
        } catch (SQLException e) {
            e.printStackTrace();
        }
        return connection;
    }

    protected static void closeAll() {
        try {
            if (rs != null) {
                rs.close();
            }
            if (pps != null) {
                pps.close();
            }
            if (connection != null) {
                connection.close();
            }
        } catch (SQLException e) {
            e.printStackTrace();
        }
    }
}

创建资源目录(marked as recources folder),并创建db.properties文件, 这里面主要是对MySQL数据源进行配置。

driver=com.mysql.jdbc.Driver
url=jdbc:mysql://192.168.186.100:3306/job?useSSL=false
username=root
password=niit1234
batchSIze=20

接下来编写实体类JobDetail

package com.niit.csv;

import java.util.Date;

/**
 * @Author: deLucia
 * @Date: 2021/4/18
 * @Version: 1.0
 * @Description:
 * 关键词,岗位名称,链接,薪酬,地区,学历,工作经验,发布时间,反馈时间,公司名称,公司链接,融资情况,标签,语言要求,年龄要求,职位描述,公司规模,公司地址,其他信息,公司介绍,企业介绍,当前时间
 */
public class JobDetail {
    /**
     *   链接
     */
    private String jobUrl;
    /**
     *   岗位名称
     */
    private String jobName;
    /**
     * 薪酬
     */
    private String jobSalary;
    /**
     * 地区
     */
    private String jobRegion;
    /**
     * 学历
     */
    private String seekerEdu;
    /**
     * 工作经验
     */
    private String seekerExp;
    /**
     * 发布时间
     */
    private String gmtPublish;
    /**
     * 反馈时间
     */
    private String gmtFeedback;
    /**
     * 公司名称
     */
    private String companyName;
    /**
     * 公司链接
     */
    private String companyUrl;
    /**
     * 融资情况
     */
    private String companyFinancing;
    /**
     * 标签
     */
    private String jobTag;
    /**
     * 当前时间
     */
    private Date gmtCreate;

    /**
     * 最低月薪
     */
    private int minSalaryPerMonth;
    /**
     * 最高月薪
     */
    private int maxSalaryPerMonth;

    /**
     * 一年几薪
     */
    private int monthsSalaryPerYear;

    /**
     * 市
     */
    private String city;

    public String getJobUrl() {
        return jobUrl;
    }

    public void setJobUrl(String jobUrl) {
        this.jobUrl = jobUrl;
    }

    public String getJobName() {
        return jobName;
    }

    public void setJobName(String jobName) {
        this.jobName = jobName;
    }

    public String getJobSalary() {
        return jobSalary;
    }

    public void setJobSalary(String jobSalary) {
        this.jobSalary = jobSalary;
    }

    public String getJobRegion() {
        return jobRegion;
    }

    public void setJobRegion(String jobRegion) {
        this.jobRegion = jobRegion;
    }

    public String getSeekerEdu() {
        return seekerEdu;
    }

    public void setSeekerEdu(String seekerEdu) {
        this.seekerEdu = seekerEdu;
    }

    public String getSeekerExp() {
        return seekerExp;
    }

    public void setSeekerExp(String seekerExp) {
        this.seekerExp = seekerExp;
    }

    public String getGmtPublish() {
        return gmtPublish;
    }

    public void setGmtPublish(String gmtPublish) {
        this.gmtPublish = gmtPublish;
    }

    public String getGmtFeedback() {
        return gmtFeedback;
    }

    public void setGmtFeedback(String gmtFeedback) {
        this.gmtFeedback = gmtFeedback;
    }

    public String getCompanyName() {
        return companyName;
    }

    public void setCompanyName(String companyName) {
        this.companyName = companyName;
    }

    public String getCompanyUrl() {
        return companyUrl;
    }

    public void setCompanyUrl(String companyUrl) {
        this.companyUrl = companyUrl;
    }

    public String getCompanyFinancing() {
        return companyFinancing;
    }

    public void setCompanyFinancing(String companyFinancing) {
        this.companyFinancing = companyFinancing;
    }

    public String getJobTag() {
        return jobTag;
    }

    public void setJobTag(String jobTag) {
        this.jobTag = jobTag;
    }

    public Date getGmtCreate() {
        return gmtCreate;
    }

    public void setGmtCreate(Date gmtCreate) {
        this.gmtCreate = gmtCreate;
    }

    public int getMinSalaryPerMonth() {
        return minSalaryPerMonth;
    }

    public void setMinSalaryPerMonth(int minSalaryPerMonth) {
        this.minSalaryPerMonth = minSalaryPerMonth;
    }

    public int getMaxSalaryPerMonth() {
        return maxSalaryPerMonth;
    }

    public void setMaxSalaryPerMonth(int maxSalaryPerMonth) {
        this.maxSalaryPerMonth = maxSalaryPerMonth;
    }

    public int getMonthsSalaryPerYear() {
        return monthsSalaryPerYear;
    }

    public void setMonthsSalaryPerYear(int monthsSalaryPerYear) {
        this.monthsSalaryPerYear = monthsSalaryPerYear;
    }

    public String getCity() {
        return city;
    }

    public void setCity(String city) {
        this.city = city;
    }

    public JobDetail() {
    }

    @Override
    public String toString() {
        return "JobDetail{" +
                "jobUrl='" + jobUrl + '\'' +
                ", jobName='" + jobName + '\'' +
                ", jobSalary='" + jobSalary + '\'' +
                ", jobRegion='" + jobRegion + '\'' +
                ", seekerEdu='" + seekerEdu + '\'' +
                ", seekerExp='" + seekerExp + '\'' +
                ", gmtPublish='" + gmtPublish + '\'' +
                ", gmtFeedback='" + gmtFeedback + '\'' +
                ", companyName='" + companyName + '\'' +
                ", companyUrl='" + companyUrl + '\'' +
                ", companyFinancing='" + companyFinancing + '\'' +
                ", jobTag='" + jobTag + '\'' +
                ", gmtCreate=" + gmtCreate +
                ", minSalaryPerMonth=" + minSalaryPerMonth +
                ", maxSalaryPerMonth=" + maxSalaryPerMonth +
                ", monthsSalaryPerYear=" + monthsSalaryPerYear +
                ", city='" + city + '\'' +
                '}';
    }
}

最后编写主程序如下:

package com.niit.csv;

import com.csvreader.CsvReader;
import com.sun.xml.internal.fastinfoset.stax.events.Util;

import java.nio.charset.Charset;
import java.sql.Connection;
import java.sql.Statement;
import java.text.SimpleDateFormat;
import java.util.ArrayList;
import java.util.List;

/**
 * @Author: deLucia
 * @Date: 2021/4/13
 * @Version: 1.0
 * @Description: 处理CSV后导入到MySQL
 */
public class ProcessCSV2MySQL {

    private static final SimpleDateFormat SDF = new SimpleDateFormat("yyyy-MM-dd HH:mm:ss.SSS");

    public static void main(String[] args) {

        //生成CsvReader对象,以,为分隔符,GBK编码方式
        CsvReader r;
        List<JobDetail> list = new ArrayList<JobDetail>();
        try {
            String csvFilePath = "./data/data.csv";
            r = new CsvReader(csvFilePath, ',', Charset.forName("UTF-8"));
            //读取表头
            r.readHeaders();
            //逐条读取记录,直至读完
            while (r.readRecord()) {
                JobDetail d = new JobDetail();
                d.setCompanyFinancing(r.get("融资情况").trim());
                d.setCompanyName(r.get("公司名称").trim());
                d.setCompanyUrl(r.get("公司链接").trim());

                String dateStr = r.get("当前时间").trim();
                if (!Util.isEmptyString(dateStr)) {
                    d.setGmtCreate(SDF.parse(dateStr));
                }

                d.setGmtFeedback(r.get("反馈事件").trim());
                d.setGmtPublish(r.get("发布时间").trim());
                d.setJobName(r.get("岗位名称").trim());
                String regionString = r.get("地区").trim();
                d.setJobRegion(regionString);
                String salaryStr = r.get("薪酬").trim();
                d.setJobSalary(salaryStr);
                d.setJobTag(r.get("标签").trim());
                d.setJobUrl(r.get("链接").trim());
                d.setSeekerEdu(r.get("学历").trim());
                d.setSeekerExp(r.get("经验").trim());

                //   20-60k·14薪
                if (!Util.isEmptyString(salaryStr) && !"面议".equals(salaryStr)) {
                    String[] split = salaryStr.split("·");
                    String[] s = split[0].split("-");
                    // MIN_SALARY_PER_MONTH
                    d.setMinSalaryPerMonth(Integer.parseInt(s[0]));
                    // MAX_SALARY_PER_MONTH
                    d.setMaxSalaryPerMonth(Integer.parseInt(s[1].replace("k", "")));
                    // MONTHS_SALARY_PER_YEAR
                    d.setMonthsSalaryPerYear(Integer.parseInt(split[1].replace("薪","")));
                }

                // city
                if (!Util.isEmptyString(regionString)) {
                    d.setCity(regionString.split("-")[0]);
                }

                list.add(d);
            }
            r.close();

            int totalSize = list.size();
            int index = 0;
            int batchCount = 0;
            Connection connection = DbUtils.getConnection();
            Statement statement = connection.createStatement();

            while (index <= totalSize - 1) {
                StringBuilder sb = new StringBuilder();
                for (int i = index; i < index + DbUtils.BATCH_SIZE; i++) {
                    if (i > totalSize - 1) {
                        break;
                    }
                    JobDetail d = list.get(i);
                    if (i != index) {
                        sb.append(",");
                    }
                    sb.append("(\"");
                    sb.append(d.getJobUrl());
                    sb.append("\",\"");
                    sb.append(d.getJobName());
                    sb.append("\",\"");
                    sb.append(d.getJobSalary());
                    sb.append("\",\"");
                    sb.append(d.getJobRegion());
                    sb.append("\",\"");
                    sb.append(d.getSeekerEdu());
                    sb.append("\",\"");
                    sb.append(d.getSeekerExp());
                    sb.append("\",\"");
                    sb.append(d.getGmtPublish());
                    sb.append("\",\"");
                    sb.append(d.getGmtFeedback());
                    sb.append("\",\"");
                    sb.append(d.getCompanyName());
                    sb.append("\",\"");
                    sb.append(d.getCompanyUrl());
                    sb.append("\",\"");
                    sb.append(d.getCompanyFinancing());
                    sb.append("\",\"");
                    sb.append(d.getJobTag());
                    sb.append("\",\"");
                    sb.append(d.getGmtCreate());
                    sb.append("\",\"");
                    sb.append(d.getMinSalaryPerMonth());
                    sb.append("\",\"");
                    sb.append(d.getMaxSalaryPerMonth());
                    sb.append("\",\"");
                    sb.append(d.getMonthsSalaryPerYear());
                    sb.append("\",\"");
                    sb.append(d.getCity());
                    sb.append("\")");

                }

                index += DbUtils.BATCH_SIZE;

                System.out.println(sb.toString());
                int updateResult = statement.executeUpdate("INSERT INTO `bigdata_job` VALUES " + sb.toString());

                if (updateResult > 0) {
                    System.out.println("Batch[" + (batchCount++) + "]: " + updateResult + " records updated successfully.");
                } else {
                    System.out.println("Batch[" + (batchCount++) + "]: " + updateResult + " records failed to update.");
                }
            }
        } catch (Exception e) {
            e.printStackTrace();
        } finally {
            DbUtils.closeAll();
        }
    }
}

这里设置了每10条数据一个批次,批次的大小可以通过BATCH_SIZE来修改。

数据导入

下面通过sqoop将mysql的数据导入到hive表当中,以便后续进行统计分析的工作。

在hive当中创建表

Hive是一个数据仓库基础工具提供简单的sql查询功能,可以将sql语句转换为MapReduce任务进行运行。Hive 并不能够在大规模数据集上实现低延迟快速的查询,Hive 的最佳使用场合是大数据集的批处理作业,例如,网络日志分析。

进入到hive的客户端,然后执行以下命令来创建hive数据库以及hive数据库表

create table job_detail(
job_url string,
job_name string,
job_salary string,
job_region string,
seeker_edu string,
seeker_exp string,
gmt_publish string,
gmt_feedback string,
company_name string,
company_url string,
company_financing string,
job_tag string,
gmt_create string,
min_salary_per_month int,
max_salary_per_month int,
months_salary_per_year int,
city string
) partitioned by (data_date string) row format delimited fields terminated by '\001' location 'hdfs://hadoop100:8020/user/hive/warehouse/job.db/job_detail';

使用sqoop将mysql数据导入到hive当中

数据进入mysql数据库之后,可以使用sqoop工具来讲数据导入到hive数仓当中,进行统一分析

sqoop import  \
    --connect jdbc:mysql://hadoop100:3306/job?useSSL=false  \
    --username root \
    --password niit1234 \
    --table bigdata_job \
    --delete-target-dir  \
    --hive-import  \
    --hive-database job  \
    --hive-table job_detail  \
    --hive-partition-key data_date  \
    --hive-partition-value 2021-02-28 \
    --hive-drop-import-delims \
    -m 1

使用Hive对大数据岗位数据进行多维分析

接下来使用hive进行统计分析工作,并将分析结果分别存在另一张hive表中。

1. 统计此次爬取的数据中一共有多少个大数据岗位

创建表

> create table job_count(process_date string,total_job_count int) partitioned by (data_date string) row format delimited fields terminated by '\001';

查询并插入数据

> insert overwrite table job_count partition(data_date = '2021-02-28') select '2021-02-28' as process_date,count(distinct job_url) as total_job_count from job_detail;

2、统计每个城市提供的大数据岗位数量

创建表

> create table job_city_count(process_date string,city string, total_job_count int) partitioned by (data_date string);

查询并插入数据

> insert overwrite table job_city_count partition(data_date = '2021-02-28') select '2021-02-28' as process_date, city, count(distinct job_url) as total_job_count from job_detail group by city;

3、按照薪资降序排序各城市大数据相关岗位(每个城市按薪资倒序取前10)

创建表

> create table job_city_salary(process_date string,city string, job_name string, salary_per_month int) partitioned by (data_date string);

查询并插入数据

insert overwrite table job_city_salary partition(data_date = '2021-02-28')
select
  "2021-02-28" as process_date,
  city,
  job_name,
  salary_per_month
from (
  select
    city,
    job_name,
    salary_per_month,
    row_number() over (partition by city order by salary_per_month desc) as rank
  from (
    select
      city,
      job_name,
      avg((min_salary_per_month + max_salary_per_month) * months_salary_per_year / 24) as salary_per_month
    from job_detail
    group by city,job_name having city!="null"
  ) tmp1
) tmp2 where rank<=10;

说明:

  • row_number() over (partition by ... order by)用来实现topN查询
    • 分组->排序->打行号标记,再套一层子查询根据行号打印每个分组的前10条记录

4、统计所有大数据岗位中出现次数最多的标签(取倒序前50个标签)

创建表

create table job_tag(process_date string,job_tag string, tag_count int) partitioned by (data_date string);

查询并插入数据

insert overwrite table job_tag partition(data_date='2021-02-28')
select
  '2021-02-28' as process_date,
  tmptable.single_tag as job_tag,
  count(single_tag) as tag_count
from (
  select subview.single_tag from job_detail lateral view explode(split(job_tag," ")
) subview as single_tag) tmptable group by single_tag order by tag_count desc limit 50;

说明:

  • explode函数可以将单行数据(数组)转换成多列数据输出(行转列)
  • 使用UDTF函数时(如split函数)只能select拆分出来的字段
  • 如果想要同时select其他字段,需配合侧视图(lateral view)使用
  • single_tag是给拆分出来的字段起的别名

Views: 137

09 – SQOOP安装配置

1、下载和安装

  1. 下载 http://archive.apache.org/dist/sqoop/1.4.7/
wget http://archive.apache.org/dist/sqoop/1.4.7/sqoop-1.4.7.bin__hadoop-2.6.0.tar.gz
  1. 上传sqoop-1.4.7.bin__hadoop-2.6.0.tar.gz到/tools目录下

  2. 解压安装, 改名

tar -zxvf sqoop-1.4.7.bin__hadoop-2.6.0.tar.gz -C /opt/pkg/
cd /opt/pkg/
mv sqoop-1.4.7.bin__hadoop-2.6.0/ sqoop-1.4.7
  1. 配置环境变量
#sqoop
export SQOOP_HOME=/training/sqoop-1.4.7.bin__hadoop-2.6.0
export PATH=$PATH:$SQOOP_HOME/bin

2、配置

  1. 配置sqoop的环境和配置

​ 把Sqoop可能使用的环境变量都配置上

​ 修改sqoop-env.sh:

$ mv conf/sqoop-env-template.sh conf/sqoop-env.sh
$ vi conf/sqoop-env.sh 

# Set Hadoop-specific environment variables here.

#Set path to where bin/hadoop is available
export HADOOP_COMMON_HOME=/opt/pkg/hadoop

#Set path to where hadoop-*-core.jar is available
export HADOOP_MAPRED_HOME=/opt/pkg/hadoop

#set the path to where bin/hbase is available
export HBASE_HOME=/opt/pkg/hbase

#Set the path to where bin/hive is available
export HIVE_HOME=/opt/pkg/hive

#Set the path for where zookeper config dir is
export ZOOCFGDIR=/opt/pkg/zookeeper/conf
  1. 修改sqoop-site.xml

​ 具体配置如下文件所示:

<?xml version="1.0"?>
<?xml-stylesheet type="text/xsl" href="configuration.xsl"?>

<configuration>

  <property>
    <name>sqoop.metastore.client.enable.autoconnect</name>
    <value>true</value>
    <description>If true, Sqoop will connect to a local metastore
      for job management when no other metastore arguments are
      provided.
    </description>
  </property>

  <property>
    <name>sqoop.metastore.client.autoconnect.url</name>
    <value>jdbc:hsqldb:file:/tmp/sqoop-meta/meta.db;shutdown=true</value>
    <description>The connect string to use when connecting to a
      job-management metastore. If unspecified, uses ~/.sqoop/.
      You can specify a different path here.
    </description>
  </property>

  <property>
    <name>sqoop.metastore.client.autoconnect.username</name>
    <value>SA</value>
    <description>The username to bind to the metastore.
    </description>
  </property>

  <property>
    <name>sqoop.metastore.client.autoconnect.password</name>
    <value></value>
    <description>The password to bind to the metastore.
    </description>
  </property>

  <property>
    <name>sqoop.metastore.client.record.password</name>
    <value>true</value>
    <description>If true, allow saved passwords in the metastore.
    </description>
  </property>

  <property>
    <name>sqoop.metastore.server.location</name>
    <value>/tmp/sqoop-metastore/shared.db</value>
    <description>Path to the shared metastore database files.
    If this is not set, it will be placed in ~/.sqoop/.
    </description>
  </property>

  <property>
    <name>sqoop.metastore.server.port</name>
    <value>16000</value>
    <description>Port that this metastore should listen on.
    </description>
  </property>

</configuration>
  1. 修改configure-sqoop
vi bin/configure-sqoop

​ 将出现HCAT_HOME和ACCUMULO_HOME的判断逻辑注释掉.

[hadoop@hadoop100 sqoop-1.4.7]$ vi bin/configure-sqoop

 82 #if [ -z "${HCAT_HOME}" ]; then
 83 #  if [ -d "/usr/lib/hive-hcatalog" ]; then
 84 #    HCAT_HOME=/usr/lib/hive-hcatalog
 85 #  elif [ -d "/usr/lib/hcatalog" ]; then
 86 #    HCAT_HOME=/usr/lib/hcatalog
 87 #  else
 88 #    HCAT_HOME=${SQOOP_HOME}/../hive-hcatalog
 89 #    if [ ! -d ${HCAT_HOME} ]; then
 90 #       HCAT_HOME=${SQOOP_HOME}/../hcatalog
 91 #    fi
 92 #  fi
 93 #fi
 94 #if [ -z "${ACCUMULO_HOME}" ]; then
 95 #  if [ -d "/usr/lib/accumulo" ]; then
 96 #    ACCUMULO_HOME=/usr/lib/accumulo
 97 #  else
 98 #    ACCUMULO_HOME=${SQOOP_HOME}/../accumulo
 99 #  fi
100 #fi

134 ## Moved to be a runtime check in sqoop.
135 #if [ ! -d "${HCAT_HOME}" ]; then
136 #  echo "Warning: $HCAT_HOME does not exist! HCatalog jobs will fail."
137 #  echo 'Please set $HCAT_HOME to the root of your HCatalog installation.'
138 #fi
139 
140 #if [ ! -d "${ACCUMULO_HOME}" ]; then
141 #  echo "Warning: $ACCUMULO_HOME does not exist! Accumulo imports will fail."
142 #  echo 'Please set $ACCUMULO_HOME to the root of your Accumulo installation.'
143 #fi

这样做的目的是避免运行时出现下面的警告信息,其实也可以不用注释掉:

Warning: /opt/module/sqoop/bin/…/…/hcatalog does not exist! HCatalog jobs will fail.
Please set $HCAT_HOME to the root of your HCatalog installation.
Warning: /opt/module/sqoop/bin/…/…/accumulo does not exist! Accumulo imports will fail.
Please set $ACCUMULO_HOME to the root of your Accumulo installation.
  1. 添加所需的Jar包

​ 将MySQL的驱动(使用5.x版本,不要使用高版本的)上传到sqoop安装目录下的lib目录下

$ cp mysql-connector-java-5.1.44-bin.jar /opt/pkg/sqoop-1.4.7/lib/

​ 将$HIVE_HOME/lib/hive-common-3.1.2.jar拷贝或者软链接到$SQOOP_HOME/lib

$ ln -s /opt/pkg/hive/lib/hive-common-3.1.2.jar /opt/pkg/hbase/lib

​ 如果需要解析json,可下载java-json.har,放到sqoop目录下的lib里

$ cp java-json.jar /opt/pkg/sqoop-1.4.7/lib/

3、验证

sqoop version

[hadoop@hadoop100 zookeeper-3.4.11]$ sqoop-version 
21/01/11 00:48:43 INFO sqoop.Sqoop: Running Sqoop version: 1.4.7
Sqoop 1.4.7
git commit id 2328971411f57f0cb683dfb79d19d4d19d185dd8
Compiled by maugli on Thu Dec 21 15:59:58 STD 2017

4.异常处理

  1. sqoop导入hive表报错解决
Could not load org.apache.hadoop.hive.conf.HiveConf

​ 解决方法:

​ 只需把hive安装文件夹里的/lib/hive-common-x.x.x.jar复制出来放在sqoop安装文件夹的lib文件夹里就行的了

​ 注:上面的x.x.x意思不是这个jar包真的叫hive-common-x.x.x.jar,是表示版本号的,比如说我的hive版本是2.3.3的,所以我这个jar包名是hive-common-2.3.3.jar的。

  1. 查询导入报错
INFO mapreduce.ImportJobBase: Beginning query import.
Exception in thread "main" java.lang.NoClassDefFoundError: org/json/JSONObject

根据错误定位导缺少java-json jar包

然后去下载这个jar

http://www.java2s.com/Code/Jar/j/Downloadjavajsonjar.htm

把jar包拷贝到SQOOP_HOME/lib下面,然后重新运行SQOOP

Views: 46

08 – Hive 3.1.2 安装

官方手册

GettingStarted

Manual

1.安装及配置 Hive

(1)把 Hive 的安装包 apache-hive-3.1.2-bin.tar.gz 上传到 Linux 虚拟机的/opt/download目录下, 解压

$ wget https://mirrors.bfsu.edu.cn/apache/hive/hive-3.1.2/apache-hive-3.1.2-bin.tar.gz
$ tar -zxvf apache-hive-3.1.2-bin.tar.gz

(2)将解压的文件夹移动到/opt/pkg下,同时改名为hive

$ mv apache-hive-3.1.2 /opt/pkg/hive

(3)修改/etc/profile.d/hadoop.env.sh 文件,添加环境变量。

$ sudo vim /etc/profile.d/hadoop.env.sh 

添加以下内容。

# HIVE_HOME 3.1.2 
export HIVE_HOME=/opt/module/hive 
export PATH=PATH:HIVE_HOME/bin 

执行以下命令使环境变量生效。

$ source /etc/profile.d/hadoop.env.sh

(4)进到/opt/module/hive/lib 目录下执行以下命令,解决日志 jar 包冲突。

$ cd /opt/module/hive/lib
$ mv log4j-slf4j-impl-2.10.0.jar log4j-slf4j-impl-2.10.0.jar.bak

(5)解决guava版本低于hadoop版本的问题

$ cd /opt/module/hive/lib
$ mv guava-19.0.jar guava-19.0.jar.bak
$ ln -s /opt/pkg/hadoop/share/hadoop/common/lib/guava-27.0-jre.jar ./

删除或改名lib下较低版本的guava的jar包

从hadoop目录将guava的jar包拷贝或者软链接过来

如果不处理,初始化MySQL元数据的时候就会出错。

2.驱动复制

(1)将mysql-connector-java-5.1.27.tar 驱动包拷贝到Hive的lib目录。

$ cp mysql-connector-java-5.1.27.jar /opt/pkg/hive/lib/

3.配置

(1)在/opt/module/hive/conf 目录下创建一个 hive-site.xml 文件

$ touch hive-site.xml 
$ vim hive-site.xml 

(2)配置如下


[hadoop@hadoop100 ~]$ cat /opt/pkg/hive/conf/hive-site.xml
<?xml version="1.0" encoding="UTF-8" standalone="no"?>
<?xml-stylesheet type="text/xsl" href="configuration.xsl"?>
<configuration>

  <!--配置 Hive 保存元数据信息所需的 MySQL URL 地址-->
  <property>
    <name>javax.jdo.option.ConnectionURL</name>
    <value>jdbc:mysql://hadoop100:3306/metastore?createDatabaseIfNotExist=true</value>
    <description>JDBC connect string for a JDBC metastore</description>
  </property>

  <!--配置 Hive 连接 MySQL 的驱动全类名-->
  <property>
    <name>javax.jdo.option.ConnectionDriverName</name>
    <value>com.mysql.jdbc.Driver</value>
    <description>Driver class name for a JDBC metastore</description>
  </property>

  <!--配置 Hive 连接 MySQL 的用户名 -->
  <property>
    <name>javax.jdo.option.ConnectionUserName</name>
    <value>hive</value>
    <description>username to use against metastore database</description>
  </property>

  <!--配置 Hive 连接 MySQL 的密码 -->
  <property>
    <name>javax.jdo.option.ConnectionPassword</name>
    <value>hive1234</value>
    <description>password to use against metastore database</description>
  </property>

  <property>
    <name>hive.metastore.warehouse.dir</name>
    <value>/user/hive/warehouse</value>
  </property>

  <property>
    <name>hive.metastore.schema.verification</name>
    <value>false</value>
  </property>

   <!--Hive 元数据的 thrift 的 uri地址,可配多个 -->
  <property>
    <name>hive.metastore.uris</name>
    <value>thrift://hadoop100:9083</value>
  </property>

  <!--Hive server2 的 thrift 端口 -->
  <property>
    <name>hive.server2.thrift.port</name>
    <value>10000</value>
  </property>

  <property>
    <name>hive.server2.thrift.bind.host</name>
    <value>hadoop100</value>
  </property>

  <property>
    <name>hive.metastore.event.db.notification.api.auth</name>
    <value>false</value>
  </property>

  <property>
    <name>hive.cli.print.header</name>
    <value>true</value>
  </property>

  <property>
    <name>hive.cli.print.current.db</name>
    <value>true</value>
  </property>
</configuration>

配置详情见官方文档

4.初始化元数据库

(1)启动 MySQL。

[hadoop@hadoop100 ~]$mysql -hhadoop100 -P3306 -uhive -phive1234

(2)新建 Hive 元数据库(metastore)。

mysql> create database hive; 
mysql> quit; 

(3)初始化 Hive 元数据库。

$ schematool -initSchema -dbType mysql -verbose 

5.启动 Hive

(1)Hive 2.x 以上版本,要先启动 Metastore 和 Hiveserver2 服务,否则会报错。

FAILED: HiveException java.lang.RuntimeException: Unable to instantiate org.apache.hadoop.hive.ql.metadata.SessionHiveMetaStoreClient 

(2)在/opt/pkg/hive/bin 目录下编写 Hive 服务启动脚本,在脚本中启动 Metastore 和 Hiveserver2 服务。

[hadoop@hadoop100 bin]$ vi /opt/pkg/hive/bin/hive-services.sh

#!/bin/bash
HIVE_LOG_DIR=$HIVE_HOME/logs

mkdir -p $HIVE_LOG_DIR

#检查进程是否运行正常,参数1为进程名,参数2为进程端口
function check_process()
{
    pid=$(ps -ef 2>/dev/null | grep -v grep | grep -i $1 | awk '{print $2}')
    ppid=$(netstat -nltp 2>/dev/null | grep $2 | awk '{print $7}' | cut -d '/' -f 1)
    echo $pid
    [[ "$pid" =~ "$ppid" ]] && [ "$ppid" ] && return 0 || return 1
}

function hive_start()
{
    metapid=$(check_process HiveMetastore 9083)
    cmd="nohup hive --service metastore >$HIVE_LOG_DIR/metastore.log 2>&1 &"
    cmd=$cmd" sleep 4; hdfs dfsadmin -safemode wait >/dev/null 2>&1"
    [ -z "$metapid" ] && eval $cmd || echo "Metastroe服务已启动"
    server2pid=$(check_process HiveServer2 10000)
    cmd="nohup hive --service hiveserver2 >$HIVE_LOG_DIR/hiveServer2.log 2>&1 &"
    [ -z "$server2pid" ] && eval $cmd || echo "HiveServer2服务已启动"
}

function hive_stop()
{
    metapid=$(check_process HiveMetastore 9083)
    [ "$metapid" ] && kill $metapid || echo "Metastore服务未启动"
    server2pid=$(check_process HiveServer2 10000)
    [ "$server2pid" ] && kill $server2pid || echo "HiveServer2服务未启动"
}

case $1 in
"start")
    hive_start
    ;;
"stop")
    hive_stop
    ;;
"restart")
    hive_stop
    sleep 2
    hive_start
    ;;
"status")
    check_process HiveMetastore 9083 >/dev/null && echo "Metastore服务运行正常" || echo "Metastore服务运行异常"
    check_process HiveServer2 10000 >/dev/null && echo "HiveServer2服务运行正常" || echo "HiveServer2服务运行异常"
    ;;
*)
    echo Invalid Args!
    echo 'Usage: '$(basename $0)' start|stop|restart|status'
    ;;
esac

(3)增加脚本执行权限。

$ sudo chmod +x hive-services.sh 

(4)启动 Hive 后台服务。

$ hive-services.sh start 

(5)查看 Hive 后台服务运行情况。

需要多试几次,因为服务从启动直到进程出现需要等待约一分钟左右时间。

$ hive-services.sh status 
Metastore 服务运行正常 
HiveServer2 服务运行正常 

(6)启动 Hive 客户端。

[hadoop@hadoop100 bin]$ hive
which: no hbase in (/opt/rh/llvm-toolset-7.0/root/usr/bin:/opt/pkg/hive/bin:/opt/pkg/flume/bin:/opt/pkg/kafka/bin:/opt/pkg/zookeeper/bin:/opt/pkg/hadoop/bin:/opt/pkg/hadoop/sbin:/opt/pkg/maven/bin:/sbin:/opt/pkg/java/bin:/opt/bin:/usr/local/bin:/usr/bin:/usr/local/sbin:/usr/sbin:/home/hadoop/.local/bin:/home/hadoop/bin)
Hive Session ID = 2b898c67-6677-4e98-8e23-0d70d358d206

Logging initialized using configuration in jar:file:/opt/pkg/hive/lib/hive-common-3.1.2.jar!/hive-log4j2.properties Async: true
Hive-on-MR is deprecated in Hive 2 and may not be available in the future versions. Consider using a different execution engine (i.e. spark, tez) or using Hive 1.X releases.
Hive Session ID = 8aa334ad-253c-4974-bdb2-971b22bd3afb
hive (default)>

6. 日志

hive和beeline工具的日志默认在/tmp/<操作用户名>下生成,

如果希望执行命令时实时看到日志,也可以创建conf/hive-log4j2.properties以及conf/beeline-log4j2.properties(有模板)

  • 日志存放位置可以修改

    • property.hive.log.dir = /opt/pkg/hive/logs/
      property.hive.log.file = hive.log
  • 默认日志级别是info,会导致hive客户端中输出很多不必要的信息

    • 但是修改级别后并没有效果

hive服务器日志可以查看

$ tail -F /opt/pkg/hive/logs/hiveServer2.log

7. beeline 使用示例

Hive客户端工具后续将使用Beeline 替代HiveCLI ,并且后续版本也会废弃掉HiveCLI 客户端工具,Beeline是 Hive 0.11版本引入的新命令行客户端工具,它是基于SQLLine CLI的JDBC客户端。

beeline连接hiveserver2

beeline -u "jdbc:hive2://localhost:10000"  -nhadoop -p123123
Java HotSpot(TM) 64-Bit Server VM warning: ignoring option MaxPermSize=512M; support was removed in 8.0
scan complete in 2ms
Connecting to jdbc:hive2://localhost:10000
Connected to: Apache Hive (version 2.3.4)
Driver: Hive JDBC (version 2.3.4)
Transaction isolation: TRANSACTION_REPEATABLE_READ
Beeline version 2.3.4 by Apache Hive
0: jdbc:hive2://localhost:10000>

类似hive-cli 的执行脚本功能

nohup beeline -u jdbc:hive2://127.0.0.1:10000  -n hadoop -p 123123  --color=true --silent=false  \
--hivevar p_date=${partitionDate} --hivevar f_date=${fileLocDate}  \
-f hdfs_add_partition_dmp_clearlog.hql  >> $logdir/load_${curDate}.log

beeline支持的操作

type command !help in beeline terminal

!help

output:

!addlocaldriverjar  Add driver jar file in the beeline client side.
!addlocaldrivername Add driver name that needs to be supported in the beeline
                    client side.
!all                Execute the specified SQL against all the current connections
!autocommit         Set autocommit mode on or off
!batch              Start or execute a batch of statements
!brief              Set verbose mode off
!call               Execute a callable statement
!close              Close the current connection to the database
!closeall           Close all current open connections
!columns            List all the columns for the specified table
!commit             Commit the current transaction (if autocommit is off)
!connect            Open a new connection to the database.
!dbinfo             Give metadata information about the database
!describe           Describe a table
!dropall            Drop all tables in the current database
!exportedkeys       List all the exported keys for the specified table
!go                 Select the current connection
!help               Print a summary of command usage
!history            Display the command history
!importedkeys       List all the imported keys for the specified table
!indexes            List all the indexes for the specified table
!isolation          Set the transaction isolation for this connection
!list               List the current connections
!manual             Display the BeeLine manual
!metadata           Obtain metadata information
!nativesql          Show the native SQL for the specified statement
!nullemptystring    Set to true to get historic behavior of printing null as
                    empty string. Default is false.
!outputformat       Set the output format for displaying results
                    (table,vertical,csv2,dsv,tsv2,xmlattrs,xmlelements, and
                    deprecated formats(csv, tsv))
!primarykeys        List all the primary keys for the specified table
!procedures         List all the procedures
!properties         Connect to the database specified in the properties file(s)
!quit               Exits the program
!reconnect          Reconnect to the database
!record             Record all output to the specified file
!rehash             Fetch table and column names for command completion
!rollback           Roll back the current transaction (if autocommit is off)
!run                Run a script from the specified file
!save               Save the current variabes and aliases
!scan               Scan for installed JDBC drivers
!script             Start saving a script to a file
!set                Set a beeline variable
!sh                 Execute a shell command
!sql                Execute a SQL command
!tables             List all the tables in the database
!typeinfo           Display the type map for the current connection
!verbose            Set verbose mode on

常用的几个command

  • !connect url –连接不同的Hive2服务器
  • !exit –退出shell
  • !help –显示全部命令列表
  • !verbose –显示查询追加的明细

5. 异常处理

一般hiverServer2的启动比较花时间,需等待5分钟左右才能启动,如果长时间还没有启动需要查看日志寻找失败原因

启动hiveserver2报错 1

Hive启动hiveserver2报错:Could not open client transport with JDBC Uri解决方案

报错信息:

Error: Could not open client transport with JDBC Uri: jdbc:hive2://node1:10000/hive_metadata;user=hadoop: java.net.ConnectException: 拒绝连接 (Connection refused) (state=08S01,code=0)
Beeline version 2.3.3 by Apache Hive

原因:hiveserver2增加了权限控制,需要在hadoop的配置文件中配置代理用户

解决方案

关闭dfs和yarn

$ stop-dfs.sh
$ stop-yarn.sh

在hadoop的core-site.xml中添加如下内容(其中hadoop为允许作为代理用户的用户及用户组)

<property>
   <name>hadoop.proxyuser.hadoop.hosts</name>
   <value>*</value>
</property>
<property>
   <name>hadoop.proxyuser.hadoop.groups</name>
   <value>*</value>
</property>

重启dfs

$ start-dfs.sh

重启yarn

$ start-yarn.sh

重新连接Hive

beeline -u jdbc:hive2://hadoop100:10000 -n hadoop -p

启动hiveserver2报错 2

若日志中发现如下异常信息:

Safe mode is ON. The reported blocks 3 needs additional 2 blocks to reach the threshold 0.9990 of total blocks 5. The number of live datanodes 2 has reached the minimum number 0. Safe mode will be turned off automatically once the thresholds have been reached.

说明我们的损坏的文件比例超过了阈值, 这个阈值配置在hdfs中, 也就是说不允许任何一个块损坏掉. 如果我们配置成99%应该就不会触发safemode了.
由于系统断电,内存不足等原因导致dataNode丢失超过设置的丢失百分比,系统自动进入安全模式

解决办法

执行命令退出安全模式:

hadoop dfsadmin -safemode leave`

执行健康检查,删除损坏掉的block
hdfs fsck  /  -delete

运行后如果出现下面提示,表示修复完毕

The filesystem under path '/' is HEALTHY

如果没有修复则可以多执行一次hdfs fsck命令

beeline下无法导入hbase表

改为使用bin/hive就可以导入了, 可能是BUG。

Views: 63

07 Flume的安装与配置

安装

  1. 下载

    http://flume.apache.org/download.html

    http://archive.apache.org/dist/flume/stable/

    wget http://archive.apache.org/dist/flume/stable/apache-flume-1.9.0-bin.tar.gz

    这里使用最新的 apache-flume-1.9.0版本

  2. 解压安装

    tar zxvf apache-flume-1.9.0-bin.tar.gz -C /opt/pkg/
  3. 改目录名

    mv apache-flume-1.9.0-bin/ flume
  4. 配置环境变量,并让环境变量生效

    # FLUME 1.9.0
    export FLUME_HOME=/opt/pkg/flume
    export PATH=$FLUME_HOME/bin:$PATH
  5. 修改conf/flume-env.sh,配置JDK路径(该文件事先是不存在的,需要复制一份)
    复制:

    cp flume-env.template.sh flume-env.sh

    编辑文件,并设置如下内容:

    #设置JAVA_HOME:
    export JAVA_HOME = /opt/pkg/java         
    #修改默认的内存:  
    export JAVA_OPTS="-Xms1024m -Xmx1024m -Xss256k -Xmn2g -XX:+UseParNewGC -XX:+UseConcMarkSweepGC -XX:-UseGCOverheadLimit"   
  6. 将hadoop-3.1.4安装路径下的依赖的jar软链接到flume-1.9.0/lib下:

    $ cd /opt/pkg/flume/lib
    $ ln -s /opt/pkg/hadoop/share/hadoop/common/hadoop-common-3.1.4.jar ./
    $ ln -s /opt/pkg/hadoop/share/hadoop/common/lib/commons-configuration2-2.1.1.jar ./
    $ ln -s /opt/pkg/hadoop/share/hadoop/common/lib/hadoop-auth-3.1.4.jar ./      
    $ ln -s /opt/pkg/hadoop/share/hadoop/common/lib/htrace-core4-4.1.0-incubating.jar ./
    $ ln -s /opt/pkg/hadoop/share/hadoop/common/lib/commons-io-2.5.jar ./         
    $ ln -s /opt/pkg/hadoop/share/hadoop/hdfs/hadoop-hdfs-3.1.4.jar ./
    

测试

  1. 验证

    bin/flume-ng version
    
    flume 1.9.0
    Source code repository: https://git-wip-us.apache.org/repos/asf/flume.git
    Revision: d4fcab4f501d41597bc616921329a4339f73585e
    Compiled by fszabo on Mon Dec 17 20:45:25 CET 2018
    From source with checksum 35db629a3bda49d23e9b3690c80737f9
  2. 配置Flume HDFS Sink:
    在flume的conf目录新建一个log2hdfs.conf
    添加如下内容:

    [hadoop@hadoop100 conf]$ vi log2hdfs.conf
    
    # define the agent
    a1.sources=r1
    a1.channels=c1
    a1.sinks=k1
    
    # define the source
    #上传目录类型
    a1.sources.r1.type=spooldir
    a1.sources.r1.spoolDir=/tmp/flume-logs
    #定义自滚动日志完成后的后缀名
    a1.sources.r1.fileSuffix=.FINISHED
    #根据每行文本内容的大小自定义最大长度4096=4k
    a1.sources.r1.deserializer.maxLineLength=4096
    
    # define the sink
    a1.sinks.k1.type = hdfs
    #上传的文件保存在hdfs的/flume/logs目录下
    a1.sinks.k1.hdfs.path = hdfs://hadoop100:8020/flume/logs/%y-%m-%d/
    a1.sinks.k1.hdfs.filePrefix=access_log
    a1.sinks.k1.hdfs.fileSufix=.log
    a1.sinks.k1.hdfs.batchSize=1000
    a1.sinks.k1.hdfs.fileType = DataStream
    a1.sinks.k1.hdfs.writeFormat= Text
    # roll 滚动规则:按照数据块128M大小来控制文件的写入,与滚动相关其他的都设置成0
    #为了演示,这里设置成500k写入一次
    a1.sinks.k1.hdfs.rollSize= 512000
    a1.sinks.k1.hdfs.rollCount=0
    a1.sinks.k1.hdfs.rollInteval=0
    #控制生成目录的规则:一般是一天或者一周或者一个月一次,这里为了演示设置10秒
    a1.sinks.k1.hdfs.round=true
    a1.sinks.k1.hdfs.roundValue=10
    a1.sinks.k1.hdfs.roundUnit= second
    #是否使用本地时间
    a1.sinks.k1.hdfs.useLocalTimeStamp=true
    
    #define the channel
    a1.channels.c1.type = memory
    #自定义event的条数
    a1.channels.c1.capacity = 500000
    #flume事务控制所需要的缓存容量1000条event
    a1.channels.c1.transactionCapacity = 1000
    
    #source channel sink cooperation
    a1.sources.r1.channels = c1
    a1.sinks.k1.channel = c1
    

    注意

    • a1.sources.r1.spoolDir目录如果不存在需要先创建
    • a1.sinks.k1.hdfs.path目录会自动创建
      • 这里的路径是`hdfs://hadoop100:8020/flume/logs/yy-mm-dd/
      • 也就是每天的数据都会产生滚动日志。
      • 实际应该是按天或者按周、按月来生成滚动日志。
  3. 启动flume

  • 准备

    创建/tmp/flumn-logs, 并分配权限

     sudo mkdir -p  /tmp/flume-logs
  • 启动
    执行如下命令进行启动:

     flume-ng agent --conf ./conf/ -f ./conf/flume-hdfs.conf --name a1 -Dflume.root.logger=INFO,console
  • 测试

     # 每次执行追加一行文字
     echo xxxxxxxxxxxx >> /tmp/flume-logs/access_log123.log
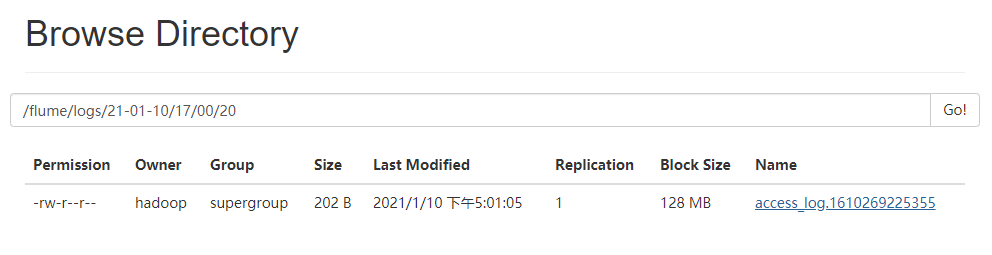
  • 到Hadoop的控制台http://hadoop100:9870/查看 hdfs:hadoop100:9870/flume/logs/下有没有数据生成:

    image-20210110175013827

异常: 日志收集失败,报错:

2021-03-09 22:38:50,834 (SinkRunner-PollingRunner-DefaultSinkProcessor) [ERROR - org.apache.flume.sink.hdfs.HDFSEventSink.process(HDFSEventSink.java:459)] process failed
java.lang.NoSuchMethodError: com.google.common.base.Preconditions.checkArgument(ZLjava/lang/String;Ljava/lang/Object;)V

原因: flume/lib/guava-xxx.jar 和 hadoop自带的jar包发生冲突

解决: 将flume/lib下的guava包删除或者改名, 只保留hadoop的版本即可

Views: 135