版权 本文为时间海绵原创文章,转载无需和我联系,但请注明来自博客 https://blog.hzchendou.com
一、SpringSecurity 入门
介绍
SpringSecurity 是Spring 全家桶中的安全框架,为了解决“用户身份认证”、“资源访问鉴权”这两个核心问题,SpringSecurity提供了一整套安全框架,基于安全框架,用户可以自定义身份认证、资源鉴权功能,例如:手机验证码登录、基于RDBC鉴权等,本文章主要介绍如何创建基于SpringSecurity项目。
项目创建
项目源码已上传到Gitee: 地址。
项目依赖
基于 SpringBoot 创建SpringSecurity 可以实现开箱即用功能,引入依赖项:
– SpringBoot依赖
|
1 2 3 4 5 6 |
<parent> <groupId>org.springframework.boot</groupId> <artifactId>spring-boot-starter-parent</artifactId> <version>2.7.0</version> <relativePath/> <!-- lookup parent from repository --> </parent> |
– Spring MVC 依赖(搭建基于 http 协议的web项目)
|
1 2 3 4 |
<dependency> <groupId>org.springframework.boot</groupId> <artifactId>spring-boot-starter-web</artifactId> </dependency> |
– Spring Security 依赖
|
1 2 3 4 |
<dependency> <groupId>org.springframework.boot</groupId> <artifactId>spring-boot-starter-security</artifactId> </dependency> |
详细 pom 文件可以参见源码:https://gitee.com/hzchendou/spring-security-demo/blob/lesson1/pom.xml
项目模块
创建简单mvc API,代码如下:
|
1 2 3 4 5 6 7 8 9 10 11 12 13 14 |
/** * hello 访问控制器 * @Date: 2022-05-23 11:27 * @since: 1.0 */ @RequestMapping("/anonymity") @RestController public class AnonymityController { @RequestMapping("/hello") public ResultVO test() { return ResultVO.success("hello world"); } } |
项目启动
自此完成项目配置,基于SpringBoot 自动装配功能可以帮助我们完成大部分配置,引入依赖后会帮助创建一个基础运行框架,配置了一些默认配置项,运行项目后看到如下日志:
|
1 2 3 4 5 6 7 8 9 10 11 12 13 14 15 16 17 18 19 20 21 22 23 24 |
. ____ _ __ _ _ /\\ / ___'_ __ _ _(_)_ __ __ _ \ \ \ \ ( ( )\___ | '_ | '_| | '_ \/ _` | \ \ \ \ \\/ ___)| |_)| | | | | || (_| | ) ) ) ) ' |____| .__|_| |_|_| |_\__, | / / / / =========|_|==============|___/=/_/_/_/ :: Spring Boot :: (v2.7.0) 2022-05-23 12:23:13.584 INFO 8538 --- [ main] c.h.b.demo.springsecurity.Application : Starting Application using Java 1.8.0_211 on hzchendoudeMac-mini.local with PID 8538 (/Users/chendou/repo/hzchendou/learning/springsecurity/target/classes started by chendou in /Users/chendou/repo/hzchendou/learning/springsecurity) 2022-05-23 12:23:13.586 INFO 8538 --- [ main] c.h.b.demo.springsecurity.Application : No active profile set, falling back to 1 default profile: "default" 2022-05-23 12:23:14.338 INFO 8538 --- [ main] o.s.b.w.embedded.tomcat.TomcatWebServer : Tomcat initialized with port(s): 8080 (http) 2022-05-23 12:23:14.344 INFO 8538 --- [ main] o.apache.catalina.core.StandardService : Starting service [Tomcat] 2022-05-23 12:23:14.344 INFO 8538 --- [ main] org.apache.catalina.core.StandardEngine : Starting Servlet engine: [Apache Tomcat/9.0.63] 2022-05-23 12:23:14.426 INFO 8538 --- [ main] o.a.c.c.C.[Tomcat].[localhost].[/] : Initializing Spring embedded WebApplicationContext 2022-05-23 12:23:14.426 INFO 8538 --- [ main] w.s.c.ServletWebServerApplicationContext : Root WebApplicationContext: initialization completed in 806 ms 2022-05-23 12:23:14.666 WARN 8538 --- [ main] .s.s.UserDetailsServiceAutoConfiguration : Using generated security password: ab60d0d9-a34b-4aee-ad31-e8881672c6a0 This generated password is for development use only. Your security configuration must be updated before running your application in production. 2022-05-23 12:23:14.742 INFO 8538 --- [ main] o.s.s.web.DefaultSecurityFilterChain : Will secure any request with [org.springframework.security.web.session.DisableEncodeUrlFilter@20eaeaf8, org.springframework.security.web.context.request.async.WebAsyncManagerIntegrationFilter@748ac6f3, org.springframework.security.web.context.SecurityContextPersistenceFilter@7affc159, org.springframework.security.web.header.HeaderWriterFilter@72eb6200, org.springframework.security.web.csrf.CsrfFilter@52bf7bf6, org.springframework.security.web.authentication.logout.LogoutFilter@66de00f2, org.springframework.security.web.authentication.UsernamePasswordAuthenticationFilter@163042ea, org.springframework.security.web.authentication.ui.DefaultLoginPageGeneratingFilter@479b5066, org.springframework.security.web.authentication.ui.DefaultLogoutPageGeneratingFilter@68f6e55d, org.springframework.security.web.authentication.www.BasicAuthenticationFilter@1d8b0500, org.springframework.security.web.savedrequest.RequestCacheAwareFilter@1682c08c, org.springframework.security.web.servletapi.SecurityContextHolderAwareRequestFilter@3fd05b3e, org.springframework.security.web.authentication.AnonymousAuthenticationFilter@6fff46bf, org.springframework.security.web.session.SessionManagementFilter@76ececd, org.springframework.security.web.access.ExceptionTranslationFilter@67e25252, org.springframework.security.web.access.intercept.FilterSecurityInterceptor@52b46d52] 2022-05-23 12:23:14.783 INFO 8538 --- [ main] o.s.b.w.embedded.tomcat.TomcatWebServer : Tomcat started on port(s): 8080 (http) with context path '' 2022-05-23 12:23:14.791 INFO 8538 --- [ main] c.h.b.demo.springsecurity.Application : Started Application in 1.471 seconds (JVM running for 1.869) |
会生成一串用户密码,这是SpringSecurity 帮助学习的默认配置,后续将会讲解,
启动完成在浏览器输入访问地址:http://localhost:8080/anonymity/hello
网页会自动跳转到 http://localhost:8080/login
输入用户名:user
输入密码:在日志中的一串字符串, 这里是 *ab60d0d9-a34b-4aee-ad31-e8881672c6a0*(由程序自动生成,每次生成内容不一样)
登录成功后跳转到指定地址,得到内容如下:
|
1 |
{"code":200,"data":"hello world","message":null} |
至此完成SpringSecurity项目搭建,SpringSecurity 提供了默认配置,默认组织匿名访问接口。
总结
- SpringSecurity 项目搭建很方便,结合 SpringBoot 进行使用可以快速完成基础框架搭建,同时提供默认配置,不需要任何配置即可完成项目资源保护
- SpringSecurity 提供了 用户身份鉴定(用户登录), 以及用户访问权限控制(判断是否拥有权限访问项目接口)
上述内容帮助完成搭建基础项目,当然这样的程序无法满足实际项目需求,我们需要自定义认证(登录方式)以及 鉴权(权限控制)流程,下一篇我们将在此基础上自定义登录方式
特别声明:项目采用最新SpringSecurity版本:5..7.1,版本升级带来了一点新变化,可能与老版本由一点不同,但是核心理念是一致的
二、SpringSecurity 自定义手机验证登录方式
简介
在上一篇文章中,我们介绍了如何搭建一套基于SpringSecuity的项目框架,并且进行了演示,本文将继续扩展项目功能,实现自定义用户登录功能。
项目源码仓库:Gitee
代码分支:lesson2
原理介绍
SpringSecurity 提供了web服务项目相关的安全配置,通常我们使用 Spring MVC进行开发(基于Servlet 容器技术实现,现在 Spring 提供了 WebFlux 技术可以提高系统吞吐量,两者都是基于 HTTP协议开发的web服务,MVC提供的是阻塞I/O,WebFlux 提供非阻塞 I/O),Servlet 容器中提供了两种核心组件:
- Filter
- Servlet
Filter 简介
Filter 组件可以实现过滤器功能,Http 请求达到时,Filter 优先接收到请求信息,并且可以依据业务逻辑对请求提前进行处理,例如,CORS(浏览器的同源请求策略, 详细信息参见:阮一峰网络日志), 对于非同源的请求,项目方可以按照要求选择拒绝或者接受请求,接口定义如下:
|
1 2 3 4 5 6 7 8 9 |
public interface Filter { /// 初始化 public default void init(FilterConfig filterConfig) throws ServletException {} /// 过滤 public void doFilter(ServletRequest request, ServletResponse response, FilterChain chain) throws IOException, ServletException; /// 销毁 public default void destroy() {} } |
在 public void doFilter(ServletRequest request, ServletResponse response, FilterChain chain) throws IOException, ServletException; 方法中可以获取到http 请求信息,并且可以阻断 Http 请求,防止调用实际的业务逻辑代码,例如 实现基于IP黑名单过滤器,发现请求IP 在系统的 IP黑名单中,可以直接返回错误信息阻止请求继续执行。
Servlet 简介
Servlet 组件用于接收Http请求信息,并依据请求信息进行处理,项目的业务逻辑在 Servlet 中进行处理,接口定义如下:
|
1 2 3 4 5 6 7 8 9 10 11 12 13 |
public interface Servlet { /// 初始化方法 public void init(ServletConfig config) throws ServletException; /// 获取配置 public ServletConfig getServletConfig(); //// 业务处理 public void service(ServletRequest req, ServletResponse res) throws ServletException, IOException; /// 获取基础信息 public String getServletInfo(); /// 销毁 public void destroy(); } |
其中最主要的是 public void service(ServletRequest req, ServletResponse res) throws ServletException, IOException; 业务逻辑代码在此处进行调用处理(Spring MVC 中的重要组件 DispatcherServlet 是Servlet 子类,通过 service 方法接收并处理 Http 请求)
SpringSecurity原理
通过上述Servlet 技术简单讲解,我们知道Filter主要用于实现过滤功能,这些功能与业务逻辑关系不大,可以在请求进入业务逻辑之前进行拦截处理,保障系统稳定运行,SpringSecurity正是通过一系列“Filter组件”来实现安全过滤功能(在执行业务逻辑之前对Http请求进行身份校验和权限控制),SpringSecurity 中的两个主要功能分别是:
- 身份校验:对当前发起请求的用户(可能是真实用户,也可能是网络爬虫或者是恶意攻击者)进行身份识别,主要解决你是谁的问题
- 权限控制:对当前访问资源进行权限控制(管理后台功能只对管理员开发,普通用户无法访问),主要解决你是否有权限访问资源
通过上述两个功能点可以实现系统的访问控制安全,对于不符合要求的请求,直接返回错误信息,阻止不安全的资源访问。本文重点讲解身份校验,权限控制将在后续进行分析。
用户名密码登录分析
在之前文章中使用“user”用户进行了登录,这是SpringSecurity提供的默认用户密码登录实现:"org.springframework.security.web.authentication.UsernamePasswordAuthenticationFilter",这是一个Filter 子类,可以实现Filter过滤功能,核心代码如下:
|
1 2 3 4 5 6 7 8 9 10 11 12 13 14 15 16 17 18 19 20 21 22 23 24 25 26 27 28 29 30 31 32 33 34 |
public class UsernamePasswordAuthenticationFilter extends AbstractAuthenticationProcessingFilter { /// 默认匹配 POST /login 请求 private static final AntPathRequestMatcher DEFAULT_ANT_PATH_REQUEST_MATCHER = new AntPathRequestMatcher("/login", "POST"); public UsernamePasswordAuthenticationFilter() { super(DEFAULT_ANT_PATH_REQUEST_MATCHER); } public UsernamePasswordAuthenticationFilter(AuthenticationManager authenticationManager) { super(DEFAULT_ANT_PATH_REQUEST_MATCHER, authenticationManager); } //// 在 doFilter 方法中调用该方法实现过滤 @Override public Authentication attemptAuthentication(HttpServletRequest request, HttpServletResponse response) throws AuthenticationException { /// 判断请求方法是否支持 if (this.postOnly && !request.getMethod().equals("POST")) { throw new AuthenticationServiceException("Authentication method not supported: " + request.getMethod()); } String username = obtainUsername(request); username = (username != null) ? username.trim() : ""; String password = obtainPassword(request); password = (password != null) ? password : ""; /// 包装成 用户密码Token UsernamePasswordAuthenticationToken authRequest = UsernamePasswordAuthenticationToken.unauthenticated(username, password); // Allow subclasses to set the "details" property /// 设置请求信息,这是一些额外的信息,例如用户IP地址等信息,与核心校验逻辑关系不大 setDetails(request, authRequest); //// 调用 AuthenticationManager 进行身份验证,成功返回 Authentication 对象,失败抛出异常 return this.getAuthenticationManager().authenticate(authRequest); } } |
我们来分析一下 attemptAuthentication 方法,执行的逻辑如下:
- 判断Http请求是否为用户密码登录请求(主要看请求路径是否为 /login 并且为 POST方法)
- 获取请求中的用户名密码信息(登录参数信息)
- 委托给AuthenticationManager组件进行身份验证
- 返回成功或者是错误信息
可以理解为Filter中并没有承担核心的身份信息校验责任,主要完成校验请求是否为用户名密码请求,如果是提取出相关参数,委托给AuthenticationManager组件校验身份,如果成功返回Authentication对象。这里有几个关键的类:
- UsernamePasswordAuthenticationToken:保存用户名密码信息(是Authentication的子类)
- Authentication:代表待验证信息或者是已验证完成后的身份信息(可以是未验证的信息也可以是已验证的身份信息,通过方法boolean isAuthenticated() 返回值判断是为已验证信息)
- AuthenticationManager:验证管理器负责对待验证信息内容进行验证,验证成功返回身份信息,失败返回错误信息
UsernamePasswordAuthenticationToken和Authentication都是数据模型类,不存在处理逻辑,AuthenticationManager是主要的验证逻辑处理类,在SpringSecurity 中提供了ProviderManager实现类,核心代码如下:
|
1 2 3 4 5 6 7 8 9 10 11 12 13 14 15 16 17 18 19 20 21 22 23 24 25 26 27 28 29 30 31 32 33 34 35 36 37 38 39 40 41 42 43 44 45 46 47 48 49 50 51 52 53 54 55 56 57 58 59 60 61 |
public class ProviderManager implements AuthenticationManager, MessageSourceAware, InitializingBean{ /// 身份校验处理器 private List<AuthenticationProvider> providers = Collections.emptyList(); @Override public Authentication authenticate(Authentication authentication) throws AuthenticationException { Class<? extends Authentication> toTest = authentication.getClass(); AuthenticationException lastException = null; AuthenticationException parentException = null; Authentication result = null; Authentication parentResult = null; /// 循环使用Provider 来验证身份信息,只要有一个验证通过就算成功 for (AuthenticationProvider provider : getProviders()) { /// 判断Provider是否支持验证Authentication子类类型,例如前面的UsernamepasswordAuthenticationToken if (!provider.supports(toTest)) { continue; } try { /// 使用具体的验证器进行验证,验证通过返回具体验证信息 result = provider.authenticate(authentication); if (result != null) { break; } } catch (AccountStatusException | InternalAuthenticationServiceException ex) { throw ex; } catch (AuthenticationException ex) { lastException = ex; } } /// 如果验证器无法验证,并且存在父级验证器那么使用父级验证器进行验证 if (result == null && this.parent != null) { // Allow the parent to try. try { parentResult = this.parent.authenticate(authentication); result = parentResult; } catch (ProviderNotFoundException ex) { } catch (AuthenticationException ex) { parentException = ex; lastException = ex; } } /// 判断是否存在已验证结果,存在返回验证信息,不存在抛出一样信息 if (result != null) { if (this.eraseCredentialsAfterAuthentication && (result instanceof CredentialsContainer)) { ((CredentialsContainer) result).eraseCredentials(); } if (parentResult == null) { this.eventPublisher.publishAuthenticationSuccess(result); } return result; } throw lastException; } } |
在上述代码中最主要的是private List
|
1 2 3 4 5 6 7 8 9 |
public interface AuthenticationProvider { ///对待验证信息进行验证 Authentication authenticate(Authentication authentication) throws AuthenticationException; //// 判断当前验证器是否支持对该类型验证信息进行校验处理 boolean supports(Class<?> authentication); } |
SpringSecurity中提供了对UsernamepasswordAuthenticationToken参数验证的AuthenticationProvider子类DaoAuthenticationProvider,相关接口实现如下:
- 判断是否支持方法
|
1 2 3 4 |
/// 判断待验证参数authentication是否为UsernamePasswordAuthenticationToken类型或者是其子类 public boolean supports(Class<?> authentication) { return (UsernamePasswordAuthenticationToken.class.isAssignableFrom(authentication)); } |
- 身份验证逻辑
|
1 2 3 4 5 6 7 8 9 10 11 12 13 14 15 16 17 18 19 20 21 22 23 24 25 26 27 28 29 30 31 32 33 34 35 36 37 38 39 40 41 42 43 44 45 46 47 48 49 |
@Override public Authentication authenticate(Authentication authentication) throws AuthenticationException { String username = determineUsername(authentication); boolean cacheWasUsed = true; UserDetails user = this.userCache.getUserFromCache(username); if (user == null) { cacheWasUsed = false; try { /// 依据用户名以及参数信息查找用户信息 user = retrieveUser(username, (UsernamePasswordAuthenticationToken) authentication); } catch (UsernameNotFoundException ex) { /// 这里为了隐藏用户不存在错误,会对该错误进行包装,抛出新错误 if (!this.hideUserNotFoundExceptions) { throw ex; } throw new BadCredentialsException(this.messages .getMessage("AbstractUserDetailsAuthenticationProvider.badCredentials", "Bad credentials")); } } try { //// 信息校验前执行 this.preAuthenticationChecks.check(user); //// 校验用户密码是否正确 additionalAuthenticationChecks(user, (UsernamePasswordAuthenticationToken) authentication); } catch (AuthenticationException ex) { if (!cacheWasUsed) { throw ex; } //// 如果使用的是缓存,那么进行绕过缓存再次验证防止缓存信息过期 cacheWasUsed = false; user = retrieveUser(username, (UsernamePasswordAuthenticationToken) authentication); this.preAuthenticationChecks.check(user); additionalAuthenticationChecks(user, (UsernamePasswordAuthenticationToken) authentication); } /// 校验结束处理 this.postAuthenticationChecks.check(user); if (!cacheWasUsed) { this.userCache.putUserInCache(user); } Object principalToReturn = user; if (this.forcePrincipalAsString) { principalToReturn = user.getUsername(); } /// 验证成功返回成功信息 return createSuccessAuthentication(principalToReturn, authentication, user); } |
整体流程图如下所示:
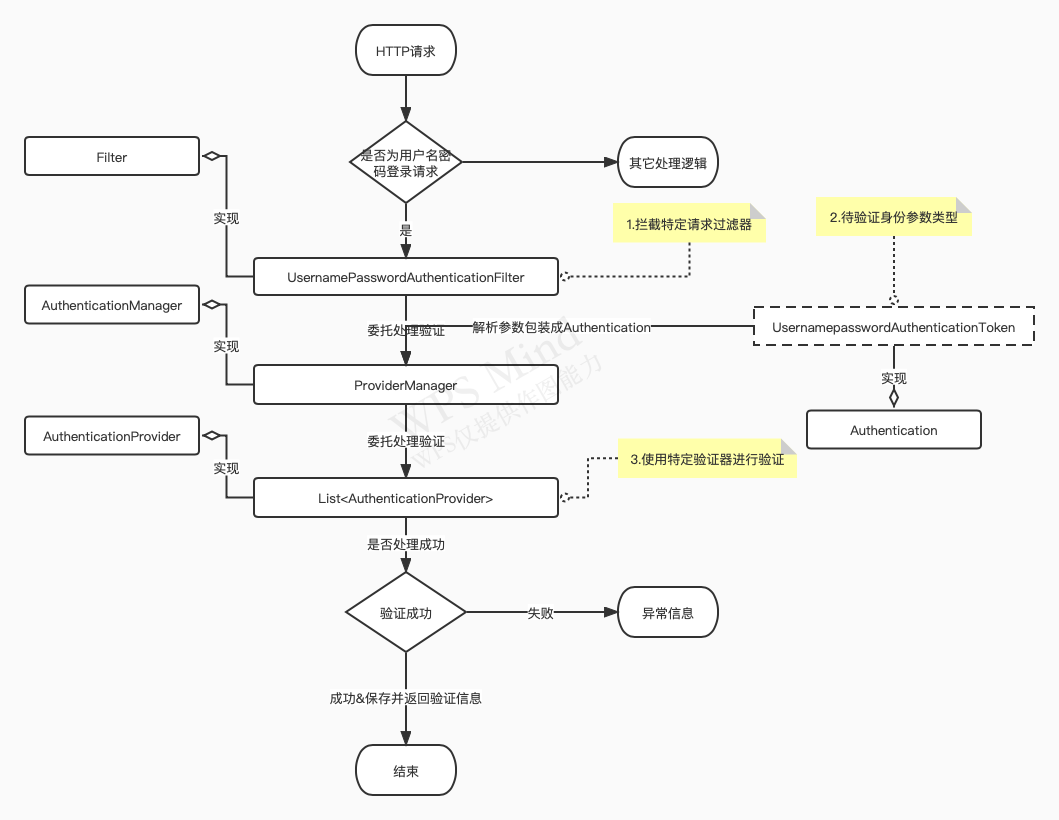
自定义验证流程
通过上述分析我们可以知道,自定义一个身份验证逻辑需要实现以下三个组件:
- 自定义验证参数类型:Authentication
- 自定义拦截过滤器:Filter
- 自定义特定验证参数类型验证器:AuthenticationProvider
下面我们将实现常用的手机验证码验证登录功能。
自定义验证参数
通过分析UsernamePasswordAuthenticationToken组件,我们知道该Token主要包装验证参数信息,方便后续使用,实现逻辑如下:
|
1 2 3 4 5 6 7 8 9 10 11 12 13 14 15 16 17 18 19 20 21 22 23 24 25 26 27 28 29 30 31 32 33 34 35 36 37 38 39 40 41 42 43 44 |
public class PhoneCodeAuthenticationToken extends AbstractAuthenticationToken { private final Object principal; private Object credentials; ///未验证参数构造器 private PhoneCodeAuthenticationToken(String phone, String code) { super(null); this.principal = phone; this.credentials = code; /// 设置是否验证:false-未验证,true-已验证 super.setAuthenticated(false); } ///已验证参数构造器 /// authorities代表取得打权限信息 private PhoneCodeAuthenticationToken(Object principal, Collection<? extends GrantedAuthority> authorities) { super(authorities); this.principal = principal; /// 设置是否验证:false-未验证,true-已验证 super.setAuthenticated(true); } /// 未验证Token public PhoneCodeAuthenticationToken unAuthToken(String phone, String code) { return new PhoneCodeAuthenticationToken(phone, code); } ////已验证Token public PhoneCodeAuthenticationToken authToken(Object principal, Collection<? extends GrantedAuthority> authorities) { return new PhoneCodeAuthenticationToken(principal, authorities); } @Override public Object getCredentials() { return credentials; } @Override public Object getPrincipal() { return principal; } } |
自定义拦截器
通过分析UsernamePasswordAuthenticationFilter组件,我们知道拦截器主要完成三个功能:
- 拦截特定请求
- 解析参数
- 委托给验证器进行验证处理
手机验证码登录拦截POST/phone/login请求,解析参数,包装成PhoneCodeAuthenticationToken对象,最后委托给AuthenticationManager组件验证,具体代码参见Gitee仓库:地址
运行验证
程序启动后发起POST请求,参数信息:
- phone:15000000000
- code:888888
请求成功后返回用户信息(SpringSecurity默认配置会将登录成功请求跳转到 / 路径):
|
1 2 3 4 5 6 7 8 9 10 11 |
{ "code": 200, "data": { "username": "15000000000", "phone": "15000000000", "roles": [ "ROLE_USER" ] }, "message": null } |
至此完成手机验证码登录功能
我们使用POST请求,SpringSecurity默认提供csrf保护,会拦截 POST请求,因此需要禁用
总结
- SpringSecurity 使用Servlet容器组件Filter功能进行请求拦截,实现身份校验以及权限控制
- SpringSecurity 使用AuthenticationManager来实现身份校验功能(实际上你可以在Filter中直接完成身份验证功能,但是这种硬编码方式会增加程序耦合性,后期维护/扩展不方便)
- SpringSecurity 中的AuthenticationManager委托多个AuthenticationProvider对请求参数进行校验
- 自定义手机验证码验证流程需要实现三个类:
- 继承Filter的PhoneCodeAuthenticationFilter, 对手机验证码登录请求进行拦截,并解析处请求参数信息,最后委托给AuthenticationManager进行身份校验
- 继承Authentication的PhoneCodeAuthenticationToken
- 登录时存放请求参数信息:手机号和验证码
- 登录成功后存放用户信息:用户名、手机号、权限等
- 继承AuthenticationProvider的PhoneCodeAuthenticationProvider,对请求参数进行验证,验证通过返回用户信息
有过SpringSecurity开发经验的同学会发现仓库中的代码使用HttpSecurity进行配置的方式与之前的方式不同,这是SpringSecurity官方在新版中推荐使用的方式,老版本的配置方式将会被遗弃,目前两种方式都可以使用
参考文档
三、SpringSecurity 动态权限访问控制
简介
在先前文章中我们搭建了SpringSecurity项目,并且讲解了自定义登录方式需要做哪些工作,如果你感兴趣可以前往博客阅读文章以及代码,在本文将继续讲解如何实现动态权限控制。
代码仓库:Gitee
代码分支:lesson3
目标
Web项目通常都有前台和后台服务,前台服务面向目标客户,后台服务为项目方提供管理和数据分析服务,因此不同的用户需要赋予不同的角色,例如前台用户角色为USER,后台用户为ADMIN,USER允许访问"/user/hello"接口,ADMIN允许访问"/admin/hello"接口,但是USER不能访问。这是项目必须有的基本功能,同时访问规则也会不断变化,例如: 有一个用户昵称功能,初期只允许会员用户(可以理解为拥有角色VIP的用户)使用,后期产品决定全员都可以使用,这种需求也很常见,如果采用硬编码的方式那么会导致频繁修改代码,测试、发布,增加额外工作量,如果可以动态配置接口访问权限,那么就能减少很多工作量,SpringSecurity框架提供了扩展点,基于这些扩展点可以很方便的实现动态权限控制访问功能,我们再来回顾一下需求:
- 基于角色进行接口权限控制
- 访问接口需要的角色可以动态配置
原理分析
通过上一篇文章我们知道SpringSecurity基于Filter实现身份验证和权限控制功能,SpringSecurity提供了实现类FilterSecurityInterceptor对访问路径进行权限控制,核心代码逻辑如下:
|
1 2 3 4 5 6 7 8 9 10 11 12 |
public void invoke(FilterInvocation filterInvocation) throws IOException, ServletException { ///此处省略无关逻辑 /// 在这里执行权限控制逻辑 InterceptorStatusToken token = super.beforeInvocation(filterInvocation); try { filterInvocation.getChain().doFilter(filterInvocation.getRequest(), filterInvocation.getResponse()); } finally { super.finallyInvocation(token); } super.afterInvocation(token, null); } |
在访问实际业务逻辑之前调用父级方法beforeInvocation进行权限判断,如果权限不符合要求,直接抛出异常阻止访问实际业务逻辑,核心代码如下:
|
1 2 3 4 5 6 7 8 9 10 11 12 13 14 15 16 17 18 19 20 21 22 23 24 25 26 27 28 29 30 31 32 33 34 35 36 37 38 |
protected InterceptorStatusToken beforeInvocation(Object object) { //此处省略无关代码 //// 这里获取与访问路径相关的权限信息,例如:/user/hello 对应 ROLE_USER 角色,当然一个路径可能对应多个权限 Collection<ConfigAttribute> attributes = this.obtainSecurityMetadataSource().getAttributes(object); if (CollectionUtils.isEmpty(attributes)) { /// 这里注意如果对应的路径在系统中没有配置权限或者是获取方法没有处理这种请求会导致放行,特别注意 return null; // no further work post-invocation } /// 未登录用户直接返回未验证错误 if (SecurityContextHolder.getContext().getAuthentication() == null) { credentialsNotFound(this.messages.getMessage("AbstractSecurityInterceptor.authenticationNotFound", "An Authentication object was not found in the SecurityContext"), object, attributes); } //// 获取验证信息 Authentication authenticated = authenticateIfRequired(); // Attempt authorization /// 判断用户是否拥有访问权限 attemptAuthorization(object, attributes, authenticated); /// 这里实现了类似Linux su 命令,将当前用户暂时赋予另外一个用户运行权限,可以先忽略不看 // Attempt to run as a different user Authentication runAs = this.runAsManager.buildRunAs(authenticated, object, attributes); if (runAs != null) { SecurityContext origCtx = SecurityContextHolder.getContext(); SecurityContext newCtx = SecurityContextHolder.createEmptyContext(); newCtx.setAuthentication(runAs); SecurityContextHolder.setContext(newCtx); if (this.logger.isDebugEnabled()) { this.logger.debug(LogMessage.format("Switched to RunAs authentication %s", runAs)); } // need to revert to token.Authenticated post-invocation return new InterceptorStatusToken(origCtx, true, attributes, object); } this.logger.trace("Did not switch RunAs authentication since RunAsManager returned null"); // no further work post-invocation return new InterceptorStatusToken(SecurityContextHolder.getContext(), false, attributes, object); } |
这里有两个重点内容:
- 通过this.obtainSecurityMetadataSource().getAttributes(object);方法来获取访问所需要的权限信息
- 通过attemptAuthorization(object, attributes, authenticated)方法对访问所需的权限以及用户身份信息进行决策,判断是否允许访问
路径权限分析
上述的this.obtainSecurityMetadataSource()方法返回SecurityMetadataSource类型对象,该接口核心代码如下:
|
1 2 3 4 5 6 7 8 |
public interface SecurityMetadataSource extends AopInfrastructureBean { /// 依据object获取权限信息,我们可以把ConfigAttribute理解为String类型,在我们系统中可以理解保存着角色信息,例如ROLE_USER Collection<ConfigAttribute> getAttributes(Object object) throws IllegalArgumentException; ///获取系统中配置的所有权限信息,用于后续验证器判断是否支持该类型决策 Collection<ConfigAttribute> getAllConfigAttributes(); /// object 类型,用于判断SecurityMetadataSource支持解析的object类型 boolean supports(Class<?> clazz); } |
可以看出SecurityMetadataSource的主要作用是给出当前访问需要哪些权限,方便后续判断,可以理解为一个数据源,用来获取访问权限列表
访问权限控制分析
这里我们需要重点查看方法attemptAuthorization(object, attributes, authenticated);包含对用户访问控制权限进行判断,核心代码如下:
|
1 2 3 4 5 6 7 8 9 10 11 |
private void attemptAuthorization(Object object, Collection<ConfigAttribute> attributes, Authentication authenticated) { try { /// 委托accessDecisionManager进行决策判断 this.accessDecisionManager.decide(authenticated, object, attributes); } catch (AccessDeniedException ex) { /// 异常请求直接向上抛出异常信息 throw ex; } } |
这个方法很简单,就是委托accessDecisionManager来进行访问决策,我们来看一下这个接口的核心代码:
|
1 2 3 4 5 6 7 8 9 |
public interface AccessDecisionManager { //// 对访问进行决策,判断是否有权限 void decide(Authentication authentication, Object object, Collection<ConfigAttribute> configAttributes) throws AccessDeniedException, InsufficientAuthenticationException; /// 查看访问控制器是否支持该类型决策 boolean supports(ConfigAttribute attribute); /// 查看访问控制器是否支持特定类型,这个类型就是 上面方法中object对应的类型 boolean supports(Class<?> clazz); } |
接口也很简单,有点类似AuthenticationProvider接口,调用decide方法,如果允许访问那么不进行任何处理,如果不允许访问就抛出异常信息。
代码实现梳理分析
上述核心逻辑很简单,但是实现逻辑有点绕,不要紧我们画个流程图再来梳理一遍(觉得绕主要是不相关代码对理解造成了困扰,还有可能就是被这种俄罗斯套娃形式绕晕了)
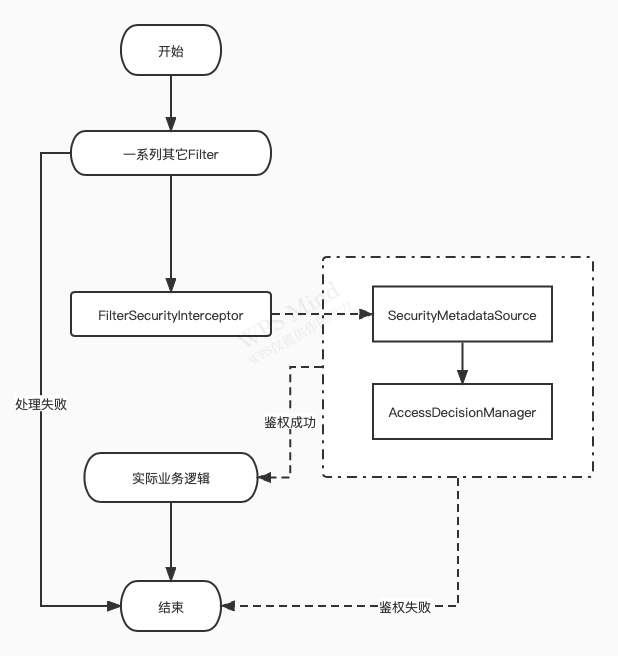
通过上述分析我们可以发现,权限控制需要两个核心功能:
- 访问路径所需要的权限(实现接口SecurityMetadataSource)
- 依据用户权限、路径所需权限进行决策判断是否允许访问(实现接口AccessDecisionManager)
完成上述功能后,将这些功能组装成FilterSecurityInterceptor类型对象,然后放置到SpringSecurity过滤链中实现过滤功能
代码实现
直接动手实现动态权限控制
实现路径权限获取
这里为了更加贴近实际项目,将提供一个RoleService作为数据源,实现代码如下:
|
1 2 3 4 5 6 7 8 9 10 11 12 13 14 15 16 17 18 19 20 21 22 23 24 25 26 |
@Service public class RoleService { public List<ConfigAttribute> roles = new ArrayList<>(); private Map<String, List<ConfigAttribute>> urlRoleMaps = new HashMap<>(); @PostConstruct public void init() { /// 初始化数据 roles.addAll(SecurityConfig.createList("ROLE_USER", "ROLE_ADMIN", "ROLE_VIP")); urlRoleMaps.put("/", SecurityConfig.createList("ROLE_USER", "ROLE_ADMIN")); urlRoleMaps.put("/user/hello", SecurityConfig.createList("ROLE_USER", "ROLE_ADMIN")); urlRoleMaps.put("/user/nickname", SecurityConfig.createList("ROLE_VIP")); urlRoleMaps.put("/admin/hello", SecurityConfig.createList("ROLE_ADMIN")); } /// 获取所有角色信息 public Collection<ConfigAttribute> getAllRoles() { return Collections.unmodifiableList(roles); } ///依据请求路径查询所需权限 public Collection<ConfigAttribute> getRoleByPath(String path) { Collection<ConfigAttribute> roles = urlRoleMaps.get(path); if (roles == null) { return Collections.EMPTY_LIST; } return Collections.unmodifiableCollection(roles); } } |
代码很简单,就是初始化数据,提供路径与权限对应的数据服务,在实际项目中通常从数据库中获取这些信息。
下面编写RolePermissionMetadataSource接口的实现类,代码如下:
|
1 2 3 4 5 6 7 8 9 10 11 12 13 14 15 16 17 18 19 20 21 22 23 24 25 26 27 |
/// FilterInvocationSecurityMetadataSource 是SecurityMetadataSource的子接口,实际上就是 SecurityMetadataSource,没有扩展任何方法 public class RolePermissionMetadataSource implements FilterInvocationSecurityMetadataSource { @Autowired private RoleService roleService; @Override public Collection<ConfigAttribute> getAttributes(Object object) throws IllegalArgumentException { FilterInvocation invocation = (FilterInvocation) object; String url = invocation.getRequestUrl(); /// 通过请求路径获取访问路径所需的权限列表 Collection<ConfigAttribute> roles = roleService.getRoleByPath(url); if (roles != null && roles.size() > 0) { return roles; } //没有匹配上的资源,禁止访问,设置不存在的访问权限 // 通过之前的分析知道,如果这里返回空,将会直接放行,运行登录用户访问,这是有风险的 return SecurityConfig.createList(RoleEnums.ROLE_REFUSE.name()); } @Override public Collection<ConfigAttribute> getAllConfigAttributes() { return roleService.getAllRoles(); } @Override public boolean supports(Class<?> clazz) { return FilterInvocation.class.isAssignableFrom(clazz); } } |
实现路径访问控制决策类
继承接口AccessDecisionManager,核心代码如下:
|
1 2 3 4 5 6 7 8 9 10 11 12 13 14 15 16 17 18 19 20 21 22 23 24 25 26 27 28 29 30 31 32 33 34 35 36 37 38 39 40 41 42 43 44 45 46 47 48 |
public class PathAccessDecisionManager implements AccessDecisionManager { ///拒绝访问权限名称 private static final String BASE_REFUSE_NAME = RoleEnums.ROLE_REFUSE.name(); @Override public void decide(Authentication authentication, Object object, Collection<ConfigAttribute> configAttributes) throws AccessDeniedException, InsufficientAuthenticationException { Iterator<ConfigAttribute> iterator = configAttributes.iterator(); //进行权限匹配,如果用户拥有资源权限那么进行放行操作 while (iterator.hasNext()) { ConfigAttribute ca = iterator.next(); // 当前请求需要的权限 String needRole = ca.getAttribute(); if (RoleEnums.ROLE_ANONYMOUS.name().equalsIgnoreCase(needRole)) { return; } if (BASE_REFUSE_NAME.equalsIgnoreCase(needRole)) { if (authentication instanceof AnonymousAuthenticationToken) { //匿名用户 throw new AccessDeniedException("资源信息不存在"); } else { //登录用户 throw new AccessDeniedException("权限不足!"); } } // 当前用户所具有的权限 Collection<? extends GrantedAuthority> authorities = authentication.getAuthorities(); for (GrantedAuthority authority : authorities) { if (authority.getAuthority().equalsIgnoreCase(needRole)) { return; } } } //如果当前请求没有验证,返回未验证异常 if (authentication instanceof AnonymousAuthenticationToken) { throw new AccessDeniedException("用户未登录"); } throw new AccessDeniedException("权限不足!"); } @Override public boolean supports(ConfigAttribute attribute) { return true; } @Override public boolean supports(Class<?> clazz) { return FilterInvocation.class.isAssignableFrom(clazz); } } |
组装Filter
我们将上述实现类与FilterSecurityInterceptor进行组装,实现权限动态过滤:
|
1 2 3 4 5 6 7 8 9 10 |
///动态权限控制 Filter, 默认会拦截所有请求进行权限判断 private FilterSecurityInterceptor filterSecurityInterceptor() { FilterSecurityInterceptor interceptor = new FilterSecurityInterceptor(); /// 由于包含Spring Bean,因此需要注入实现,而不是直接new interceptor.setSecurityMetadataSource(rolePermissionMetadataSource); interceptor.setAccessDecisionManager(new PathAccessDecisionManager()); return interceptor; } ///加入到SpringSecurity过滤链中 httpSecurity.addFilterBefore(roleAuthFilter, FilterSecurityInterceptor.class); |
运行验证
我们代码里创建了三个用户:
-
115000000000, 拥有:ROLE_USER
-
115666666666, 拥有:ROLE_USER、ROLE_VIP
-
115888888888, 拥有:ROLE_USER、ROLE_ADMIN
程序运行完成后使用15000000000进行手机验证码登录:
– POST http://localhost:8080/phone/login?phone=15000000000&code=888888
– 返回:
|
1 2 3 4 5 6 7 8 9 10 11 |
{ "code": 200, "data": { "username": "15000000000", "phone": "15000000000", "roles": [ "ROLE_USER" ] }, "message": null } |
可以看到拥有ROLE_USER权限,那么我们访问 http://localhost:8080/user/hello, 返回:
|
1 2 3 4 5 |
{ "code": 200, "data": "Hello User", "message": null } |
访问http://localhost:8080/admin/hello, 返回:
|
1 2 3 4 |
{ "code": 400, "message": "请求受限" } |
我们看到以上结果符合预期,同理可以使用15888888888用户进行同样的访问操作,在这里我们就不做过多介绍,大家有兴趣可以下载代码自行运行测试,文章开头有代码地址。
如果要修改路径对应的权限,那么只要修改RoleService中的数据即可实现权限动态配置。
总结
通过上述文章分析,我们已经完成权限动态配置,当然运行中展现的JSON数据是配置了对应处理器处理的结果,细节处理请前往代码仓库下载源码自行查看。
为了完成动态权限我们需要完成三个步骤,实现两个接口,步骤如下:
- 实现路径权限数据访问接口(实现SecurityMetadataSource)
- 实现访问控制决策接口(实现AccessDecisionManager)
- 组装Filter并加入到过滤链中(FilterSecurityInterceptor)
熟练掌握上述步骤,实现动态权限控制将不再是难题。
在SpringSecurity 中不仅提供了FilterSecurityInterceptor实现类来对访问进行权限控制,在SpringSecyrity 5.4版本中还提供了AuthorizationFilter实现类来实现相同功能,具体实现方式自行前往仓库进行查看
参考文档
四、SpringSecurity OAuth2统一授权服务
代码
代码仓库:地址
代码分支:lesson4
简介
在先前文章中我们实战演练了在SpringBoot单体应用中使用SpringSecurity开发自定义登录流程以及动态权限控制,有兴趣的同学可以前往博客阅读SpringSecurity相关文章(所有代码都已上传到Gitee仓库, 每篇文章都有一个专属分支)。随着业务的扩张,单体应用无法满足业务需求,微服务是当前大型商业服务的主流架构,在Java领域中,SpringCloud 全家桶是微服务主流开发框架,Spring Cloud Alibaba 是在Spring Cloud 的基础上进行扩展,目的是为了更好的搭配使用Alibaba生态中的微服务组件(Nacos、Sentinel、Seata等),具体内容可查看文档。
微服务框架如下所示:
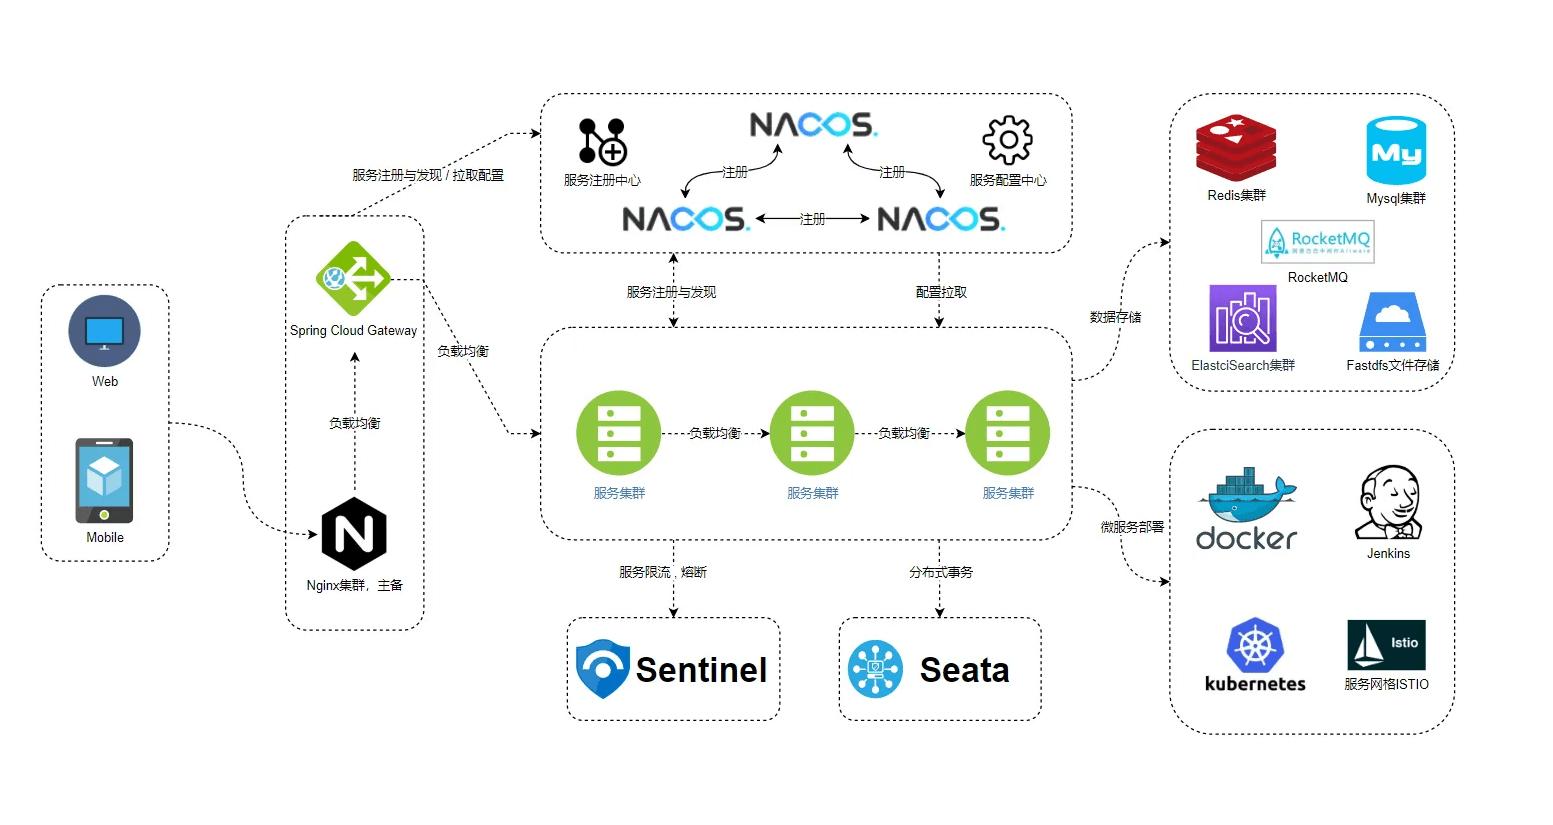
上图中的服务集群代表具体业务服务,微服务下的权限控制是为了实现服务集群的安全访问,每个服务集群包含1~N个服务,如果每个服务都定义一套安全策略,那么后期维护将会是一个大工程,因此需要统一安全策略,实现全局安全访问。
OAuth2
OAuth是一个关于授权(authorization)的开放网络标准,2.0版本在全世界得到广泛应用,网上有很多讲解OAuth2的文档,如果你对OAuth没有概念,可以查看往期文章:理解OAuth2.0、OAuth2.0的一个简单解释、OAuth2.0的四种调用方式。
假设我们是一家公司,公司内部有以下业务部门:
- 微信:提供聊天、账户系统,同时对外提供账户授权登录服务
- 电子支付:提供在线支付服务
- 王者荣耀:提供王者荣耀游戏服务
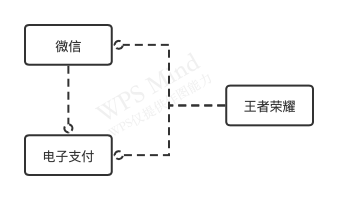
为了实现各个业务系统之间相互调用,需要一套授权系统,对内外系统提供统一的授权访问服务,OAuth协议能够满足上述要求,只需要一套授权服务就能同时满足内外系统的调用要求。
SpringSecurity OAuth
OAuth 涉及四个角色:
- 用户:实际拥有资源所有权的使用者,例如:张三
- 客户端:提供应用功能的程序客户端,可以是APP形式、web形式,例如:时间海绵博客()
- 授权服务:实现OAuth2授权协议,对外提供授权服务,例如:微信开发平台
- 资源服务:对外提供资源访问服务,例如:我们使用微信的微信扫码登录时为网站提供用户信息的微信服务
下面以微信登录为例:
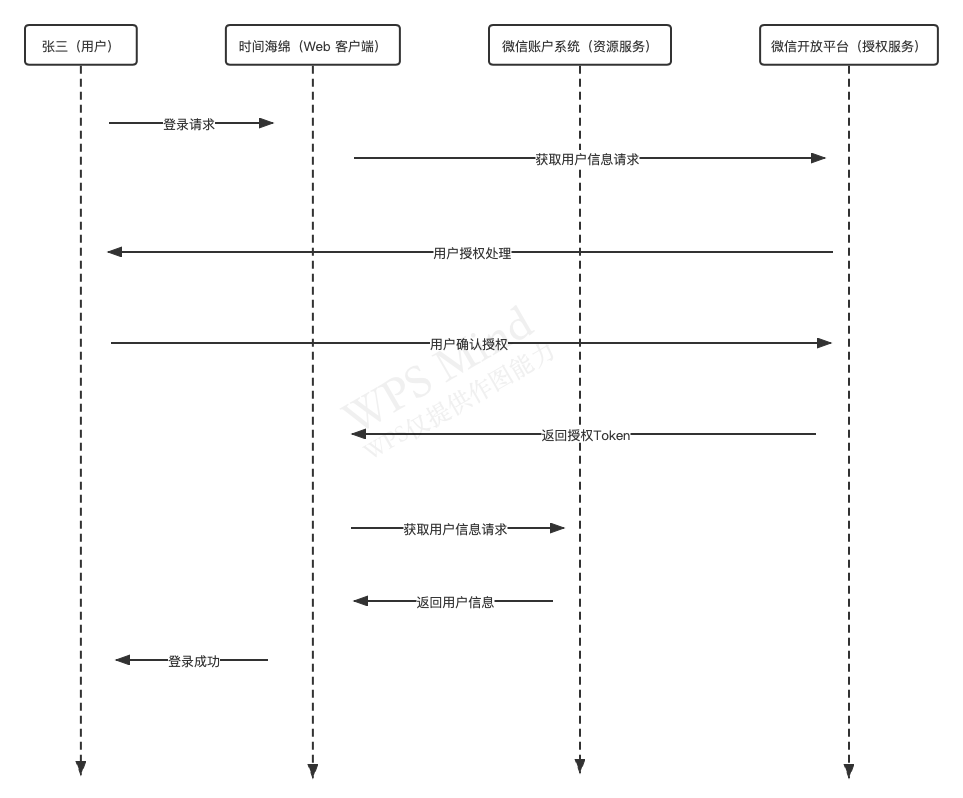
传统的模式中,我们默认web客户端是可信任的,所以没有用户授权的过程,可以访问任何数据。在OAuth协议中,客户端默认是不可信任的,需要进行授权处理。无论是内部客户端还是外部客户端都需要得到授权服务器的认证,但是内部和外部客户端可以使用不同的授权认证方式(比如最严格的授权码方式和最简单的客户端方式)。
授权服务器
使用 spring-security-oauth2 搭建授权服务器,对外提供以下功能:
-
1/oauth/authorize 获取授权码
-
1/oauth/token 提供客户端(client_credentials)、简化(implicit)、密码(password)、刷新Token(refresh_token),授权码(authorization_code)方式获取access_token
-
1/oauth/check_token 依据access_token获取授权信息
同时需要管理客户端信息,客户端信息包含以下属性:
-
1clientId 客户端Id
-
1clientSecret 客户端密码
-
1resourceId 资源Id,用于指定可以访问哪些资源服务
-
1authorizedGrantTypes 授权模式,客户端(client_credentials)、简化(implicit)、密码(password)、授权码(authorization_code)
-
1scopes 授权范围,可以指定客户端访问权限,这个在协议中没有明确指明作用,各个授权服务可以基于业务自行处理
-
1authorities 权限,客户端授权模式下需要配置,其它模式下可以不配置
-
1redirectUri 授权结果跳转地址
在先前的文章中提到了UserDetailsService用于查询用户信息,在OAuth中需要提供ClientDetailsService来查询客户端信息,代码如下:
|
1 2 3 4 5 6 7 8 9 10 11 12 13 14 15 16 17 18 19 20 21 22 23 24 25 |
public class AuthClientDetailService implements ClientDetailsService { private ClientDetailsService clientDetailsService; public AuthClientDetailService() { InMemoryClientDetailsServiceBuilder builder = new InMemoryClientDetailsServiceBuilder(); builder.withClient("blog")// client_id .secret(new BCryptPasswordEncoder().encode("blog")) .resourceIds("blog", "resource") .authorizedGrantTypes("authorization_code", "password", "client_credentials", "implicit", "refresh_token")// 该client允许的授权类型 authorization_code,password,refresh_token,implicit,client_credentials .scopes("all", "user")// 允许的授权范围 .autoApprove(false) //加上验证回调地址 .authorities("blog") .accessTokenValiditySeconds(60 * 60 * 2) // 令牌默认有效期2小时 .refreshTokenValiditySeconds(60 * 60 * 24 * 3) // 刷新令牌默认有效期3天 .redirectUris("https://blog.hzchendou.com"); try { this.clientDetailsService = builder.build(); } catch (Exception e) { System.exit(-1); } } @Override public ClientDetails loadClientByClientId(String clientId) throws ClientRegistrationException { return this.clientDetailsService.loadClientByClientId(clientId); } } |
同时需要引入AuthorizationServerConfigurer对授权服务进行配置,代码如下:
|
1 2 3 4 5 6 7 8 9 10 11 12 13 14 15 16 17 18 19 20 21 22 23 24 25 26 27 28 29 30 31 32 33 34 35 36 37 38 39 40 41 42 |
@Configuration @EnableAuthorizationServer public class AuthorizationServerConfig extends AuthorizationServerConfigurerAdapter { @Autowired private AuthClientDetailService authClientDetailService; @Autowired private AuthenticationManager authenticationManager; /** * 配置客户端信息 * * @param clients * @throws Exception */ @Override public void configure(ClientDetailsServiceConfigurer clients) throws Exception { clients.withClientDetails(authClientDetailService); } /** * 配置OAuth token相关配置 * * @param endpoints * @throws Exception */ @Override public void configure(AuthorizationServerEndpointsConfigurer endpoints) throws Exception { endpoints .authenticationManager(authenticationManager)/// 用于密码模式验证时需要提供客户端身份验证 .reuseRefreshTokens(false); } @Override public void configure(AuthorizationServerSecurityConfigurer security) throws Exception { security.authenticationEntryPoint(new AuthAuthenticationEntryPoint()); security.tokenKeyAccess("permitAll()")//oauth/token_key是公开 .checkTokenAccess("permitAll()");//oauth/check_token公开 /// 配置使用 客户端id 和密码的方式进行登录(使用明文传输,不推荐) AuthClientCredentialsTokenEndpointFilter endpointFilter = new AuthClientCredentialsTokenEndpointFilter(security); endpointFilter.afterPropertiesSet(); endpointFilter.setAuthenticationEntryPoint(new AuthAuthenticationEntryPoint()); // 客户端认证之前的过滤器 security.addTokenEndpointAuthenticationFilter(endpointFilter); } } |
使用@EnableAuthorizationServer注解配置会自动配置AuthorizationEndpoint、TokenEndpoint、CheckTokenEndpoint接口,提供OAuth授权服务。
至此完成授权服务搭建
资源服务器搭建
资源服务器也是使用spring-security-oauth2进行搭建,通过上面的介绍,我们知道资源服务器需要识别access_token来获取用户授权的信息内容,配置信息如下:
|
1 2 3 4 5 6 7 8 9 10 11 12 13 14 15 16 17 18 19 20 21 22 23 24 25 26 27 28 29 30 31 32 33 34 35 36 37 38 39 40 |
@EnableResourceServer @Configuration public class SpringSecurityResourceServerConfig extends ResourceServerConfigurerAdapter { public static final String RESOURCE_ID = "resource"; @Autowired TokenStore tokenStore; @Override public void configure(HttpSecurity httpSecurity) throws Exception { httpSecurity.formLogin().disable(); httpSecurity.exceptionHandling() .accessDeniedHandler(new PathAccessDeniedHandler()) .authenticationEntryPoint(new AuthAuthenticationEntryPoint()); httpSecurity.authorizeRequests() .antMatchers("/admin/**").hasAuthority("admin") .antMatchers("/user/**").hasAuthority("user") .and().csrf().disable() .sessionManagement().sessionCreationPolicy(SessionCreationPolicy.STATELESS); } @Override public void configure(ResourceServerSecurityConfigurer resources) { //当前资源服务 id,用于校验授权信息是否能够访问 resources.resourceId(RESOURCE_ID) .tokenStore(tokenStore) /// 设置Token服务,用于识别access_token授权信息 .tokenServices(tokenService())//验证令牌的服务 .stateless(true); } //资源服务令牌解析服务 @Bean public ResourceServerTokenServices tokenService() { //使用远程服务请求授权服务器校验token,必须指定校验token 的url、client_id,client_secret RemoteTokenServices service = new RemoteTokenServices(); service.setCheckTokenEndpointUrl("http://localhost:8081/oauth/check_token"); service.setClientId("blog"); service.setClientSecret("blog"); return service; } } |
通过配置@EnableResourceServer注解,将会在Filter过滤链中添加OAuth2AuthenticationProcessingFilter过滤器拦截请求,依据access_token解析授权信息, 查看请求头是否有Authorization属性,该属性代表access_token信息。
OAuth服务验证
启动授权服务以及资源服务,访问 POST http://localhost:8081/oauth/token,请求参数如下所示(使用密码模式访问):
|
1 2 3 4 5 |
client_id:blog client_secret:blog grant_type:password username:admin password:admin |
返回结果:
|
1 2 3 4 5 6 7 |
{ "access_token": "db9898be-2aef-4f86-9486-b3735db6403e", "token_type": "bearer", "refresh_token": "44d9aeff-8839-4a9b-b6ea-1ea6310bab5e", "expires_in": 6971, "scope": "all user" } |
启动资源服务,访问 GET http://localhost:8082/admin/hello,请求头信息如下:
|
1 |
Authorization:Bearer db9898be-2aef-4f86-9486-b3735db6403e |
返回信息如下:
|
1 2 3 4 |
{ "code": 200, "data": "Hello Admin" } |
说明访问成功
总结
SpringSecurity中的功能都是通过组装Filter链来完成特定功能实现,
- SpringSecurity OAuth授权服务需要提供对外服务,因此还提供了AuthorizationEndpoint、TokenEndpoint、CheckTokenEndpoint等接口模块,当然你也可以用自己的实现来替换这些服务。
- SpringSecurity OAuth 资源服务提供了OAuth2AuthenticationProcessingFilter过滤器来解析access_token授权信息,获得权限信息,后续的权限验证流程与先前的SpringSecurity单体应用是一致的
参考文档
五、SpringSecurity OAuth2扩展自定义授权模式
代码
代码仓库:地址
代码分支:lesson5
简介
在上一篇文章中,我们使用SpringSecurity OAuth2搭建了一套授权服务,对业务系统进行统一授权管理。OAuth提供了四种授权方式:
- 授权码模式(authorization_code)
- 简化模式(implicit)
- 客户端(client_credentials)
- 密码(password)
在实际业务中上述四种模式不能满足所有要求,例如业务系统接入了短信验证码登录方式,需要进行扩展满足业务需求
手机验证码登录
原理分析
SpringSecurity OAuth在使用@EnableAuthorizationServer注解会自动装配TokenEndpoint对象,这个对象会提供一个POST /oauth/token接口,我们以密码授权模式分析调用流程,如下所示:
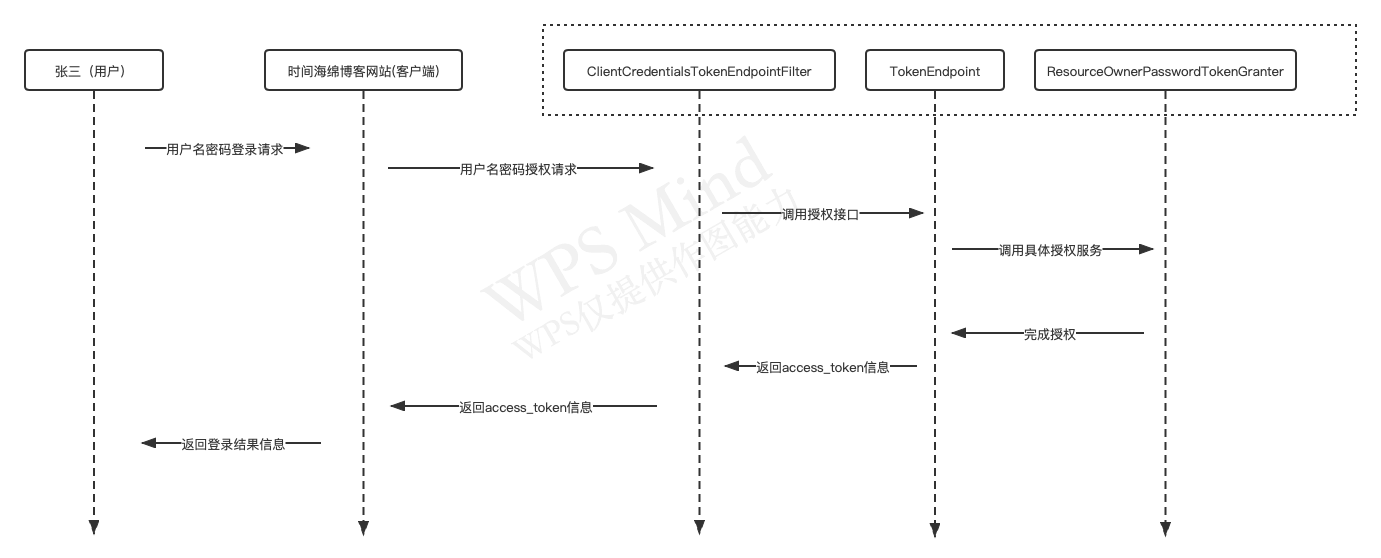
用户在时间海绵博客发起用户名密码登录请求,时间海绵博客服务器端接收到请求后,调用OAuth协议中的密码授权模式发送请求到OAuth授权服务器,请求信息如下:
|
1 2 3 4 5 |
client_id:blog client_secret:blog grant_type:password username:admin password:admin |
在ClientCredentialsTokenEndpointFilter过滤器中对客户端信息(client_id和client_secret)进行校验,授权成功后才能访问TokenEndpoint接口(这里要注意,对于OAuth授权服务器来说,过滤链主要完成对客户端信息的校验,用户信息在TokenEndpoint中进行校验,这是因为不同的授权模式关注的用户信息类型不同,需要具体问题具体分析)。
在TokenEndpoint中依据验证的客户端信息以及请求的授权模式进行对比,校验客户端是否有权限进行特定类型授权请求,校验通过后委托给TokenGranter组件进行具体授权模式校验,如上图所示,ResourceOwnerPasswordTokenGranter负责对密码授权模式请求校验,SpringSecurity OAuth还提供了以下实现来校验授权请求:
-
1AuthorizationCodeTokenGranter负责校验授权码模式(authorization_code)请求
-
1ClientCredentialsTokenGranter负责校验客户端模式(client_credentials)请求
-
1ImplicitTokenGranter负责校验简化模式(implicit)请求
-
ResourceOwnerPasswordTokenGranter负责校验密码模式(password)请求
TokenGranter校验成功将返回AccessToken信息,后续客户端可以使用AccessToken信息获取到授权用户信息完成对应操作。
通过上述可以知道,如果要扩展实现短信验证码模式,需要自定义实现TokenGranter组件来校验手机验证码授权请求,TokenGranter定义如下所示:
|
1 2 3 4 |
public interface TokenGranter { //// 对授权类型以及请求参数进行处理,如果成功则返回AccessToken信息 OAuth2AccessToken grant(String grantType, TokenRequest tokenRequest); } |
手机验证码模式代码实现
实现一个继承ToeknGranter接口的类,通过分析已有的TokenGranter子类,我们可以很容易实现,定义一个SmsCodeTokenGranter类,代码实现如下所示:
|
1 2 3 4 5 6 7 8 9 10 11 12 13 14 15 16 17 18 19 20 21 22 23 24 25 26 27 28 29 30 31 32 33 34 35 36 37 38 39 40 41 42 43 44 45 46 47 48 49 50 51 52 53 54 55 56 57 |
public class SmsCodeTokenGranter extends AbstractTokenGranter { /// 授权模式类型,需要与请求字段grant_type的值相等才会进入处理 private static final String GRANT_TYPE = "sms_code"; /// 验证手机与验证码信息是否匹配,这里只是简单的进行匹配处理,判断是否是否为15000000000,验证码是否为:888888 private final PhoneSmsCodeService phoneSmsCodeService; public SmsCodeTokenGranter(AuthorizationServerTokenServices tokenServices, ClientDetailsService clientDetailsService, OAuth2RequestFactory requestFactory, PhoneSmsCodeService phoneSmsCodeService ) { super(tokenServices, clientDetailsService, requestFactory, GRANT_TYPE); this.phoneSmsCodeService = phoneSmsCodeService; } @Override protected OAuth2Authentication getOAuth2Authentication(ClientDetails client, TokenRequest tokenRequest) { Map<String, String> parameters = new LinkedHashMap(tokenRequest.getRequestParameters()); String mobile = parameters.get("mobile"); // 手机号 String code = parameters.get("code"); // 短信验证码 ///对参数进行基础校验 if (StringUtils.isEmpty(mobile) || StringUtils.isEmpty(code)) { throw new InvalidGrantException("授权请求参数异常"); } /// 校验手机验证码是否符合要求 if (!phoneSmsCodeService.checkSmsCode(mobile, code)) { throw new InvalidGrantException("授权请求参数异常"); } /// 这里为了简单直接硬编码写入用户信息,通常需要在数据库中取出用户相关信息 List<GrantedAuthority> roles = new ArrayList<>(); roles.add( new SimpleGrantedAuthority("user")); User user = new User(mobile, "", roles); /// 授权模式 UsernamePasswordAuthenticationToken userAuth = new UsernamePasswordAuthenticationToken(user, null, roles); userAuth.setAuthenticated(true); OAuth2Request storedOAuth2Request = this.getRequestFactory() .createOAuth2Request(client, tokenRequest); return new OAuth2Authentication(storedOAuth2Request, userAuth); } } 继承AbstractTokenGranter抽象类(该类继承了TokenGranter接口),我们只需要关注核心逻辑"验证手机验证码信息是否正确",校验正确将返回一个OAuth2Authentication对象,这个对象包含了用户信息以及OAuth2请求信息。 完成这一步后,我们需要将SmsCodeTokenGranter装配到TokenEndpoint组件中对sms_code授权类型进行校验处理,配置逻辑如下: public void configure(AuthorizationServerEndpointsConfigurer endpoints) throws Exception { endpoints .authenticationManager(authenticationManager)/// 用于密码模式验证时需要提供客户端身份验证信息 .reuseRefreshTokens(false); //// 取出系统中的四种模式 List<TokenGranter> granters = new ArrayList<>(Arrays.asList(endpoints.getTokenGranter())); /// 添加手机验证码的授权模式 granters.add(new SmsCodeTokenGranter(endpoints.getTokenServices(), endpoints.getClientDetailsService(), endpoints.getOAuth2RequestFactory(), phoneSmsCodeService)); /// 这是一个组装模式,实现了TokenGranter接口,循环调用List中的TokenGranter组件进行校验处理,直到返回验证成功信息或者是异常信息 CompositeTokenGranter compositeTokenGranter = new CompositeTokenGranter(granters); endpoints.tokenGranter(compositeTokenGranter); } |
上述在AuthorizationServerConfigurerAdapter配置类中进行,具体参见代码。
运行校验
需要注意,这是一个新的授权模式,因此需要先授权客户端拥有手机短信验证模式请求权限,配置客户端的authorizedGrantTypes属性包含sms_code权限(这一步参见代码)。
启动服务,发送手机验证码授权请求POST /oauth/token,请求参数:
|
1 2 3 4 5 |
client_id:blog client_secret:blog grant_type:sms_code mobile:15000000000 code:888888 |
返回参数信息:
|
1 2 3 4 5 6 7 |
{ "access_token": "cf4243c1-085e-4f82-b733-03fb38c90a7c", "token_type": "bearer", "refresh_token": "01474dd1-c5c5-436b-98b1-8f146cde2391", "expires_in": 7199, "scope": "all user" } |
手机短信验证码授权模式验证成功,具体代码参见代码仓库。
总结
- 扩展自定义授权模式,需要继承TokenGranter接口,实现具体校验逻辑
- 将实现的自定义授权TokenGraner类装配到TokenEndpoint组件中
- 特别注意需要将新的授权模式grantType信息授权给指定的客户端,不然客户端无法发送自定义授权模式请求,例如本案例中的sms_code请求
参考文档
六、SpringSecurity OAuth2 + SpringCloud Gateway实现统一鉴权管理
代码
代码仓库:地址
代码分支:lesson6
简介
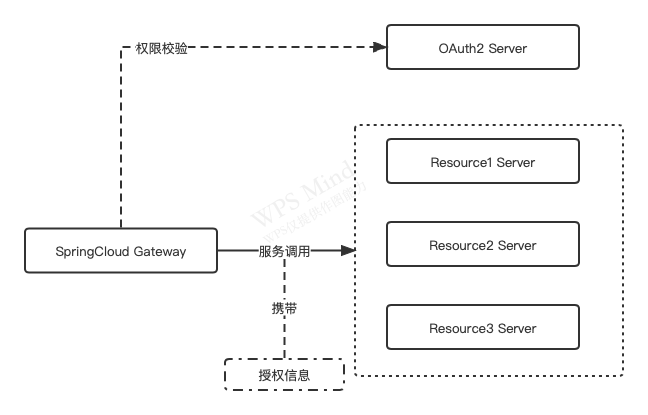
在先前文章中,我们使用SpringSecurity OAuth2搭建了一套基于OAuth2协议的授权系统,并扩展了手机验证码授权模式。在微服务架构下,网关承担着流量入口的角色,所有的请求都要先经过网关,然后由网关负责转发到具体的服务,因此可以在网关实现统一鉴权,网关对请求中的权限进行鉴定,然后将权限信息转发到具体的资源服务,在资源服务中只需要简单校验请求中的权限信息即可(查看信息是否有效),整体流程如下所示:
统一鉴权
SpringCloud Gateway网关
我们在上一篇的基础上引入网关服务,在这里使用SpringCloud Gateway组件进行搭建,引入依赖:
|
1 2 3 4 |
<dependency> <groupId>org.springframework.cloud</groupId> <artifactId>spring-cloud-starter-gateway</artifactId> </dependency> |
网关在OAuth2授权协议中承担着资源服务的角色,对请求进行身份鉴定和访问权限控制,身份鉴定需要访问OAuth2授权服务,因此需要引入OAuth2资源服务以及客户端依赖:
|
1 2 3 4 5 6 7 8 9 |
<dependency> <groupId>org.springframework.security</groupId> <artifactId>spring-security-oauth2-resource-server</artifactId> </dependency> <dependency> <groupId>org.springframework.boot</groupId> <artifactId>spring-boot-starter-oauth2-client</artifactId> </dependency> |
通过之前的文章,我们可以知道SpringSecurity 通过组装一系列的Filter来完成身份验证和权限访问控制功能,但是SpringCloud Gateway使用了新技术框架Reactive Stack(响应式编程),在Spring中提供了Spring WebFlux模块支持响应式编程,传统的Spring MVC都是基于阻塞I/O编程,而Spring WebFlux是基于非阻塞I/O,我们不再这里讨论这两个的区别,只需要知道WebFlux特别适合I/O密集型性应用,网关就是典型的I/O密集应用(网络I/O处理频繁)。SpringSecurity对WebFlux提供了支持,在WebFlux中WebFilter组件承担着与Filter相似的功能。
我们在先前的应用中通过HttpSecurity组件来组装SpringSecurity功能,在这里要使用新的组件ServerHttpSecurity来组装SpringSecurity功能,配置如下所示:
|
1 2 3 4 5 6 7 8 9 10 11 12 13 14 15 16 17 18 19 20 21 22 23 24 25 26 27 28 29 30 31 32 33 34 35 36 37 38 39 40 41 42 43 |
///启用WebFlux下的SpringSecurity配置 @EnableWebFluxSecurity public class ResourceServerConfig { //// 访问权限验证 @Autowired AuthManagerHandler authManagerHandler; //// 无权限访问处理器 @Autowired AccessDeniedHandler accessDeniedHandler; /// 登录信息失效处理器 @Autowired LoginLoseHandler loginLoseHandler; ////访问白名单,对白名单路径可以实现匿名访问 @Autowired private WhiteUrlProperties whiteUrlProperties; @Bean public SecurityWebFilterChain springSecurityFilterChain(ServerHttpSecurity http) { http.oauth2ResourceServer() /// 这里配置对令牌的校验,从OAuth2授权服务中获取令牌对应的授权信息 .opaqueToken() ///令牌校验地址,用于校验令牌是否有效,已经令牌对应的授权信息 .introspectionUri("http://localhost:8081/oauth/check_token") //// 客户端信息 .introspectionClientCredentials("blog", "blog") .and() .accessDeniedHandler(accessDeniedHandler) .authenticationEntryPoint(loginLoseHandler) .and().authorizeExchange() .pathMatchers(HttpMethod.OPTIONS).permitAll() //o .pathMatchers("/**").access(authManagerHandler) .anyExchange().authenticated() .and() .addFilterBefore(securityGlobalFilter(whiteUrlProperties), SecurityWebFiltersOrder.FIRST) .cors().disable().csrf().disable(); return http.build(); } /// 该过滤器实现将获取到的授权信息转发到下游服务中,方便后续校验 public WebFilter securityGlobalFilter(WhiteUrlProperties properties) { return new SecurityGlobalFilter(properties); } } |
网关路由配置以及其它细节信息可以前往代码仓库进行查看,在此不做过多解释。
资源服务器
资源服务器也需要做一些调整,不需要对请求进行严格的访问控制,只需要校验网关传递的授权信息即可,然后将授权信息放入到SecurityContext中方便后续处理,同时需要注意在资源服务中还是使用Spring MVC框架进行处理(Spring WebFlux可以提高系统吞吐量,但是也会增加编程难度,例如原先的线程变量将不适用,具体需要考量整体编程人员掌握的技术栈来做决定)。
这里的资源服务器不再依赖OAuth授权服务,因此可以移除@EnableResourceServer配置(不直接参与权限控制,只需要校验上游传递的授权信息是否有效即可),同时增加对上游SpringCloud Gateway传递的授权信息进行解析处理,增加自定义SecurityAuthTokenFilter组件:
|
1 2 3 4 5 6 7 8 9 10 11 12 13 14 15 16 17 18 19 20 |
public class SecurityAuthTokenFilter extends OncePerRequestFilter { private static final String AUTH_TOKEN_NAME = "token"; @Override protected void doFilterInternal(HttpServletRequest request, HttpServletResponse response, FilterChain filterChain) throws ServletException, IOException { String token = request.getHeader(AUTH_TOKEN_NAME); if (StringUtils.isEmpty(token)) { /// 继续处理 filterChain.doFilter(request, response); return; } ///....省略处理细节,具体前往代码仓库进行查看 //// 创建自定义的Authentication对象,必须申明为已授权,也就是isAuthenticated()方法返回为true BlogAuthentication authentication = new BlogAuthentication(userId, clientId, authorities); //....省略处理细节,具体前往代码仓库进行查看 /// 将授权信息放入到SecurityContext中,方便后续使用 SecurityContextHolder.getContext().setAuthentication(authentication); filterChain.doFilter(request, response); } } |
运行验证
分别运行Gateway网关服务、OAuth授权服务、Resource资源服务
- Gateway 8080端口
- OAuth 8081端口
- Resource 8082端口
授权登录
使用密码模式进行授权登录,发送请求POST http://localhost:8080/blog-oauth/oauth/token,请求参数:
|
1 2 3 4 5 |
client_id:blog client_secret:blog grant_type:password username:admin password:admin |
返回结果:
|
1 2 3 4 5 6 7 |
{ "access_token": "4aace702-cc9d-4a92-b507-9b65f192a65f", "token_type": "bearer", "refresh_token": "a50a6cff-97b0-4d0f-b3d2-e0fdcee6f142", "expires_in": 5591, "scope": "all user" } |
资源访问
使用得到的access_token访问资源服务器中的/admin/hello接口,发送请求GET http://localhost:8080/blog-resource/admin/hello,请求头中携带参数:
|
1 |
Authorization:Bearer 4aace702-cc9d-4a92-b507-9b65f192a65f |
返回结果:
|
1 2 3 4 5 6 |
{ "code": 200, "data": "Hello Admin" } 访问其他权限的接口,发送请求GET http://localhost:8080/blog-resource/user/hello,请求头中携带参数: Authorization:Bearer 4aace702-cc9d-4a92-b507-9b65f192a65f |
返回结果:
|
1 2 3 4 |
{ "code": 400, "message": "无权限访问" } |
至此得到期望的访问结果,实现了统一权限控制
总结
- SpringCloud Gateway使用WebFlux技术进行开发
- SpringSecurity提供了@EnableWebFluxSecurity来支持WebFlux
- SpringSecurity使用ReactiveSecurityContextHolder.getContext()来实现SecurityContextHolder功能
参考文档
七、SpringSecurity OAuth2 + JWT + SpringCloud Gateway实现统一鉴权管理
代码
代码仓库:地址
代码分支: lesson7
简介
在上一篇文章中,我们使用SpringSecurity OAuth2 + SpringCloud Gateway搭建了一套符合微服务架构的授权系统,在Gateway网关实现统一身份鉴定、访问权限控制,同时将授权信息下发到下游业务服务中,下游业务服务只需要关注核心业务逻辑。上述架构依赖于auth授权服务器,每一次业务请求都需要使用access_token请求auth授权服务器来获取用户授权信息,如果access_token自带授权信息,那么网关只需要鉴别access_token有效信息,这将会降低系统对auth授权服务器的依赖,JWT(JSON Web Token)将是很好的选择。
JWT
我们这里不详细介绍JWT,有兴趣的同学可以查看阮一峰老师的文章:JWT入门教程。JWT定义了一种数据结构,它由三部分组成:
- Header,头部,定义了签名算法,令牌类型
- Payload,负载,是一个JSON对象,包含实际应用中使用的数据,例如用户名,用户角色,注意这部分内容是不加密的,因此不能包含保密信息
- Signature,签名,用于验证JWT是否有效,防止信息内容篡改
JWT内容是不加密的,可以使用在线工具解码信息,查看内容。例如有一个JWT格式Token:
|
1 |
eyJhbGciOiJSUzI1NiIsInR5cCI6IkpXVCJ9.eyJhdWQiOlsicmVzb3VyY2UiLCJibG9nIl0sImV4X3VzZXJuYW1lIjoiYWRtaW4iLCJ1c2VyX25hbWUiOiJhZG1pbiIsInNjb3BlIjpbImFsbCIsInVzZXIiXSwiZXhwIjoxNjU0NTk0MTc2LCJhdXRob3JpdGllcyI6WyJhZG1pbiJdLCJqdGkiOiI2NTdjZmU0Yi05ZDBlLTRhNTUtYjJjOS1iZWE3MTA2YWJkYWIiLCJjbGllbnRfaWQiOiJibG9nIn0.CGQTlvCCwGWIuJBy_qNeX2YBEYYTy6W1FPXOll75P1jdEyvi_TDiTLE4AO2Fa9vtgdWKrtywgGi4kFWZw8mcRFmhVfl9ehdoPcN5Hmdnz-ybJuLWh0i1k0xqg6MsZryTR1wAweEggZkHsIdCZfOw-yPZFTKuhAgVL4d-12Uthb4 |
在线解析后得到信息如下:
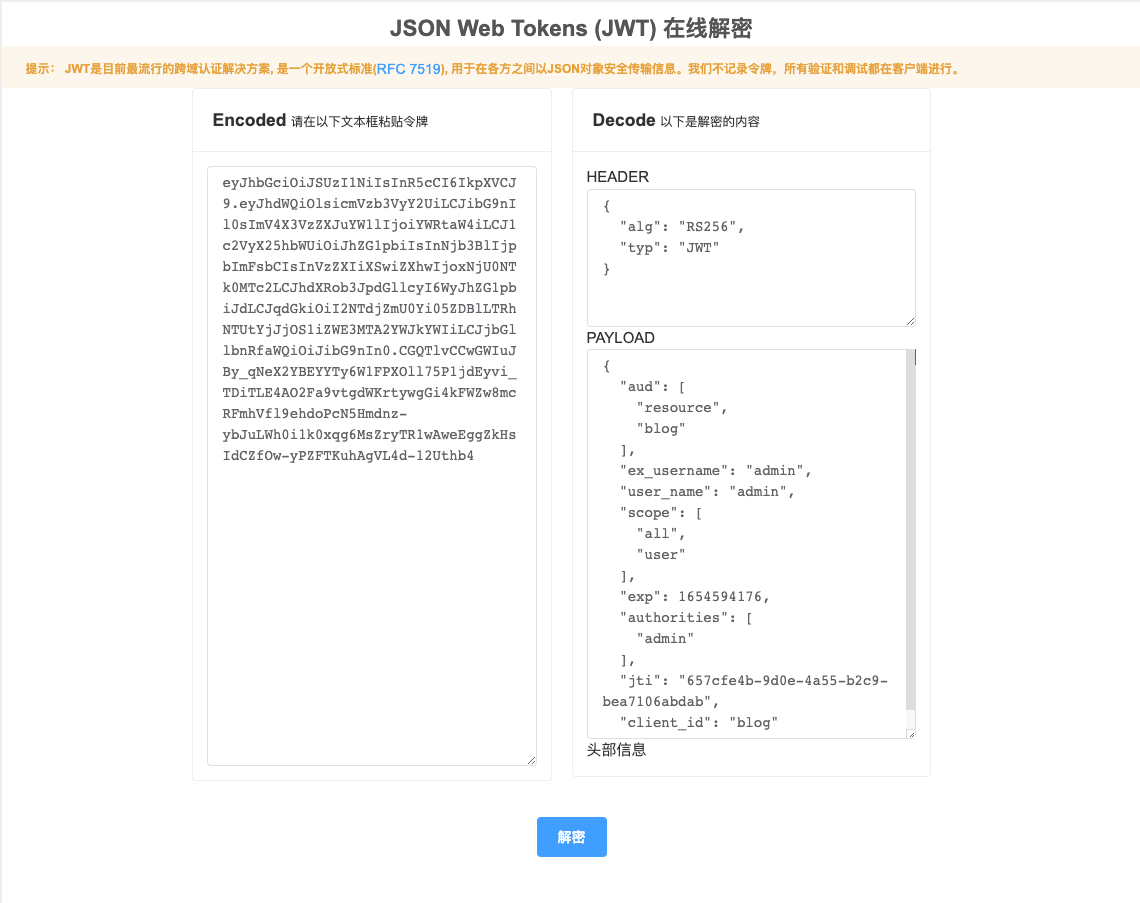
项目改造优化
优化分析
在先前文章中,我们将授权信息保存在auth授权服务器中,客户端需要通过请求auth授权服务器来获取授权信息,如果使用JWT,并且在JWT中保存相关授权信息,那么可以直接解析JWT就可以获取授权信息(需要验证JWT是有有效)。
在先前的项目中,我们使用SpringSecurity OAuth2默认配置来创建access_token,实际上SpringSecurity OAuth2提供了对JWT格式access_token支持,我们需要更改access_token的生成方式,因此需要修改auth授权服务中的Token生成方式,同时需要对Gateway网关服务中的Token解析方式进行修改
生成JWT格式Token
使用SpringSecurity OAuth2时,如果没有配置TokenService对象,将会默认使用DefaultTokenServices组件来管理access_token, 使用UUID.randomUUID().toString()方式生成access_token和refresh_token,因此token中不包含任何信息。我们需要配置新的TokenService对象来生成JWT格式Token。
SpringSecurity OAuth2提供了以下组件来生成JWT格式Token:
-
1JwtTokenStore实现了TokenStore接口,用来管理access_token和refresh_token
-
1JwtAccessTokenConverter实现了TokenEnhancer, AccessTokenConverter接口,可以生成JWT格式token
JWT签名算法我们选用安全性更高的非对称加密算法:RSA(在代码auth/src/test/java/com/hzchendou/blog/demo/RSAKeyTest中提供生成RSA Key方法),配置TokenService:
|
1 2 3 4 5 6 7 8 9 10 11 12 13 14 15 16 17 18 19 20 21 22 23 24 25 26 27 28 29 |
@Bean public TokenStore tokenStore() { return new JwtTokenStore(accessTokenConverter()); } @Bean public JwtAccessTokenConverter accessTokenConverter() { JwtAccessTokenConverter converter = new JwtAccessTokenConverter(); converter.setKeyPair(keyPair()); //非对称秘钥,具体参见代码 return converter; } @Bean public AuthorizationServerTokenServices tokenService() { DefaultTokenServices service = new DefaultTokenServices(); service.setClientDetailsService(authClientDetailService); service.setSupportRefreshToken(true); service.setTokenStore(tokenStore); //令牌增强 TokenEnhancerChain tokenEnhancerChain = new TokenEnhancerChain(); List<TokenEnhancer> tokenEnhancers = new ArrayList<>(); tokenEnhancers.add(tokenEnhancer); tokenEnhancers.add(accessTokenConverter); tokenEnhancerChain.setTokenEnhancers(tokenEnhancers); service.setTokenEnhancer(tokenEnhancerChain); service.setAccessTokenValiditySeconds(60 * 60 * 2); // 令牌默认有效期2小时 service.setRefreshTokenValiditySeconds(60 * 60 * 24 * 3); // 刷新令牌默认有效期3天 return service; } |
将TokenService配置到OAuth服务中:
|
1 |
endpoints.tokenServices(tokenService());//令牌管理服务 |
解析JWT格式Token
在网关中需要配置JWT格式解析器,使用JwtAuthenticationConverter来解析JWT中的字段:
|
1 2 3 4 5 6 7 8 9 |
@Bean public Converter<Jwt, ? extends Mono<? extends AbstractAuthenticationToken>> jwtAuthenticationConverter() { JwtGrantedAuthoritiesConverter jwtGrantedAuthoritiesConverter = new JwtGrantedAuthoritiesConverter(); jwtGrantedAuthoritiesConverter.setAuthorityPrefix(""); jwtGrantedAuthoritiesConverter.setAuthoritiesClaimName("authorities"); JwtAuthenticationConverter jwtAuthenticationConverter = new JwtAuthenticationConverter(); jwtAuthenticationConverter.setJwtGrantedAuthoritiesConverter(jwtGrantedAuthoritiesConverter); return new ReactiveJwtAuthenticationConverterAdapter(jwtAuthenticationConverter); } |
因为使用RSA签名算法,因此在Gateway中需要配置RSA公钥来验证Token有效性, 有多种方式可以配置JWT解析验证器来验证JWT的有效性:
方法一、SpringSecurity OAuth2提供的方式:
配置public key信息来验证JWT有效性,在配置文件中配置(配置获取公约的接口地址):
|
1 2 3 4 5 6 7 8 9 10 11 12 13 14 15 16 17 18 19 |
spring: security: oauth2: resourceserver: jwt: jwk-set-uri: http://localhost:8081/key/public-key /// 这里需要在oauth授权服务器中配置接口 @RestController public class KeyController { @Autowired KeyPair keyPair; //获取公钥 @GetMapping("/key/public-key") public Map<String, Object> getPublicKey() { RSAPublicKey publicKey = (RSAPublicKey) keyPair.getPublic(); RSAKey key = new RSAKey.Builder(publicKey).build(); return new JWKSet(key).toJSONObject(); } } |
方法二、直接配置PublicKey方式(直接将公钥写入到配置文件中进行读取):
我们这里直接将public key 配置到gateway网关中:
|
1 2 3 |
jwt: rsa: publickey: MIGfMA0GCSqGSIb3DQEBAQUAA4GNADCBiQKBgQCEfoWyfxqYz6j6tczCoELJfCwxpC+iHox7YEvz6slxNworp+CQAC86qt4Rx14lijoufiBMol0/mAABlG1lv3K1LOgQGcwueZDY5nk0uabOWv787moVbQHRTQoAwMIeSDPQ3SgSoEFyHM6Jj/We7XUpAyQEXKk9AabAvywEk2u9ewIDAQAB |
然后手动创建JwtDecoder:
|
1 2 3 4 5 6 7 8 9 10 11 12 13 14 15 16 17 18 19 20 |
@Slf4j @Configuration public class TokenConfig { @Value("${jwt.rsa.publickey}") private String publicKey; public RSAPublicKey rsaPublicKey() { try { return (RSAPublicKey)RSAUtils.decodePublicKey(publicKey); } catch (Exception ex) { log.error("生成 KeyPair 失败", ex); System.exit(-1); return null; } } @Bean public NimbusReactiveJwtDecoder nimbusReactiveJwtDecoder() { return NimbusReactiveJwtDecoder.withPublicKey(rsaPublicKey()) .signatureAlgorithm(SignatureAlgorithm.from("RS256")).build(); } } |
还有一步需要配置,JWT Token解析后的类型是JwtAuthenticationToken,因此需要修改SecurityGlobalFilter中ReactiveSecurityContextHolder.getContext()方法返回的authentication类型(具体参见代码)
运行校验
分别运行auth、resource、gateway服务:
- gateway – 8080
- auth – 8081
- resource – 8082
发起OAuth2密码授权请求: POST http://localhost:8080/blog-oauth/oauth/token,请求参数:
|
1 2 3 4 5 |
client_id:blog client_secret:blog grant_type:password username:admin password:admin |
请求结果:
|
1 2 3 4 5 6 7 8 9 |
{ "access_token": "eyJhbGciOiJSUzI1NiIsInR5cCI6IkpXVCJ9.eyJhdWQiOlsicmVzb3VyY2UiLCJibG9nIl0sImV4X3VzZXJuYW1lIjoiYWRtaW4iLCJ1c2VyX25hbWUiOiJhZG1pbiIsInNjb3BlIjpbImFsbCIsInVzZXIiXSwiZXhwIjoxNjU0NTk4MzY3LCJhdXRob3JpdGllcyI6WyJhZG1pbiJdLCJqdGkiOiIyMmVlOTU4My00Y2U5LTRmNzEtOGI4MS02YjViNzdmYWNlYWEiLCJjbGllbnRfaWQiOiJibG9nIn0.atWwzwpCK1ycjf3-EkPUYs4DMqO7rGPIMwMjHKS3FrTKRjMW5DHkQjtilG2EB8qGNBlwQJo0xAnQ_RNMzOjVojGxyb-TUPCubqODnmnYhuee0ho2TurDT5YzfO-Ypkv2SDqEm6Kw38m-oV_93NofGtKNJD1or2kwdoZe6kn4qgw", "token_type": "bearer", "refresh_token": "eyJhbGciOiJSUzI1NiIsInR5cCI6IkpXVCJ9.eyJhdWQiOlsicmVzb3VyY2UiLCJibG9nIl0sImV4X3VzZXJuYW1lIjoiYWRtaW4iLCJ1c2VyX25hbWUiOiJhZG1pbiIsInNjb3BlIjpbImFsbCIsInVzZXIiXSwiYXRpIjoiMjJlZTk1ODMtNGNlOS00ZjcxLThiODEtNmI1Yjc3ZmFjZWFhIiwiZXhwIjoxNjU0ODUwMzY3LCJhdXRob3JpdGllcyI6WyJhZG1pbiJdLCJqdGkiOiJjMzZhNDQ2Mi00ZmE3LTQ2OGUtODNiMS1iYzk4MDFjMzBjMWEiLCJjbGllbnRfaWQiOiJibG9nIn0.IyBeBQMjU-KYGIvvlQTrTkEtrPmTjLZIl1oFvyK0vytOlOFaE4Q5tMOLf1lt1UaBpmi2Tz4ElQSc6EMYX_OKmbyEHSidYxseUr8gE5MVM1raqOPCnR0Dyn7okQ0NvArOB9JuxLTXSa3NoSM3OxRQm2sUS55e6FKpifZ2q7xgGnY", "expires_in": 7199, "scope": "all user", "ex_username": "admin", "jti": "22ee9583-4ce9-4f71-8b81-6b5b77faceaa" } |
发起资源服务器请求:POST http://localhost:8080/blog-resource/admin/hello,请求头携带token参数:
|
1 |
Authorization:Bearer eyJhbGciOiJSUzI1NiIsInR5cCI6IkpXVCJ9.eyJhdWQiOlsicmVzb3VyY2UiLCJibG9nIl0sImV4X3VzZXJuYW1lIjoiYWRtaW4iLCJ1c2VyX25hbWUiOiJhZG1pbiIsInNjb3BlIjpbImFsbCIsInVzZXIiXSwiZXhwIjoxNjU0NTk2OTQyLCJhdXRob3JpdGllcyI6WyJhZG1pbiJdLCJqdGkiOiJkOWRhZjhmYS1jOTY4LTQ2YzQtODMyMi1kOTQxNGU3YWZhY2UiLCJjbGllbnRfaWQiOiJibG9nIn0.Jkz_Tlk1W7opXspihyDkp1VFcIXu3ebfVPkshjFcKpktPmqkUIA4D2aWF5A13fq5QGUIDQKf89rVeGHaFfer657J7kqaax2qNT6yuNgmQAu4C8VQkG01VLDsOa-m9xaZnqR_--Af-Z7FbwpZNOT2pBuyP4M3efnMmGhRQQjB4hQ |
返回结果:
|
1 2 3 4 |
{ "code": 200, "data": "Hello Admin" } |
结果符合预期,到此完成JWT + SpringSecurity OAuth2 + SpringCloud Gateway 统一权限访问控制功能
总结
- JWT自带用户信息,只需要验证Token有效性
- OAuth授权服务添加JWT TokenService返回JWT格式token
- Gateway网关服务添加JWTAuthenticationConverter解析JWT信息,同时添加NimbusReactiveJwtDecoder对JWT有效性进行验证
参考文档
Views: 364


