Flume综合案例之静态拦截器使用
1. 案例场景
-
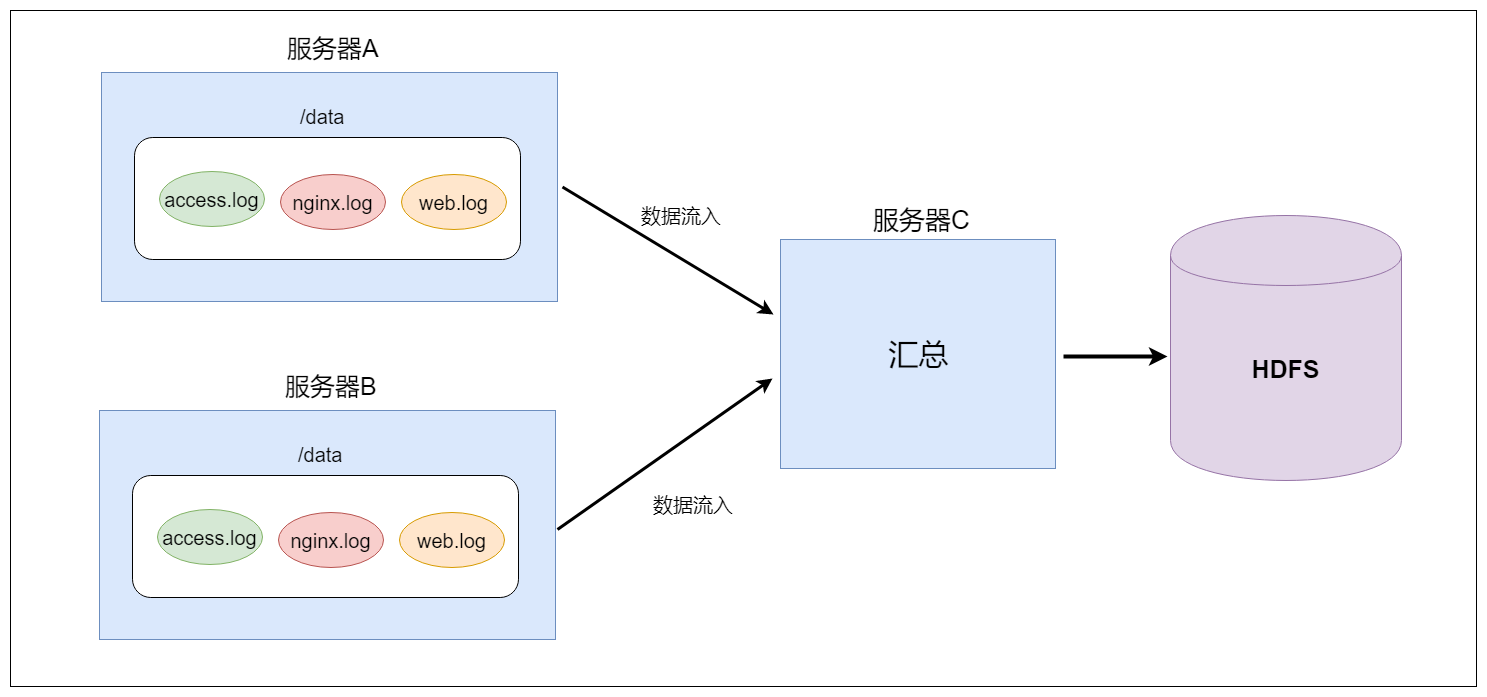
A、B两台日志服务机器实时生产日志主要类型为access.log、nginx.log、web.log
-
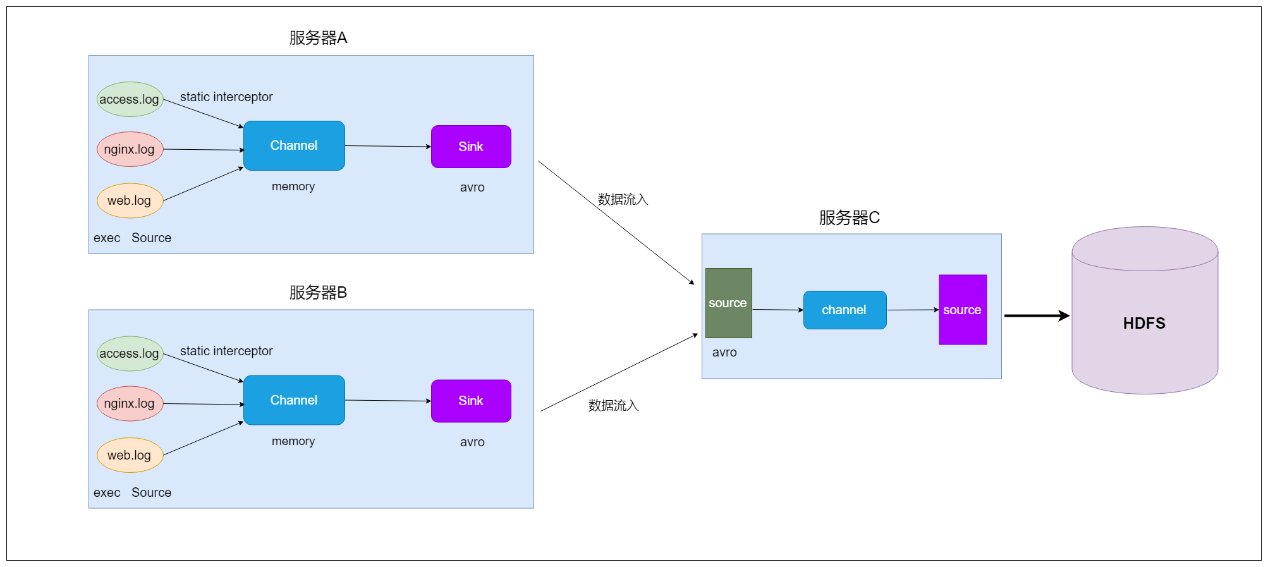
现在需要把A、B 机器中的access.log、nginx.log、web.log 采集汇总到C机器上然后统一收集到hdfs中。
-
但是在hdfs中要求的目录为:
/source/logs/access/20200210/**
/source/logs/nginx/20200210/**
/source/logs/web/20200210/**
2. 场景分析

3. 数据流程处理分析

4. 实现
-
服务器A对应的IP为 192.168.52.100
-
服务器B对应的IP为 192.168.52.110
-
服务器C对应的IP为 192.168.52.120
采集端配置文件开发
- node01与node02服务器开发flume的配置文件
cd /kkb/install/apache-flume-1.9.0-bin/conf/
vim exec_source_avro_sink.conf- 内容如下
# Name the components on this agent
a1.sources = r1 r2 r3
a1.sinks = k1
a1.channels = c1

# set source
a1.sources.r1.type = exec
a1.sources.r1.command = tail -F /kkb/install/taillogs/access.log
a1.sources.r1.interceptors = i1
a1.sources.r1.interceptors.i1.type = static
##  static拦截器的功能就是往采集到的数据的header中插入自定义的key-value对;与node03上的agent的sink中的type相呼应
a1.sources.r1.interceptors.i1.key = type
a1.sources.r1.interceptors.i1.value = access

a1.sources.r2.type = exec
a1.sources.r2.command = tail -F /kkb/install/taillogs/nginx.log
a1.sources.r2.interceptors = i2
a1.sources.r2.interceptors.i2.type = static
a1.sources.r2.interceptors.i2.key = type
a1.sources.r2.interceptors.i2.value = nginx

a1.sources.r3.type = exec
a1.sources.r3.command = tail -F /kkb/install/taillogs/web.log
a1.sources.r3.interceptors = i3
a1.sources.r3.interceptors.i3.type = static
a1.sources.r3.interceptors.i3.key = type
a1.sources.r3.interceptors.i3.value = web

# set sink
a1.sinks.k1.type = avro
a1.sinks.k1.hostname = node03
a1.sinks.k1.port = 41415

# set channel
a1.channels.c1.type = memory
a1.channels.c1.capacity = 20000
a1.channels.c1.transactionCapacity = 10000

# Bind the source and sink to the channel
a1.sources.r1.channels = c1
a1.sources.r2.channels = c1
a1.sources.r3.channels = c1
a1.sinks.k1.channel = c1服务端配置文件开发
- 在node03上面开发flume配置文件
cd /kkb/install/apache-flume-1.9.0-bin/conf/
vim avro_source_hdfs_sink.conf- 内容如下
# Name the components on this agent
a1.sources = r1
a1.sinks = k1
a1.channels = c1

#定义source
a1.sources.r1.type = avro
a1.sources.r1.bind = node03
a1.sources.r1.port =41415

#定义channels
a1.channels.c1.type = memory
a1.channels.c1.capacity = 20000
a1.channels.c1.transactionCapacity = 10000

#定义sink
a1.sinks.k1.type = hdfs
a1.sinks.k1.hdfs.path=hdfs://node01:8020/source/logs/%{type}/%Y%m%d
a1.sinks.k1.hdfs.filePrefix =events
a1.sinks.k1.hdfs.fileType = DataStream
a1.sinks.k1.hdfs.writeFormat = Text
#时间类型
a1.sinks.k1.hdfs.useLocalTimeStamp = true
#生成的文件不按条数生成
a1.sinks.k1.hdfs.rollCount = 0
#生成的文件按时间生成
a1.sinks.k1.hdfs.rollInterval = 30
#生成的文件按大小生成
a1.sinks.k1.hdfs.rollSize  = 10485760
#批量写入hdfs的个数
a1.sinks.k1.hdfs.batchSize = 10000
#flume操作hdfs的线程数(包括新建,写入等)
a1.sinks.k1.hdfs.threadsPoolSize=10
#操作hdfs超时时间
a1.sinks.k1.hdfs.callTimeout=30000

#组装source、channel、sink
a1.sources.r1.channels = c1
a1.sinks.k1.channel = c1
采集端文件生成脚本
- 在node01与node02上面开发shell脚本,模拟数据生成
cd /kkb/install/shells
vim server.sh- 内容如下
#!/bin/bash
while true
do
 date >> /kkb/install/taillogs/access.log;
 date >> /kkb/install/taillogs/web.log;
 date >> /kkb/install/taillogs/nginx.log;
  sleep 0.5;
done- node01、node02给脚本添加可执行权限
chmod u+x server.sh顺序启动服务
- node03启动flume实现数据收集
cd /kkb/install/apache-flume-1.9.0-bin/
bin/flume-ng agent -c conf -f conf/avro_source_hdfs_sink.conf -name a1 -Dflume.root.logger=DEBUG,console- node01与node02启动flume实现数据监控
cd /kkb/install/apache-flume-1.9.0-bin/
bin/flume-ng agent -c conf -f conf/exec_source_avro_sink.conf -name a1 -Dflume.root.logger=DEBUG,console- node01与node02启动生成文件脚本
cd /kkb/install/shells
sh server.sh- 查看hdfs目录
/source/logs
Flume综合案例之自定义拦截器使用
案例需求:
- 在数据采集之后,通过Flume的拦截器,实现将无效的JSON格式的消息过滤掉。
实现步骤
第一步:创建maven java工程,导入jar包
        org.apache.flume
        flume-ng-core
        1.9.0


            org.apache.maven.plugins
            maven-compiler-plugin
            3.0

                1.8
                1.8
                UTF-8


            org.apache.maven.plugins
            maven-shade-plugin
            3.1.1


                    package

                        shade


                                *:*

                                    META-INF/*.SF
                                    META-INF/*.DSA
                                    META-INF/*.RSA
第二步:自定义flume的拦截器
新建package
com.niit.flume.interceptor新建类及内部类,分别是
JsonInterceptor、MyBuilder
package com.niit.flume.interceptor;

import org.apache.commons.codec.Charsets;
import org.apache.commons.lang.StringUtils;
import org.apache.flume.Context;
import org.apache.flume.Event;
import org.apache.flume.interceptor.Interceptor;
import org.slf4j.Logger;
import org.slf4j.LoggerFactory;

import java.util.ArrayList;
import java.util.List;
import java.util.Map;

/**
 * @Author: deLucia
 * @Date: 2021/6/2
 * @Version: 1.0
 * @Description:
 */
public class JsonInterceptor implements Interceptor {
    private static final Logger LOG = LoggerFactory.getLogger(JsonInterceptor.class);
    private String tag = "";

    public JsonInterceptor(String tag) {
        this.tag = tag;
    }

    @Override
    public void initialize() {

    }

    /**
     * 过滤JSON格式之外的数据 {“key":value, {...}}
     * @param event
     * @return
     */
    @Override
    public Event intercept(Event event) {
        String line = new String(event.getBody(), Charsets.UTF_8);
        line = line.trim();
        if (StringUtils.isBlank(line)) {
            return null;
        }

        // {..}
        if (line.startsWith("{") && line.endsWith("}")) {

            Map headers = event.getHeaders();
            headers.put("tag", tag);
            return event;

        } else {
            LOG.warn("Not Valid JSON: " + line);
            return null;
        }
    }

    @Override
    public List intercept(List list) {
        List out = new ArrayList();
        for (Event event : list) {
            Event outEvent = intercept(event);
            if (outEvent != null) {
                out.add(outEvent);
            }
        }
        return out;
    }

    @Override
    public void close() {

    }
    /**
     * 相当于自定义Interceptor的工厂类
     * 在flume采集配置文件中通过指定该Builder来创建Interceptor对象
     *
     * @author
     */
    public static class MyBuilder implements Interceptor.Builder {

        private String tag;

        @Override
        public void configure(Context context) {
            //从flume的配置文件中获得拦截器的“tag”属性值
            this.tag = context.getString("tag", "").trim();
        }

        /*
         * @see org.apache.flume.interceptor.Interceptor.Builder#build()
         */
        @Override
        public JsonInterceptor build() {
            return new JsonInterceptor(tag);
        }
    }
}
第三步:打包上传服务器
- 将我们的拦截器打成jar包放到主机名为hadoop100的服务器上的flume安装目录下的lib目录下
第四步:开发flume的配置文件
开发flume的配置文件
cd /opt/pkg/flume/conf/
vim nc-interceptor-logger.conf- 内容如下
记得将下边的i1.type根据自己的实际情况进行替换
#声明三种组件
a1.sources = r1
a1.channels = c1
a1.sinks = k1

#定义source信息
a1.sources.r1.type=netcat
a1.sources.r1.bind=localhost
a1.sources.r1.port=8888
#定义source的拦截器
a1.sources.r1.interceptors = i1
#根据自定义的拦截器,相应修改全类名及内部类名
a1.sources.r1.interceptors.i1.type =com.niit.flume.interceptor.JsonInterceptor$MyBuilder
## tag的内容将被设置到消息头中
a1.sources.r1.interceptors.i1.tag = json_event

#定义sink信息
a1.sinks.k1.type=logger

#定义channel信息
a1.channels.c1.type=memory

#绑定在一起
a1.sources.r1.channels=c1
a1.sinks.k1.channel=c1
第五步:运行FLume Agent
同时开启INFO日志级别
[hadoop@hadoop100 conf]$ bin/flume-ng agent -c conf/ -f conf/nc_interceptor_logger.conf -n a1 -Dflume.root.logger=INFO,console第六步:简单测试
通过netcat客户端发送数据
[hadoop@hadoop100 ~]$ nc localhost 8888
asd
dsa
{"OK
OK                                                                             {
OK
OK
{"key":123}
OK
查看flume的agent的日志信息如下
2021-05-26 14:40:12,233 (lifecycleSupervisor-1-4) [INFO - org.apache.flume.source.NetcatSource.start(NetcatSource.java:155)] Source starting
2021-05-26 14:40:17,326 (lifecycleSupervisor-1-4) [INFO - org.apache.flume.source.NetcatSource.start(NetcatSource.java:166)] Created serverSocket:sun.nio.ch.ServerSocketChannelImpl[/127.0.0.1:8888]
2021-05-26 14:40:20,952 (netcat-handler-0) [WARN - com.niit.flume.interceptor.JsonInterceptor.intercept(JsonInterceptor.java:48)] Invalid json format event !
2021-05-26 14:40:20,953 (netcat-handler-0) [WARN - com.niit.flume.interceptor.JsonInterceptor.intercept(JsonInterceptor.java:48)] Invalid json format event !
2021-05-26 14:40:24,109 (netcat-handler-0) [WARN - com.niit.flume.interceptor.JsonInterceptor.intercept(JsonInterceptor.java:48)] Invalid json format event !
2021-05-26 14:40:24,909 (netcat-handler-0) [WARN - com.niit.flume.interceptor.JsonInterceptor.intercept(JsonInterceptor.java:48)] Invalid json format event !
2021-05-26 14:40:36,895 (SinkRunner-PollingRunner-DefaultSinkProcessor) [INFO - org.apache.flume.sink.LoggerSink.process(LoggerSink.java:95)] Event: { headers:{tag=json_event} body: 7B 22 6B 65 79 22 3A 31 32 33 7D                {"key":123} }
Views: 108

